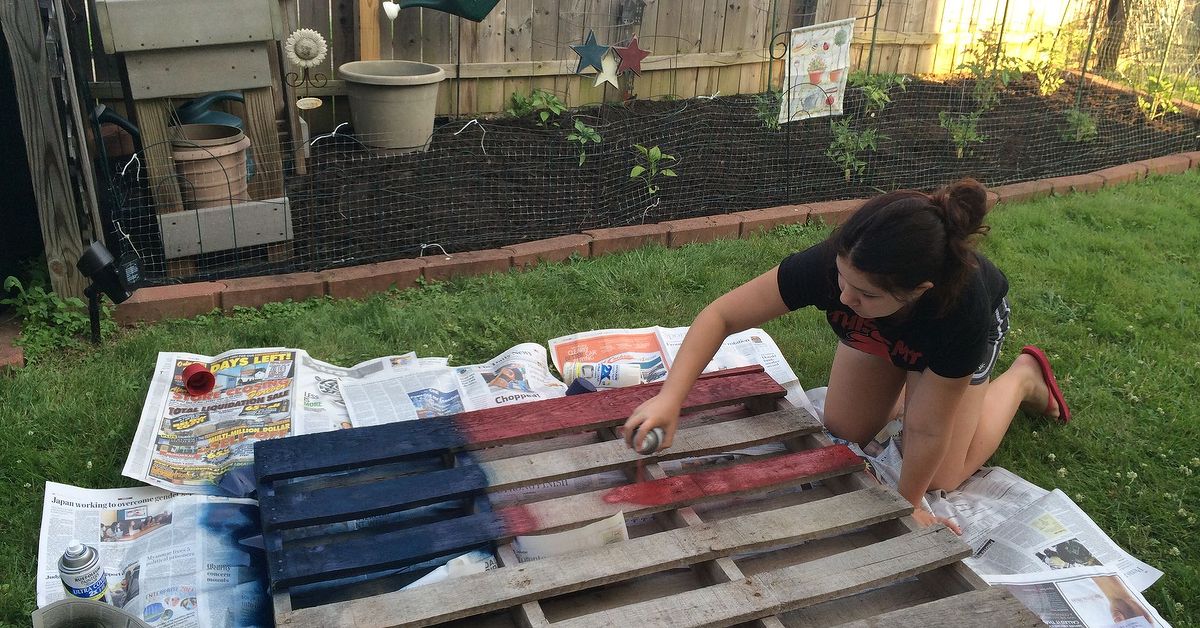
Few DIY projects combine rustic charm, patriotic style, and the satisfying destruction of an old shipping pallet quite like American flag pallet art. What begins as a stack of rough boardspossibly holding splinters, bent nails, and a mysterious warehouse historycan become a striking piece of red, white, and blue wall decor.
This project works beautifully for a porch, workshop, garage, entryway, backyard patio, or Fourth of July display. It can look crisp and traditional, heavily weathered, subtly vintage, or proudly imperfect. Best of all, pallet wood already has the knots, saw marks, dents, and uneven grain that furniture makers often spend considerable effort trying to imitate.
The current American flag contains 13 alternating red and white stripes representing the original colonies and 50 stars representing the states. For decorative pallet art, maintaining those recognizable elements creates an authentic visual connection, even when the board dimensions require slight adjustments to the official proportions.
Why American Flag Pallet Art Is Such a Popular DIY Project
American flag pallet art sits comfortably between woodworking and craft painting. You do not need cabinetmaker-level joinery, a computerized router, or a workshop containing more clamps than a hardware store. A basic saw, drill, sander, brushes, paint, and suitable wood are enough.
The design is also unusually forgiving. Slightly crooked boards enhance the handmade character. Uneven paint can resemble natural aging. A knot in the middle of a stripe looks rustic rather than disastrous. This is excellent news for beginners and for anyone whose measuring tape occasionally develops opinions of its own.
Additional benefits include:
- Reusing sound pallet boards instead of buying an entirely new panel
- Creating customizable patriotic wall decor
- Choosing dimensions that fit a particular wall or porch
- Adjusting the finish from clean and modern to distressed and antique
- Making a memorable handmade gift for veterans, military families, or new homeowners
Choose Pallet Wood Carefully
Not every pallet should become home decor. Pallets are transportation materials, and their histories can include moisture, chemicals, oil, food spills, pesticides, mold, or other contamination. Avoid boards with strong odors, oily stains, fuzzy growth, unusual discoloration, or evidence of chemical spills. When the previous use is unknown and the wood looks suspicious, leave it alone. Free lumber stops being a bargain when it comes with a laboratory experiment attached.
Understand Common Pallet Markings
International wood-packaging stamps may include the IPPC symbol, a country code, a facility number, and a treatment abbreviation. USDA APHIS identifies HT as heat treatment and MB as methyl bromide treatment. For a household craft, many makers prefer clean, dry, heat-treated boards from a known source and avoid methyl-bromide-marked wood. An official treatment stamp does not reveal everything the pallet may have carried, so visual inspection and a trustworthy source remain important.
Be Cautious With Previously Painted Wood
Unknown painted or coated wood deserves extra caution. Sanding can release fine dust, and older painted material may contain lead. EPA guidance recommends determining whether lead may be present, containing dust, protecting the work area, using appropriate personal protection, and cleaning thoroughly. When the coating cannot be identified, the safer solution is to select different lumber rather than enthusiastically converting mystery paint into airborne powder.
Materials and Tools
Materials
- Clean, dry pallet boards or reclaimed unfinished lumber
- Two or three backing strips
- Wood screws shorter than the combined board depth
- Red, white, and blue paint suitable for wood
- Wood primer, especially for a cleaner painted finish
- Star stencil, adhesive vinyl stars, or a printed star template
- Exterior-rated clear finish if the artwork will be displayed outside
- Picture-hanging hardware, a French cleat, or heavy-duty D-rings
Tools
- Work gloves and eye protection
- Dust mask or suitable respirator
- Pry bar, hammer, and nail puller
- Jigsaw, circular saw, or miter saw
- Drill and drill bits
- Orbital sander or sanding block
- Measuring tape, pencil, and straightedge
- Paintbrushes, foam brushes, or small rollers
- Drop cloth and clean rags
Planning the Flag Design
Begin by deciding where the finished artwork will hang. A 12-by-24-inch panel works well on a narrow wall, while a 19-by-36-inch piece creates more presence over a fireplace, workbench, or outdoor seating area.
A traditional flag has 13 horizontal stripes. Because ordinary pallet slats are wider than a proportional stripe on many small projects, you have two practical choices:
- Assemble a solid panel and paint 13 equal stripes across it.
- Use the natural boards as broader decorative stripes, accepting a more stylized design.
The first approach looks more recognizable and is easier when you want all 13 stripes. The second emphasizes the pallet construction and can be attractive as long as it is clearly presented as flag-inspired artwork.
For a classic layout, position the blue canton in the upper-left corner when the artwork is viewed from the front. Extend it down across the top seven stripes. Use a ready-made 50-star stencil when accuracy matters. Hand-painting 50 evenly spaced stars is possible, but it can quickly turn a relaxing Saturday project into an advanced test of patience and caffeine management.
How to Make American Flag Pallet Art
Step 1: Inspect and Clean the Boards
Check every board for contamination, rot, insect damage, deep cracks, and embedded metal. Remove loose dirt with a stiff brush. If appropriate for the wood, wipe or scrub it with mild soap and water, rinse sparingly, and allow it to dry completely before cutting or painting.
Do not seal damp wood. Moisture trapped under paint or finish can lead to peeling, discoloration, or mold.
Step 2: Disassemble the Pallet
Use a pallet breaker, pry bar, or reciprocating saw to separate usable boards. Work slowly near the ends, where thin pallet lumber tends to split. Cutting stubborn nails between the deck boards and support blocks often preserves more material than trying to pull every nail through the face.
Search carefully for hidden nails before using power tools. A forgotten nail can damage a saw blade and produce a startling noise that gives everyone in the garage an immediate interest in your project.
Step 3: Cut the Boards to Length
Arrange the boards on a flat surface and select the best faces. Mark a consistent finished length and trim both ends square. The boards do not need identical widths, but their total height should suit the planned proportions.
Dry-fit the panel before fastening anything. Move knots, cracks, nail holes, and stamped markings until they create a balanced appearance. A prominent stamp can remain visible for an industrial look, provided you are comfortable with it and the wood is suitable for reuse.
Step 4: Sand Without Erasing the Character
Start with medium or coarse sandpaper where needed to remove splinters and sharp ridges, then progress to a finer grit. Concentrate on edges, corners, and areas people may touch. Pallet wood should feel rustic, not hostile.
For a distressed finish, do not sand every saw mark away. For a cleaner design, continue until the paint surface will be reasonably even. Wood-finishing guidance commonly recommends cleaning the surface, sanding as needed, removing dust, and allowing wood to dry before applying coatings.
Step 5: Assemble the Panel
Lay the boards face down with their edges together. Position two vertical backing strips several inches from the ends. Add a third strip in the center for a large or heavy piece.
Drill pilot holes and drive screws through the backing strips into each face board. Confirm that the screws will not emerge through the front. Keep checking the panel for square, although tiny irregularities are part of the appeal.
Step 6: Mark the 13 Stripes
Turn the panel face up and measure its total height. Divide that number by 13 to determine the height of each stripe. Mark the boundaries lightly with a pencil and straightedge.
The top and bottom stripes are red. Mask the alternating areas with painter’s tape. Press the tape down firmly along uneven grain to limit paint seepage. Perfectly sharp lines are not mandatory on distressed art, but uncontrolled red blobs rarely improve a composition.
Step 7: Paint the Red and White Areas
Apply wood primer when you want strong, even color or when the lumber is highly porous. Use thin coats rather than one heavy coat. Heavy paint can collect in cracks, obscure the grain, and remain tacky longer than expected.
For a weathered effect, use a dry brush with only a small amount of paint. Drag it lightly across the grain so some natural wood remains visible. A diluted whitewash can also soften the background while allowing texture to show through. Whitewashing is particularly suitable for rustic outdoor furniture and reclaimed-wood projects because it creates color without completely hiding the grain.
Step 8: Add the Blue Canton
After the stripe paint dries, measure and mask the canton in the upper-left corner. It should extend through the height of the top seven stripes. Paint the area blue using two thin coats if necessary.
Remove painter’s tape while the final coat is still slightly soft, unless the paint manufacturer recommends otherwise. Pull the tape back over itself at a low angle to reduce edge lifting.
Step 9: Add the Stars
Secure a 50-star stencil over the dry blue field. Apply white paint with a stencil brush or foam applicator using an up-and-down motion. Keep the paint layer light; an overloaded brush pushes paint under the stencil.
For a simpler farmhouse version, use a circle of 13 stars, one oversized star, or several rows of larger stars. These are creative interpretations rather than exact reproductions. Clearly describing the piece as American flag pallet art avoids suggesting that a stylized design follows official specifications.
Step 10: Distress the Finish
Once all paint is fully dry, lightly sand selected edges, knots, board seams, and raised grain. Focus on places that would naturally show wear. Random distressing generally looks more believable than sanding every stripe in exactly the same location.
Stop frequently and step back. Distressing is one of those techniques that looks wonderful until the precise moment it does not. You can remove more paint, but putting attractive wear back on the board is considerably harder.
Step 11: Seal the Artwork
Indoor pallet wall art may need only a light clear coat, depending on the desired sheen. Outdoor American flag pallet art should receive a finish labeled for exterior wood and compatible with the paint beneath it.
Apply the number of coats directed by the manufacturer, including the edges and back where practical. Allow proper drying time between coats. Exterior wood guidance emphasizes beginning with a clean, dry surface and using coatings intended for outdoor exposure. Even sealed wood lasts longer under a covered porch than in constant sun, rain, and snow.
Step 12: Attach Hanging Hardware
Weigh the completed piece before selecting hardware. Pallet panels are often heavier than they appear. Small D-rings may work for compact art, while a French cleat is a better choice for a large panel.
Whenever possible, anchor the hardware into wall studs. For masonry, use fasteners designed for the wall material. Do not rely on a light-duty picture hook for a panel that could double as a small barn door.
Respectful Use of the Flag Design
The U.S. Flag Code provides customary guidance for displaying and respecting an actual American flag. It advises against using a real flag as ordinary decoration, marking it, or allowing it to become damaged or soiled. A painted wooden representation is decorative artwork rather than a fabric flag, but many makers still choose to orient the design correctly and treat the symbol thoughtfully.
When hanging the panel horizontally, place the canton at the viewer’s upper left. Do not deliberately display the union upside down unless representing the recognized distress signal. Avoid placing the art where it will be repeatedly stepped on, used as a disposable tabletop, or treated in a way likely to appear intentionally disrespectful.
Creative American Flag Pallet Art Ideas
Charred-Wood Flag
Darken selected boards with a controlled wood-burning technique, then add muted red, white, and blue color. This creates strong contrast and a rugged appearance. Use flame only in a suitable outdoor workspace, keep extinguishing equipment nearby, and avoid burning unknown treated or painted wood.
Military Tribute Flag
Add a service emblem, rank, unit number, name, or meaningful date below the canton. Obtain permission before including private information, and verify spelling before painting. Sanding off an incorrectly spelled family name is a memorable but unnecessary character-building exercise.
Thin-Line Design
A muted black-and-white flag with one colored stripe is sometimes used to express support for a particular service community. Because interpretations can vary, understand the intended symbolism before making or gifting one.
Natural-Wood Flag
Use stain rather than opaque paint. A pale natural stain can represent white stripes, a reddish stain can suggest red, and a blue-tinted wood stain can define the canton. This version highlights knots and grain while maintaining the familiar composition.
Seasonal Porch Display
Create a large lightweight panel for Memorial Day, Flag Day, Independence Day, and Veterans Day displays. Add removable greenery or lighting around the artwork rather than permanently attaching decorations across the design.
Common Mistakes to Avoid
- Using an unknown or contaminated pallet: Attractive grain does not cancel chemical stains, mold, or an untraceable history.
- Skipping hidden-nail inspection: Check both faces and all cut lines before sawing or sanding.
- Painting damp wood: Let cleaned boards dry fully.
- Applying thick coats: Several light coats dry more evenly and preserve texture.
- Using indoor paint outdoors: Select exterior-rated products for outdoor display.
- Sealing only the front: Moisture can enter through unprotected edges and backs.
- Installing weak hardware: Match the hanger and wall anchors to the actual finished weight.
- Overdistressing: Stop before every board looks as though it survived a century at sea.
Practical Experience: What Making American Flag Pallet Art Is Really Like
The most important practical lesson is that selecting and preparing the wood usually takes longer than painting it. A pallet that looks perfect from ten feet away may contain split ends, twisted slats, buried staples, and nail heads polished smooth by years of use. Sorting several extra boards before beginning prevents the project from stalling halfway through assembly.
Disassembly is commonly the first frustrating stage. Pulling every board straight upward with a pry bar often breaks the thinner ends. Working gradually from both sides helps, but cutting stubborn nails can save more usable lumber. The resulting embedded nail sections can be trimmed away or retained as decorative marks when they are safely below the surface.
The second lesson is that rough wood changes the behavior of paint. A measured stripe may appear uneven because the board edges dip, rise, and separate. Painter’s tape cannot always seal across deep grain. Applying a thin layer of the underlying color along the tape edge before adding the contrasting color can help seal small gaps. On heavily weathered artwork, however, minor bleeding often looks natural and saves considerable fussing.
Star stenciling is the stage most likely to expose impatience. Thick paint creates fuzzy points, and moving the stencil before the surface sets can smear several stars at once. A nearly dry foam applicator produces cleaner shapes than a fully loaded brush. Testing the technique on scrap wood first is more efficient than attempting to repair a blue canton containing what appears to be a flock of white amoebas.
Distressing also benefits from restraint. The best results usually come from sanding raised grain, outside edges, board joints, and a few random spotsnot attacking the entire panel uniformly. Natural wear is inconsistent. Leaving some areas nearly untouched gives the worn sections more visual impact.
Another common surprise is the finished weight. A large pallet flag may feel manageable on the workbench but awkward when held at shoulder height against a wall. Installing a French cleat or a pair of properly rated hangers before applying the final finish can make handling easier and reduce the risk of scratching the front later.
Finally, outdoor placement changes everything. Direct afternoon sun can fade pigments, rain can enter board gaps, and seasonal movement can loosen joints. Exterior paint and clear protection help, but sheltered placement remains the most effective defense. A piece under a porch roof generally stays attractive much longer than one exposed continuously to weather.
The rewarding part arrives when the panel is hung. Small variations that seemed bothersome on the workbench usually disappear into the overall composition. Knots add depth, crooked grain adds motion, and worn edges make the piece feel established rather than factory-made. The project succeeds not because every line is mechanically perfect, but because ordinary shipping lumber has been transformed into personal, recognizable American wall art.
Conclusion
American flag pallet art is approachable enough for a first woodworking project yet flexible enough to reward experienced makers. The process combines reclaimed wood, simple panel construction, stencil work, color, and controlled distressing in a design that can be adapted to almost any space.
Start with safe, clean lumber. Remove metal carefully, sand away splinters, assemble the panel securely, and use thin paint coats. Preserve the 13-stripe and star-filled composition for a traditional appearance, or create a clearly stylized version that highlights the wood’s natural history. When the piece will live outdoors, use compatible exterior products and place it under cover whenever possible.
Note: This project is decorative, flag-inspired wooden artwork and is not intended to replace an official fabric United States flag. Research for the article was synthesized from U.S. government, museum, veterans’ organization, home-improvement, and woodworking guidance.