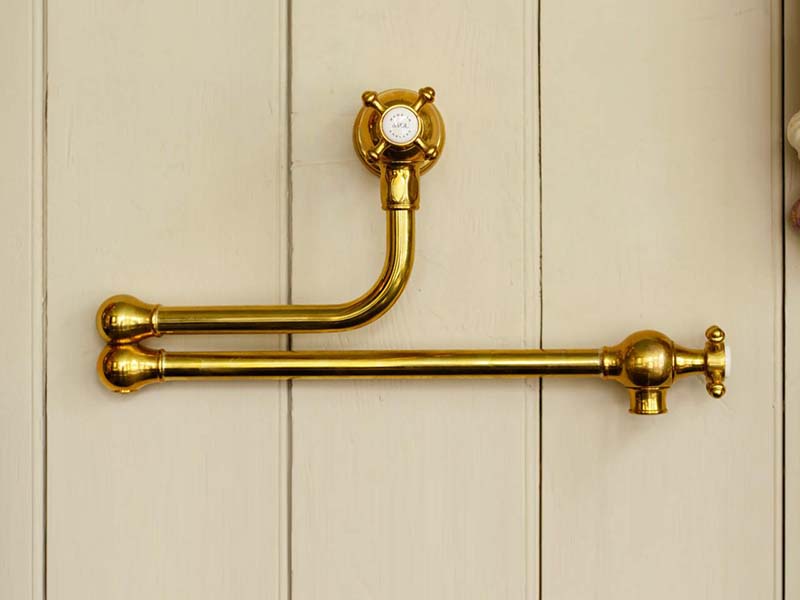
An aged brass pot filler tap is one of those kitchen features that appears decorative until the first time it fills a stockpot directly on the stove. Then it suddenly feels less like jewelry and more like a very attractive extra pair of hands.
Mounted above or beside the cooktop, this folding faucet supplies cold water exactly where large pots are used. Its warm, softly weathered finish adds character without the mirror-like shine of polished brass. The result can suit a farmhouse kitchen, a traditional room, or even a minimalist space that needs one carefully chosen vintage accent.
Still, a pot filler is not a magic wand with plumbing connections. Choosing one requires attention to reach, valve quality, water safety certification, installation height, backsplash construction, and finish care. This guide explains how an aged brass pot filler works, where it belongs, what to inspect before buying, and what homeowners commonly discover after living with one.
What Is an Aged Brass Pot Filler Tap?
A pot filler tap is a secondary kitchen faucet installed close to a range or cooktop. Most wall-mounted models have two hinged arms that extend over different burners and fold neatly against the backsplash when they are not being used. Deck-mounted versions attach to a countertop beside the cooking surface.
Unlike a regular kitchen faucet, a pot filler usually supplies cold water only. Its main job is simple: fill cooking vessels without making the cook carry them from the sink. That matters when a large stockpot can become surprisingly heavy after several gallons of water have been added.
The term aged brass describes the visible finish rather than the entire internal construction. Depending on the manufacturer, it may refer to solid brass allowed to develop a patina, brass with a protective coating, or another metal covered with a brass-toned finish. Two fixtures labeled aged brass can therefore look and age very differently.
Why Aged Brass Works So Well in a Kitchen
It Adds Warmth Without Looking Too Shiny
Polished brass can be bright, glamorous, and difficult to ignore. Aged brass is quieter. Its muted gold, brown, and amber tones bring warmth to the room while allowing stone, tile, cabinetry, and appliances to remain part of the conversation.
That makes an aged brass pot filler particularly useful in kitchens dominated by cool materials. It can soften white marble, charcoal tile, stainless steel, concrete, or deep blue cabinets without turning the room into a metallic theme park.
It Can Bridge Traditional and Modern Styles
The shape of the fixture determines much of its personality. Cross handles and decorative joints feel traditional, while straight arms and simple levers look more contemporary. In an aged brass finish, either style can create a collected, lived-in appearance.
This flexibility is why the finish appears in English-inspired kitchens, modern farmhouses, transitional renovations, and sleek spaces with flat-panel cabinets. It is old-fashioned enough to provide character but restrained enough to avoid looking like a museum exhibit.
It Does Not Require Every Metal to Match
An aged brass pot filler can coexist with stainless steel appliances, black range knobs, nickel sink faucets, or bronze cabinet hardware. Successful mixed-metal kitchens usually repeat each major finish at least once and maintain similar undertones.
For example, the pot filler might coordinate with two pendant lights and a few cabinet pulls while stainless steel remains the dominant practical finish. Exact matching is less important than visual balance. Kitchens are rooms, not marching bands.
Practical Benefits of a Pot Filler Above the Stove
Less Carrying Between the Sink and Range
The clearest advantage is reduced lifting. A pot can be placed on a burner while empty and filled in position. This is useful when preparing pasta, seafood boils, stocks, soups, preserves, or large batches of vegetables.
A pot filler does not eliminate every heavy trip because the used water may still need to be carried to the sink later. However, it removes one fully loaded journey and reduces the chance of spilling cold water across the floor before cooking has even started.
Faster Filling
Many pot fillers are designed with a higher flow rate than ordinary kitchen faucets. Certain models deliver around four gallons per minute, although actual performance depends on the fixture, household pressure, and supply line.
The difference is noticeable with a tall stockpot. Instead of standing at the sink while the faucet performs a slow dramatic monologue, the cook can gather ingredients, prepare vegetables, or reconsider why the recipe requires so many dishes.
Better Access to Oversized Cookware
Large pots do not always fit comfortably beneath a sink faucet, especially when the sink contains dishes or the fixture has limited clearance. An articulated pot filler reaches over the open top of the cookware without requiring awkward tilting.
It can also fill kettles, canning vessels, countertop beverage dispensers, and other containers that are difficult to maneuver beneath a standard spout.
How to Choose the Right Aged Brass Pot Filler
Check the Construction, Not Just the Color
A well-made pot filler should feel substantial and move smoothly through its full range. Solid-brass construction is commonly preferred for durability, but the internal valves, seals, joints, and waterway materials are equally important.
Because the fixture supplies water used for cooking, look for clearly stated compliance with applicable lead-free requirements and recognized drinking-water standards. NSF/ANSI/CAN 61 addresses contaminants that may enter drinking water, while NSF/ANSI/CAN 372 concerns lead content in wetted components. Certification information should be verifiable through the manufacturer or an accredited certifying organization.
Inspect the Valve Configuration
Many quality pot fillers use two shutoff valves: one near the wall and another near the outlet. This arrangement provides an extra layer of control. Both valves should turn cleanly without excessive force, wobbling, or scraping.
Dual valves do not make leaks impossible, so the fixture should always be folded away with both controls completely closed. A pot filler sits above a cooktop rather than a sink, which means dripping water has nowhere convenient to drain.
Measure the Reach
Do not assume that every folding arm can reach every burner. Compare the manufacturer’s maximum extension with the width and depth of the cooktop. The outlet should reach the pots you use most often without forcing the arms to remain at their absolute limit.
Also examine how the fixture folds. It should rest flat against the backsplash without hitting a cabinet, range hood, shelf, control panel, or decorative trim.
Understand the Finish Type
Some aged brass finishes are sealed to preserve a consistent appearance. Others are intentionally living finishes that darken, spot, or develop a varied patina through exposure to air, water, heat, and frequent handling.
Neither option is automatically better. A coated finish generally requires less polishing and changes more slowly. Unlacquered brass offers a more natural evolution, but owners must be comfortable with visible variation. Someone seeking perfectly uniform gold should not buy a living finish and then spend the next decade arguing with chemistry.
Planning the Installation
Choose the Location With Real Cookware
Placement should be tested with the actual range and largest frequently used pots. Set the cookware on different burners, extend a cardboard template or measuring tape from the proposed plumbing point, and check both height and reach.
General design recommendations often place wall-mounted pot fillers roughly 16 to 24 inches above the cooking surface, but there is no universal height that works for every range, faucet, and stockpot. The manufacturer’s rough-in specifications, appliance clearances, and local code requirements should guide the final position.
A fixture installed too low may collide with tall cookware. One installed too high can create splashing and look awkwardly disconnected from the range. Centering it may provide visual symmetry, while mounting it slightly off-center can improve access or avoid structural obstacles.
Install the Supply Line Before the Backsplash
The easiest time to add a pot filler is during new construction or a major kitchen renovation. A plumber can run a dedicated cold-water line, secure the connection to proper blocking, pressure-test the work, and confirm the rough-in before tile or stone covers the wall.
Retrofitting one into a finished kitchen can require opening drywall, removing backsplash material, modifying cabinetry, or accessing plumbing from an adjacent room. The faucet itself may be affordable compared with the labor and repair work needed to bring water to the correct location.
Provide Solid Structural Support
A folding pot filler creates leverage every time its arms are extended. The wall connection therefore needs more support than a decorative escutcheon can provide. Blocking or another approved mounting method should be installed behind the finished surface according to the fixture instructions.
This is especially important with heavy brass models and thick tile or stone backsplashes. A loose connection can damage the wall, strain the pipe, or turn an elegant fixture into a very expensive pendulum.
Consider Heat, Grease, and Service Access
The faucet should remain clear of direct flame, high-heat exhaust paths, and cookware handles. It also needs enough room for cleaning and occasional maintenance. Joints, cartridges, and aerators may eventually require service, so replacement parts and warranty coverage deserve attention before purchase.
Professional installation is usually the sensible choice. A licensed plumber can evaluate water pressure, mounting support, supply-line routing, local codes, and the specific requirements of the range wall.
Designing Around an Aged Brass Pot Filler
White or Cream Backsplash
Against handmade white tile, creamy stone, or pale plaster, aged brass creates a clear focal point without feeling harsh. Slightly irregular tile surfaces strengthen the handcrafted look, while clean rectangular tiles produce a more tailored result.
Dark Stone or Tile
Black, forest green, navy, and charcoal backgrounds make warm brass stand out dramatically. This combination works best when the fixture’s profile is simple enough to avoid competing with heavily patterned stone.
Natural Wood Cabinetry
Oak, walnut, and stained maple share warm undertones with aged brass. To prevent the room from becoming overly brown, introduce contrast through a lighter countertop, dark range, pale wall, or stainless steel appliance.
Statement Range and Hood
A pot filler naturally draws attention to the cooking zone. It should relate to the width, shape, and visual importance of the range and hood. A delicate faucet can disappear above a wide professional range, while an oversized ornate model may overwhelm a modest cooktop.
The goal is proportion. The faucet should look as though the wall, appliance, and fixture were introduced before the renovation rather than meeting unexpectedly on installation day.
Possible Drawbacks to Consider
A pot filler is useful, but it is still a luxury rather than an essential kitchen component. Homeowners should consider several limitations before adding one.
- Leak exposure: Because there is no sink beneath it, a dripping valve can affect the cooktop, cabinetry, wall finish, or flooring.
- Installation expense: Running a new water line and repairing finished surfaces may cost considerably more than the faucet.
- Cleaning: Grease, steam, dust, and food splatter collect on the arms and joints.
- Limited use: Households that rarely cook with large vessels may admire the fixture more often than they operate it.
- No help with draining: The full pot may still need to travel to the sink after cooking.
These disadvantages do not make the feature a poor choice. They simply mean that it should solve a real problem or deliver enough design value to justify its plumbing and maintenance requirements.
How to Clean and Maintain Aged Brass
Begin with the manufacturer’s care instructions because cleaning methods vary according to the finish. For many protected aged brass surfaces, a soft cloth, warm water, and mild liquid soap are sufficient. Drying the fixture after cleaning helps reduce water spots.
Avoid abrasive pads, scouring powders, bleach, harsh acids, and aggressive household sprays unless the manufacturer specifically approves them. These products may scratch the surface or damage a protective coating.
Unlacquered brass requires a different decision: preserve the patina or polish it away. Owners who enjoy a naturally aged appearance can wipe the fixture gently and allow darkening to continue. Those who prefer brighter brass may use a manufacturer-approved brass polish, understanding that the patina will begin forming again.
The hinged joints should move smoothly but should not be lubricated with random household products. If movement becomes stiff or a valve begins dripping, consult the service instructions or a qualified plumber. Periodically inspect the wall connection, handles, outlet, and joints for moisture.
Who Gets the Most Value From This Fixture?
An aged brass pot filler is especially worthwhile for enthusiastic cooks, households that prepare large meals, people who regularly use stockpots, and homeowners already opening the range wall during a remodel. It may also benefit anyone who wants to reduce the lifting involved in moving large water-filled vessels.
It is harder to justify in a compact kitchen where the sink is only a step from the stove, in a project with a strict budget, or in a household that mainly prepares small meals. In those situations, money may be better spent on improved ventilation, better lighting, deeper drawers, or a high-quality primary faucet.
For design-focused renovations, however, the aged brass finish can provide enough visual impact to earn its place even when the faucet is not used every day. It functions as hardware, sculpture, and plumbing in one tidy folding package.
Experiences Homeowners Commonly Have With an Aged Brass Pot Filler Tap
The first surprise is often how quickly the pot filler becomes part of the cooking routine. Owners who initially viewed it as a decorative splurge begin using it for pasta water, soup, rice, steaming, canning, and the occasional oversized vase. The convenience is most noticeable when the sink is already occupied. Instead of rearranging dishes to fit a stockpot beneath the main faucet, the cook places the empty pot on the range and fills it there.
The second discovery is that placement matters more than almost any catalog photograph suggests. A pot filler can look perfectly centered on an elevation drawing yet miss the front burner by several inches. Homeowners tend to be happiest when they test the reach with their actual cookware before the plumbing is finalized. One tall canning pot can reveal more useful information than twenty mood boards.
Many people also notice that the fixture encourages them to use more than the center burners. A properly articulated arm can swing across the cooktop, allowing a large pot to be filled wherever it will cook. When the arm is too short, the user may still need to slide a heavy vessel into place after filling it, which defeats much of the purpose.
Finish expectations produce another common learning moment. A sealed aged brass faucet may remain fairly consistent, while unlacquered brass changes visibly around the handles and joints. The areas touched most often can become brighter, darker, or more mottled than protected sections. Owners who understand this behavior usually describe the result as character. Those expecting a uniform showroom finish may call it something less complimentary.
Cleaning frequency is also easy to underestimate. The fixture lives directly above one of the busiest and greasiest parts of the kitchen. Steam carries tiny droplets upward, frying sends oil into impressive locations, and tomato sauce occasionally ignores all known laws of trajectory. A quick weekly wipe is far easier than trying to remove several months of buildup from the hinges.
Homeowners frequently appreciate dual shutoff handles once they understand their purpose. Closing both becomes a small habit after each use. This is especially reassuring because the faucet is not positioned over a drain. Some owners even include a brief valve check in their end-of-evening kitchen routine, alongside turning off the burners and wondering who left one spoon in the sink.
There are also households that admit they rarely use the pot filler. This usually happens when the sink is close to the cooktop, meals involve smaller pans, or the range is used less often than expected. Even then, an aged brass model may remain a favorite design detail. Whether that visual pleasure justifies the investment is personal, but it should be considered honestly before installation.
The most positive experiences generally share four conditions: the fixture reaches every needed burner, the rough-in height was tested with real pots, the finish behavior matched the owner’s expectations, and the plumbing was installed securely before the backsplash was completed. When those details are right, the pot filler feels integrated rather than added. It becomes the kind of small luxury that works quietly, looks better with age, and makes a busy cooking zone noticeably easier to use.
Final Thoughts
An aged brass pot filler tap combines practical convenience with a distinctive, warm finish. It can reduce lifting, speed up filling, accommodate oversized cookware, and turn an ordinary backsplash into a deliberate focal point.
The best results depend on planning rather than appearance alone. Verify the water-safety certifications, understand whether the brass finish is living or protected, measure the arm against every burner, provide solid wall support, and install the supply line before the backsplash is finished. A beautiful faucet in the wrong position is merely an expensive wall ornament with water pressure.
For households that cook often and appreciate materials that gain character over time, an aged brass pot filler can be both useful and memorable. Chosen carefully, it will not merely decorate the range wall. It will earn its place one stockpot at a time.
Note: Pot filler specifications, approved cleaning methods, installation clearances, and plumbing requirements vary by product and location. Confirm the manufacturer’s instructions and consult a licensed plumber before purchasing or installing the fixture.