“`
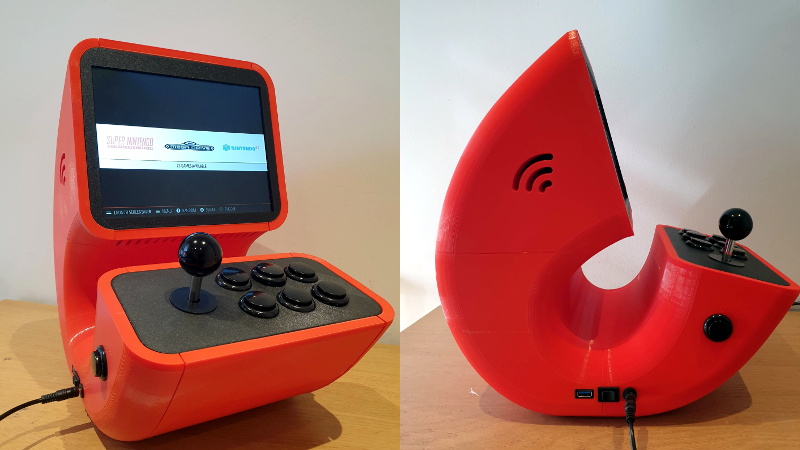
There are arcade builds, and then there are arcade builds that look like they arrived from a 1970s science-fiction lounge, possibly carrying a laser harp and a questionable shag carpet. The 3D Printed Pi Arcade belongs firmly in the second group. It is not simply a Raspberry Pi stuffed into a box with buttons. It is a sculptural, nautilus-like desktop arcade machine that proves retro gaming hardware does not have to look like a shrunken refrigerator from a pizza parlor.
At the center of the idea is a beautiful collision of three maker-world favorites: 3D printing, Raspberry Pi emulation, and the irresistible desire to press clicky arcade buttons with more drama than the situation requires. A project like this turns a compact single-board computer into an emulation station, wraps it in a custom printed shell, and gives old games the kind of physical home they deserve.
The phrase “emulation horn of plenty” fits because a Raspberry Pi arcade can serve up a generous buffet of classic systems when configured properly. Add RetroPie, arcade controls, a display, speakers, and a legally sourced game library, and suddenly your desk becomes a miniature arcade. No tokens required. No sticky floor. No mysterious nacho smell. Progress, dear reader.
What Makes This 3D Printed Pi Arcade Special?
The original build that inspired the title gained attention because it refused to follow the predictable shape of a bartop arcade cabinet. Instead of the usual boxy silhouette, the enclosure used an entirely 3D printed body with smooth, sweeping curves. It looked less like a cabinet and more like a retro-futuristic object someone might place next to a lava lamp and call “the entertainment terminal.”
That is the magic of additive manufacturing. Traditional arcade cabinets are usually made from MDF, plywood, acrylic, or metal panels. Those materials are sturdy and practical, but they often encourage flat surfaces and right angles. A 3D printer laughs at right angles, then quietly spends fourteen hours making a curved side panel while you wonder whether you bought enough filament.
Inside the printed enclosure, the concept is straightforward: a Raspberry Pi runs RetroPie, a front-end and software setup designed for retro gaming. A compact LCD panel provides the screen, while a joystick and arcade buttons create the tactile control experience. The result is a functional arcade machine with a custom-built personality.
The Heart of the Machine: Raspberry Pi Power
A Raspberry Pi is a tiny computer, but “tiny” should not be mistaken for “boring.” Over the years, Raspberry Pi boards have become popular for everything from home servers to robotics, media centers, classroom projects, and, of course, retro gaming machines. For an arcade build, the Pi is appealing because it is affordable, low power, compact, and supported by a huge maker community.
Older builds commonly used Raspberry Pi 3 boards, which were capable enough for many classic arcade and console systems. Raspberry Pi 4 improved the experience with stronger performance, USB 3, dual-display support, better networking, and RAM options up to 8GB. Raspberry Pi 5 pushes the platform further with a faster quad-core Arm Cortex-A76 processor, improved graphics support, PCIe expansion possibilities, and active cooling recommendations for demanding workloads.
For a desktop arcade, the best board depends on what you want to play. If your dream is early arcade titles, 8-bit systems, and 16-bit favorites, a Pi 3 or Pi 4 may be enough. If you want smoother performance, more headroom, faster menus, and better support for heavier emulation tasks, a Pi 4 or Pi 5 makes more sense. In other words, choose the Pi like you choose hot sauce: start with what you can handle, then upgrade when ambition starts yelling.
RetroPie: The Software Buffet
RetroPie is one of the best-known software environments for turning a Raspberry Pi into a retro-gaming machine. It brings together Raspberry Pi OS, EmulationStation, RetroArch, and a wide range of emulator cores. That combination gives users a clean interface for browsing systems and games while keeping the technical plumbing mostly hidden behind the curtain.
The usual setup process begins with writing an image to a microSD card, booting the Raspberry Pi, configuring controls, connecting to a network if needed, and adding legally obtained game files. RetroPie can look intimidating at first, especially when emulator names and configuration menus start multiplying like rabbits wearing tiny developer badges. But the basics are approachable: install, configure input, add games, test, tweak, repeat.
For arcade titles, MAME is an important name. MAME began as the Multiple Arcade Machine Emulator and now serves as a broad preservation project documenting vintage arcade machines, computers, consoles, and related systems. Its purpose is not merely to let people play old games; it also preserves technical knowledge about hardware that may otherwise disappear. That distinction matters because emulation is as much about history as it is about nostalgia.
Why 3D Printing Changes the Arcade Cabinet Game
The cabinet is where this project earns its personality. A standard arcade build often begins with woodworking plans, a saw, clamps, dust, sanding, more sanding, and then some emotional support sanding. A 3D printed arcade build changes the workflow. Instead of cutting panels, you design or download printable parts, slice them, print them, and assemble the enclosure with screws, bolts, inserts, adhesives, or a combination of everything in the “miscellaneous hardware” drawer.
3D printing allows shapes that would be difficult for beginners to make from wood or metal. Curved shells, removable panels, custom vents, cable channels, display bezels, speaker grills, joystick mounts, and decorative details can be integrated directly into the design. The printed body can become both structure and style.
That freedom comes with trade-offs. Large prints take time. Parts can warp. Layer lines may need sanding. Screw holes may require careful tolerances. Heat from electronics must be managed. A cabinet that looks gorgeous in CAD can still become a plastic potato if printed too fast, too hot, or without enough support. But when everything works, the reward is huge: a one-of-a-kind arcade machine that does not look like it escaped from a flat-pack furniture warehouse.
Key Hardware: Screen, Controls, Sound, and Power
The Display
A good retro arcade screen should feel right for classic games. Many older arcade and console titles were designed around a 4:3 aspect ratio, so a 10-inch 1024×768 LCD can be a smart fit. Pimoroni’s 10-inch HDMI LCD kit, for example, has been used in DIY arcade builds and is well suited to compact cabinet projects. A 4:3 screen avoids the awkward “classic game floating in a widescreen ocean” look that can make Pac-Man feel like he got lost in a cinema.
The Controls
Arcade buttons and joysticks are not just input devices; they are the emotional support animals of retro gaming. A proper 8-way joystick and responsive buttons transform the experience. Many DIY builders use USB encoder boards to connect arcade buttons and joysticks to a Raspberry Pi. These boards translate physical button presses into USB inputs that the software can recognize during controller configuration.
Button layout matters. Fighting games often benefit from six action buttons. Classic arcade games may need fewer. System buttons such as Start, Select, Coin, or Exit can be added, but they should be placed carefully so nobody accidentally quits a game during a heroic boss fight. That is the kind of betrayal friendships do not easily survive.
Audio
Sound can be simple or surprisingly fussy. Small speakers may connect through an amplifier board, HDMI audio, USB audio, or the Pi’s available audio options depending on the hardware. The goal is not necessarily concert-hall quality. The goal is crisp bleeps, bloops, explosions, coin sounds, and theme music that makes everyone nearby say, “Wait, is that Street Fighter?”
Power
Power stability is essential. Raspberry Pi boards can behave badly with weak power supplies, especially when powering displays, USB encoders, lights, and other accessories. A clean build should use an appropriate official or high-quality power supply, tidy internal cable routing, and ventilation that keeps the electronics comfortable. A beautiful arcade machine that randomly reboots is not retro charm; it is a tiny haunted appliance.
Design Lessons From the Nautilus-Like Enclosure
The standout feature of the 3D Printed Pi Arcade is its shape. The enclosure feels organic, with rounded forms and removable side panels that make the electronics accessible. That access is important. Any compact electronics project should assume future maintenance. SD cards need replacing. Cables wiggle loose. Buttons wear out. Speakers buzz. Someone will eventually ask, “Can we make it louder?” and you will need to open the case without performing plastic surgery.
A good enclosure design balances beauty and serviceability. Removable panels, visible fasteners, modular mounts, and enough interior space for hands and tools can save hours of frustration. The original project’s generous internal volume gives builders room to improvise. That matters because every maker eventually substitutes parts. The exact screen is out of stock. The joystick has a different mounting plate. The speaker is two millimeters larger than expected because reality enjoys slapstick comedy.
Build Workflow: From Filament to Final Boss
A sensible 3D printed Pi arcade build starts with planning. First, choose the Raspberry Pi model, display size, controls, speakers, and power approach. Then confirm the dimensions of every part before printing. Measure the screen bezel, joystick plate, button diameter, board mounts, cable exits, and screw holes. Digital calipers are your friend. Guesswork is your enemy wearing novelty sunglasses.
Next comes printing. PLA is common because it is easy to print and stiff enough for many enclosure parts. PETG can offer better heat resistance and toughness, though it may string more. ABS and ASA are stronger in some conditions but require better ventilation and printer control. For a desktop arcade that will live indoors, PLA or PETG is usually practical.
After printing, test-fit everything before painting or final assembly. This is the sacred rule of maker projects: do not spend hours sanding and painting a part before discovering the HDMI connector is blocked by a decorative flourish. Assemble the electronics loosely, route cables, boot the Pi, configure controls, and test the screen. Only then should you chase the polished finish.
Finishing Touches: Paint, Vinyl, and Arcade Drama
The difference between “neat project” and “commercial-looking build” often comes down to finishing. 3D printed parts can be sanded, primed, filled, painted, and decorated. Primer filler helps reduce layer lines. Matte paint can hide minor imperfections better than glossy paint. Vinyl decals can add color, branding, instruction labels, or retro artwork.
Classic arcade machines were loud visually as well as physically. They used bold marquees, side art, glowing buttons, and cabinet graphics that shouted from across the room. A 3D printed Pi arcade can borrow that design language without becoming a copy of any single machine. Think stripes, geometric patterns, pixel art, space-age typography, or a custom logo. Give the machine a name. Every good arcade cabinet deserves a name. “Plastic Thunder,” perhaps. Or “The Button Goblin.” Branding is a serious business.
Legal Emulation: The Not-So-Fun But Very Important Part
Emulation software itself is generally not the problem. Projects like MAME and RetroPie exist openly and have legitimate preservation, educational, and hobbyist uses. The complicated part is game files. ROMs, disk images, and other software dumps are usually copyrighted. Downloading copyrighted games from random ROM sites without permission is not magically legal because the game is old, rare, or “abandonware.” That word gets thrown around online like confetti, but it is not a universal legal permission slip.
The safest approach is to use homebrew games, public-domain software, officially released ROMs, games you have legal rights to use, or collections sold by rights holders. Some developers release older titles legally, and modern retro-inspired homebrew communities create excellent new games for old systems. A clean arcade build should be fun without turning your SD card into a tiny legal swamp.
Performance Expectations: What Plays Well?
Performance depends on the Raspberry Pi model, emulator core, game system, display settings, cooling, and configuration. Early arcade games, 8-bit consoles, 16-bit consoles, and many older systems usually run well on common Raspberry Pi setups. More demanding arcade boards, later 3D consoles, and accuracy-focused emulation may require more powerful hardware or careful tuning.
One common mistake is assuming “newer emulator version” always means “better on a Pi.” Sometimes newer cores are more accurate but more demanding. Older emulator versions may run faster but with compatibility compromises. RetroPie gives users choices, which is wonderful until you realize choices can become a menu-shaped jungle. The practical rule is simple: test the games you actually care about, not the entire history of electronic entertainment in one weekend.
Why This Project Still Matters
The 3D Printed Pi Arcade matters because it shows that DIY retro gaming does not have to imitate commercial cabinets. Many home arcade builds are impressive, but they often recreate familiar forms: bartop cabinet, mini cabinet, cocktail table, wall-mounted box. This project asks a better question: what if an arcade machine looked like something only a 3D printer would dare attempt?
That question opens creative doors. A Pi arcade can be shaped like a spaceship dashboard, a tiny jukebox, a cyberpunk control pod, a cartoon robot head, or a museum-style display terminal. The electronics stay mostly the same, but the experience changes because the enclosure changes. Hardware design affects how a project feels, not just how it functions.
Practical Tips for Building Your Own 3D Printed Pi Arcade
Start With the Screen
The screen determines much of the cabinet size. Choose it early and design around its exact dimensions. A 4:3 HDMI LCD is excellent for retro games, while widescreen displays may require bezels or software scaling to look right.
Leave Room for Wires
Cables need more space than you think. HDMI connectors, USB plugs, power leads, speaker wires, and button harnesses can quickly turn a tidy interior into electronic spaghetti. Plan cable channels and tie-down points.
Use Heat Wisely
Raspberry Pi boards can get warm, especially newer models. Use vents, heatsinks, and active cooling where appropriate. Do not seal everything inside a plastic shell and hope the laws of thermodynamics are taking a holiday.
Prototype the Controls
Before final printing, test joystick and button spacing on cardboard or a quick draft print. Hands are picky. A layout that looks perfect on screen may feel awkward after ten minutes of actual play.
Make Maintenance Easy
Use removable panels and standard screws. Avoid designs that require dismantling half the cabinet just to reach the microSD card or USB ports. Future you deserves kindness.
Extra Experience Section: Living With a 3D Printed Pi Arcade
The best part of a 3D printed Pi arcade is not the first boot. The first boot is mostly relief: the screen lights up, the buttons work, nothing smells hot, and you briefly feel like a wizard in safety glasses. The real joy begins after the machine has lived on your desk for a while. That is when it stops being a project and becomes an object people notice.
A custom arcade machine changes the energy of a room. Visitors do not ask, “What brand is that?” They ask, “Did you make that?” That question is the maker equivalent of applause. Even people who do not care about Raspberry Pi boards or emulator cores understand buttons, joysticks, and a glowing screen. The machine invites interaction. It says, “Press something. You know you want to.”
In daily use, small details matter more than expected. The angle of the screen decides whether you lean comfortably or hunch like a goblin guarding treasure. The height of the control panel affects wrist comfort. The sharpness of printed edges becomes obvious during longer play sessions. Builders often learn to sand hand-rest areas smooth, round off corners, and use finishes that feel pleasant rather than merely look good.
Noise is another experience factor. Arcade buttons can be loud in a satisfying way, but not everyone in the house may share your passion for midnight Galaga. Clicky microswitches deliver authentic feedback, while quieter buttons may be better for shared spaces. Speaker volume also matters. A small amplifier can make classic game audio surprisingly punchy, but too much treble can turn retro charm into electronic mosquito theater.
Maintenance becomes part of the relationship. The more custom the cabinet, the more important it is to document your wiring. Label button connections. Keep a copy of your configuration. Save the 3D files. Note which screws go where. Six months later, you will not remember whether the red wire went to Player One Start or the glowing button you installed because it “looked important.” Documentation is not glamorous, but neither is opening a machine and whispering, “What did I do?”
Game selection also shapes the experience. A huge library sounds impressive, but it can become overwhelming. The better approach is to curate. Create a favorites list with games people actually play. Include quick arcade titles, two-player games, puzzle games, racing games, and a few oddities for conversation. A good arcade library is like a good snack table: variety matters, but nobody needs forty-seven bowls of plain crackers.
Over time, a 3D printed Pi arcade can become a platform for upgrades. You might add better speakers, LED buttons, a cleaner power switch, a cooling fan, a removable back panel, or a redesigned marquee. That is the beauty of printing your own enclosure. The machine is never completely finished. It simply reaches different levels of “finished enough,” which is the official motto of hobby electronics whether anyone admits it or not.
Most importantly, building one teaches a rare combination of skills: digital design, printing, sanding, electronics, software setup, input mapping, troubleshooting, and visual design. It is a workshop disguised as a toy. And when the project finally works, you get to celebrate by playing a game that is older than your router. That is a pretty wonderful bargain.
Conclusion: A Small Arcade With a Big Personality
The 3D Printed Pi Arcade is more than a clever retro gaming machine. It is a reminder that modern maker tools can revive old experiences in new forms. Raspberry Pi hardware supplies the computing muscle, RetroPie organizes the emulation environment, MAME and other emulator projects help preserve software history, and 3D printing gives the whole thing a body with attitude.
Anyone can buy a mini arcade cabinet. That is convenient, and convenience has its place. But building one from printed parts, selected components, and careful configuration creates something richer. It becomes personal. It becomes repairable. It becomes a conversation piece. Most importantly, it becomes yours.
So yes, a 3D printed Pi arcade really can be an emulation horn of plenty. It pours out nostalgia, engineering lessons, design freedom, and the kind of button-mashing joy that makes adults grin like kids who found a forgotten stack of quarters. Just source your games legally, ventilate your Pi, measure twice, print once, and keep a screwdriver nearby. The final boss is usually cable management.
“`