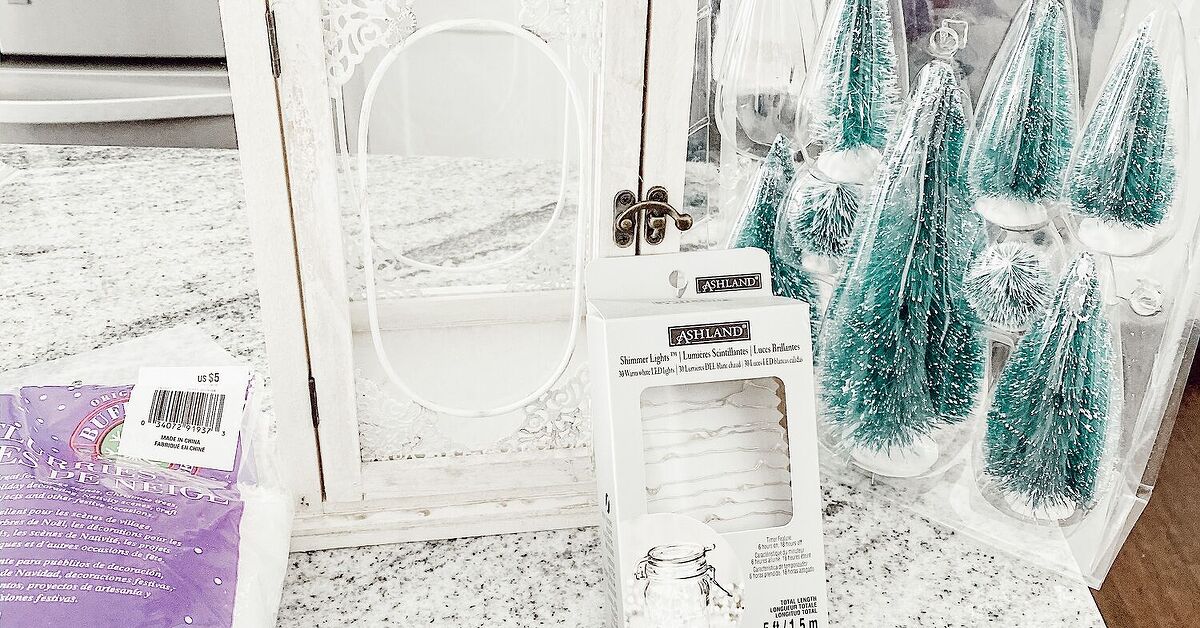
There is a special kind of holiday magic that happens when you put tiny trees, soft snow, warm lights, and one charming lantern together. Suddenly, you are not just decorating a table. You are creating a miniature winter world where woodland deer behave politely, bottle brush trees never shed needles, and the snow always looks perfect because it does not have to be shoveled at 6 a.m.
Making a winter wonderland in a lantern is one of those Christmas craft projects that looks expensive, feels cozy, and does not require a fine arts degree, a power tool collection, or an emotional support glue gun. With a basic decorative lantern, faux snow, LED lights, miniature trees, ornaments, and a few thoughtful design tricks, you can build a glowing holiday centerpiece for a mantel, entry table, dining room, bookshelf, porch, or bedside nook.
This project blends the best ideas from modern holiday decorating: flameless candles for safety, miniature Christmas village details for nostalgia, natural textures for warmth, and budget-friendly materials for sanity. Whether your style is farmhouse Christmas, snowy woodland, glam winter sparkle, Scandinavian minimalism, or “I found all of this in a craft bin and made it work,” a DIY winter lantern can be customized beautifully.
What Is a Winter Wonderland Lantern?
A winter wonderland lantern is a decorative lantern filled with miniature seasonal elements to create a tiny snowy scene. Think of it as a snow globe’s calmer cousin. Instead of shaking it and watching glitter attack everything like festive confetti with ambition, you arrange the scene inside a lantern and let LED lights create a warm glow.
The basic formula is simple: start with a lantern, add a snowy base, build height with bottle brush trees or mini houses, tuck in small accents, and finish with fairy lights or a flameless candle. The result can look like a Christmas village, a frosty forest, a North Pole path, a cozy cabin scene, or a simple winter terrarium.
The beauty of this craft is flexibility. A black metal lantern creates a classic farmhouse look. A white lantern feels clean and snowy. A brass or gold lantern leans elegant and vintage. A wooden lantern adds rustic charm. A glass lantern lets the lights bounce around the room, which is exactly what holiday decor should do when it is not busy hiding extension cords.
Why This DIY Holiday Lantern Works So Well
Holiday decorating often becomes a battle between beauty, budget, and storage space. A winter scene lantern wins because it is compact, reusable, and easy to refresh from year to year. You can swap red berries for silver ornaments, add mini wrapped gifts, change the ribbon, or replace the woodland deer with tiny skiers if your Christmas village needs drama.
It also works in almost any space. On a mantel, it becomes a glowing focal point. On a dining table, it acts as a centerpiece without blocking conversation unless your guests are very short or your lantern is absurdly tall. In an entryway, it gives visitors an instant “cozy home” feeling. On a covered porch, it can greet guests with soft light as long as the materials are suitable for that protected setting.
Most importantly, this DIY Christmas lantern creates atmosphere. The combination of faux snow, miniature trees, and warm white lights gives that peaceful winter-evening feeling without the icy sidewalk, wet boots, or mysterious missing glove.
Supplies You Need
You do not need every item on this list, but these supplies give you a strong starting point for making a winter wonderland in a lantern:
- Decorative lantern with glass panels or open sides
- Faux snow, snow batting, cotton batting, or white felt
- Mini bottle brush trees in assorted heights
- Battery-operated LED fairy lights, micro lights, or flameless candle
- Miniature houses, deer, snowmen, sleds, signs, or tiny ornaments
- Hot glue gun, glue dots, floral wire, or museum putty
- Small pinecones, faux berries, mini wreaths, or greenery picks
- Ribbon, twine, bells, or a bow for the outside
- Scissors, wire cutters, tweezers, and a popsicle stick for positioning
- Optional: chunky glitter, iridescent flakes, mica-style snow, or clear beads
If you are crafting on a budget, look for lanterns at discount stores, thrift shops, craft store sales, or in your own storage bins. Many people already own a lantern that has been waiting patiently for its main-character moment. Faux snow, mini trees, and fairy lights are widely available at craft stores, home improvement stores, dollar stores, and seasonal sections of major retailers.
Choosing the Right Lantern
The lantern is the frame for your entire snowy masterpiece, so choose one that matches the mood you want. A tall lantern gives you room for trees, layered lights, and a dramatic vertical scene. A short, wide lantern is ideal for a village-style display with small houses and figurines. A lantern with a front door or hinged panel is easiest to work with because you can adjust the scene without using tweezers like a tiny holiday surgeon.
Best Lantern Styles for This Project
Metal lanterns are sturdy and timeless. Black, bronze, and pewter finishes work especially well with farmhouse, rustic, and traditional Christmas decor.
White lanterns blend beautifully with snowy scenes and make the whole piece feel brighter. They are great for coastal Christmas, Scandinavian winter decor, or neutral holiday styling.
Wood lanterns add warmth and look lovely with pinecones, burlap ribbon, natural greenery, and woodland animals.
Glass-heavy lanterns let the lighting shine from every angle. They are perfect for centerpieces because the scene is visible all around.
Before you begin, clean the glass panels inside and out. Faux snow has a talent for sticking to fingerprints, and glitter will happily highlight every smudge like it is doing investigative reporting.
Step-by-Step: Making A Winter Wonderland In A Lantern
Step 1: Plan the Scene Before You Glue Anything
Place your lantern on the table and arrange your miniatures outside it first. This is the “measure twice, glue once” portion of the craft. Decide where the tallest tree will go, where the lights will sit, and whether your focal point is a mini house, a deer, a snowman, a candle, or a cluster of frosty trees.
A good winter lantern usually has three visual layers: a background, a middle area, and a foreground. Put taller trees in the back, medium pieces in the middle, and small accents near the front. This creates depth and keeps the scene from looking like all the tiny decorations rushed the glass door at once.
Step 2: Build the Snowy Base
Add snow batting, cotton batting, white felt, or a thin piece of foam to the bottom of the lantern. This gives your scene a soft, snowy floor and helps raise small figures so they are easier to see. If your lantern base is deep, a piece of foam board or Styrofoam can create a hidden platform.
Sprinkle faux snow over the batting for texture. Use a light hand. A little faux snow looks magical. Too much looks like your miniature forest experienced a weather emergency. For sparkle, add a pinch of chunky white glitter or iridescent flakes. Avoid loose glitter if the lantern will be moved often, unless you enjoy finding sparkle on your socks in March.
Step 3: Add the Lights
Battery-operated LED fairy lights are the easiest and safest choice for a winter wonderland lantern. Warm white lights create a cozy candlelit effect, while cool white lights feel icier and more modern. Micro lights on thin wire are especially useful because they tuck around trees and disappear into the snow.
Hide the battery pack behind a tree, under batting, or at the back of the lantern. Glue dots or removable adhesive can hold it in place while still letting you change batteries later. Make sure the switch remains accessible. Nothing ruins holiday joy faster than needing to dismantle an entire tiny village just to turn on the lights.
A flameless LED candle is another great option. It gives the lantern a traditional glow and works beautifully in simpler scenes with pinecones, greenery, and snow. For safety, avoid real candles inside a lantern filled with faux snow, mini trees, paper houses, ribbon, or other decorative materials.
Step 4: Place the Trees and Main Focal Point
Now add your bottle brush trees. Use at least two or three different heights for a natural look. Place the tallest tree slightly off-center rather than directly in the middle. This small design trick makes the finished lantern look more relaxed and professionally styled.
If you are using a mini house, place it where it can be seen clearly through the glass. A little house with lights behind it looks charming, even if the house itself does not light up. Add smaller trees around it to make it feel nestled into the scene. If your focal point is a deer or snowman, angle it slightly instead of facing it straight forward. Tiny characters need good staging too.
Step 5: Add Mini Details
This is where the lantern develops personality. Add a tiny sled leaning against a tree, a miniature sign that says “North Pole,” a few small ornaments as oversized baubles, or a cluster of red berries for color. Pinecones bring a natural woodland feel, while silver bells and pearl beads make the scene more elegant.
The secret is restraint. Miniature crafts can go from “enchanted winter scene” to “holiday yard sale in a box” very quickly. Choose one main theme and repeat it. For example, use red berries, red ribbon, and one red ornament. Or choose all-white snow, silver accents, and frosted trees. Repetition makes the lantern feel intentional.
Step 6: Decorate the Outside
Once the inside is complete, dress up the outside of the lantern. Tie a ribbon around the top handle, attach a small wreath to the front, or tuck greenery and berries along the roofline. A simple bow can make the whole project look finished.
If your inside scene is busy, keep the outside simple. If your inside scene is minimal, the outside can handle a larger bow, bells, or a frosted pine pick. The goal is balance, not a lantern wearing every accessory in the craft aisle.
Design Ideas for Different Holiday Styles
Rustic Farmhouse Winter Lantern
Use a black or wood lantern, buffalo snow, natural pinecones, burlap ribbon, warm white lights, and mini evergreen trees. Add a tiny deer or cabin for a cozy woodland feel. Finish with plaid ribbon on the handle.
Elegant White Christmas Lantern
Choose a white or gold lantern with soft snow batting, pearl beads, silver ornaments, frosted bottle brush trees, and warm LED fairy lights. This style looks beautiful on a mantel, console table, or formal dining room centerpiece.
Vintage Christmas Village Lantern
Add small cardboard houses, retro-style bottle brush trees, tiny wreaths, and warm lights. Choose red, mint, cream, and soft green accents for a nostalgic look. This style feels like something found in Grandma’s attic, but in the charming way, not the “why is this box sticky?” way.
Kid-Friendly Snowman Lantern
Use a plastic or sturdy lantern, soft batting, a cheerful snowman, colorful mini presents, and battery-operated lights. Skip fragile glass ornaments and tiny loose pieces if younger children will be handling it.
Minimal Scandinavian Lantern
Keep the color palette simple: white snow, natural wood, one or two trees, and a single flameless candle. Add twine or a small evergreen sprig outside. This style proves that holiday decor can whisper instead of shouting “Jingle Bells” in sequins.
Safety Tips for a Winter Wonderland Lantern
Because this project often includes faux snow, fabric, paper, plastic, and greenery, flameless lighting is the smart choice. Use LED fairy lights, battery-operated candles, or plug-in lights only when they are appropriate for the lantern and location. Check light strands for frayed wires, cracked battery compartments, or loose connections before using them.
Do not place a real flame inside a lantern filled with craft materials. Faux snow and decorative picks may look innocent, but they are not designed to cuddle up to fire. Also, keep battery packs accessible, remove batteries before long-term storage, and turn lights off when you leave the house or go to bed.
If displaying the lantern outdoors, use a covered porch or protected area and choose materials labeled for outdoor use. Wind, moisture, and freezing weather can damage paper houses, loose snow, and battery packs. For households with pets or small children, avoid tiny loose ornaments, button batteries within reach, and breakable glass accents.
Common Mistakes to Avoid
Using too much snow: Thick snow can bury your miniatures and make the scene look messy. Start with a thin layer and add more only where needed.
Forgetting battery access: Always test the lights and make sure you can reach the switch after decorating.
Overcrowding the lantern: Leave a little negative space so each detail can shine. Tiny trees need breathing room too.
Mixing too many color themes: Red plaid, neon ornaments, silver glitter, rustic burlap, and pastel houses can work individually, but together they may look like five holidays fighting in a phone booth.
Using real candles: A real candle inside a craft-filled lantern is risky. LED lights give the glow without the worry.
Where to Display Your Winter Wonderland Lantern
A finished winter wonderland lantern can go almost anywhere that needs a cozy seasonal touch. Place it on a mantel with garland and stockings, or use two matching lanterns at either end for symmetry. Set it on an entry table with a bowl of ornaments and a vase of greenery. Use it as a dining table centerpiece with smaller votives around it. Put it on a bookshelf with white ceramic houses or framed holiday photos.
For a porch display, use a larger lantern with weather-resistant faux greenery and outdoor-safe lights. Pair it with a wreath, doormat, and a basket of birch logs for an inviting winter look. Indoors, smaller lanterns work well in bedrooms, kitchens, bathrooms, and office corners. Because the lighting is battery-operated, you are not chained to an outlet, which is one of the small but glorious freedoms of modern crafting.
How to Store and Reuse It
At the end of the season, remove batteries from lights and candles to prevent corrosion. If the inside scene is glued down, cover the lantern loosely with tissue paper or place it in a storage bin where it will not be crushed. If your pieces are removable, store miniatures in labeled bags so next year you are not searching for one tiny deer in a box of garland like a holiday detective.
You can also redesign the lantern for other seasons. Replace snow and bottle brush trees with moss and eggs for spring, seashells for summer, mini pumpkins for fall, or black branches and bats for Halloween. A good lantern is not just a Christmas decoration. It is a tiny stage waiting for seasonal drama.
Personal Experience: What I Learned While Making A Winter Wonderland In A Lantern
The first time I made a winter wonderland in a lantern, I had a clear artistic vision. By “clear artistic vision,” I mean I had a lantern, a bag of faux snow, and unreasonable confidence. I pictured a peaceful snowy forest with glowing lights and charming miniature trees. What I created at first looked more like a snowstorm had hit a craft store and everyone inside had panicked.
The main lesson came quickly: build the scene in layers. I originally poured the snow in first, shoved everything into the lantern, and hoped for magic. The trees leaned. The deer disappeared. The fairy lights clumped together like they were holding a meeting. Once I removed everything and started again, the process became much easier. I placed the lights first, added a thin snowy base, then positioned the tallest trees in the back and smaller pieces near the front. Suddenly, the lantern had depth. It looked like a real little landscape instead of a storage problem.
I also learned that glue is helpful, but not everything needs to be permanently attached. Glue dots and removable putty are wonderful for this project because they allow small adjustments. One year, I made a traditional red-and-green lantern. The next year, I changed it to a snowy white woodland scene by swapping the ribbon, removing a few bright ornaments, and adding frosted pinecones. If I had hot-glued every single piece like a person possessed by holiday enthusiasm, that refresh would have been impossible.
Lighting made the biggest difference. The lantern looked nice in daylight, but once the LED fairy lights turned on, it became something special. Warm white lights gave the snow a golden glow and made the bottle brush trees look softer. I tried cool white lights too, and they created a crisp icy look, which was beautiful for a modern winter theme. For a cozy Christmas lantern, though, warm white is hard to beat.
Another experience worth sharing: test your lantern from the angle where people will actually see it. I once made a lantern that looked perfect from above while I was working on the table. Unfortunately, when I placed it on the mantel, the prettiest details were hidden behind the bottom frame. Now I always place important elements a little higher using foam, batting, or a small hidden base. Miniature scenes need stage risers just like school concerts.
Finally, I learned not to chase perfection. A winter wonderland lantern should feel handmade, cozy, and personal. A slightly leaning tree can look windswept. A sprinkle of uneven snow can look natural. A tiny deer placed in a dramatic pose can become the unofficial star of the holiday season. The goal is not to create a museum model. The goal is to make something that glows warmly in your home and makes you smile when you walk past it.
The best part of this project is that it invites creativity without demanding expertise. You can make it with kids, customize it for your decor style, or build one as a handmade gift. It is affordable, forgiving, and festive. And unlike real snow, it stays exactly where you put itunless you sneeze near the faux snow bag, in which case, congratulations, your table is now participating in winter.
Conclusion
Making a winter wonderland in a lantern is a simple, beautiful way to bring holiday charm into your home. With faux snow, bottle brush trees, miniature accents, and safe LED lighting, you can create a glowing Christmas scene that feels custom, cozy, and surprisingly easy to assemble. The project works for nearly every decorating style, from rustic farmhouse to elegant white Christmas, and it can be refreshed year after year with small changes.
The most successful winter lanterns use layers, balanced colors, accessible lighting, and a few meaningful details rather than a mountain of decorations. Start with a sturdy lantern, build a soft snowy base, add height and depth, then finish with lights and exterior accents. Keep safety in mind by choosing flameless candles or battery-operated LED lights, especially when using faux snow, fabric, greenery, or paper miniatures.
In the end, this DIY holiday lantern is more than a craft. It is a tiny glowing world you can place on a mantel, table, shelf, or porch to make the season feel warmer. No shovel required.
Note: This article was created from synthesized real-world craft, home decor, holiday lighting, and seasonal safety guidance commonly recommended by reputable U.S. home, craft, retail, and fire-safety organizations.