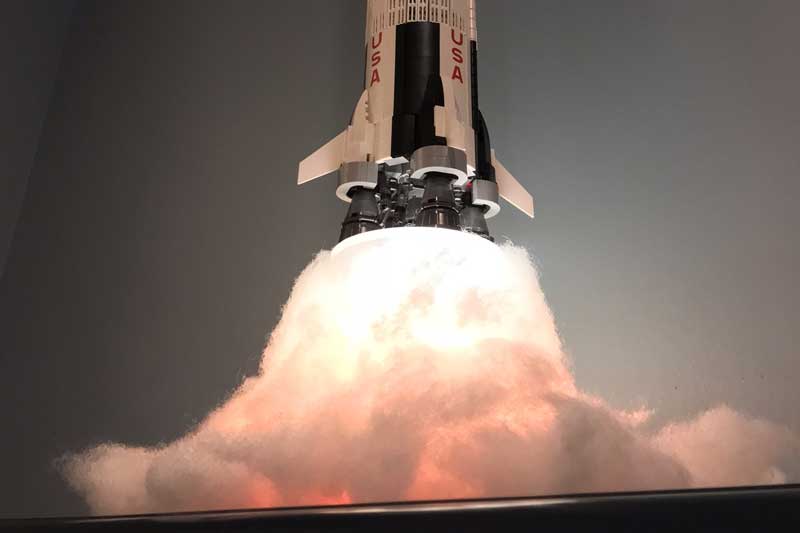
The LEGO NASA Apollo Saturn V is already the sort of model that makes guests stop mid-sentence and say, “Wait, is that one meter tall?” Add an LED launch stand underneath it, however, and the display stops being a model. It becomes a tiny mission control moment sitting in your living room, minus the danger, the rocket fuel, and the awkward phone call to your landlord about scorched ceiling paint.
The idea behind an LED stand for Lego Saturn V is beautifully simple: take one of the most beloved LEGO space sets ever made, support it vertically, then use light, diffusion, and a bit of theatrical smoke styling to make it look like the rocket is blasting off. It is part display stand, part lamp, part STEM project, and part proof that adult LEGO fans are never truly done building. They merely pause until someone discovers addressable LEDs.
This concept became especially popular after makers began sharing launch-effect stands using clear acrylic tubing, cotton or pillow stuffing for exhaust clouds, and programmable LED strips such as NeoPixels. The result is not just “LEGO with lights.” It is a display that understands what the Saturn V represents: ambition, engineering, scale, history, and that very specific human urge to say, “I can make this cooler.”
Why the LEGO Saturn V Deserves a Launch Effect
The official LEGO NASA Apollo Saturn V set is a display legend for good reason. The model measures over 39 inches tall, uses 1,969 pieces, and is built at approximately 1:110 scale. The piece count is not random; 1969 honors the year Apollo 11 landed humans on the Moon. That is the kind of detail LEGO fans love because it lets a box of plastic bricks quietly wink at history.
The set also includes three removable rocket stages: the S-IC first stage, the S-II second stage, and the S-IVB third stage. It includes the Apollo spacecraft, a lunar lander and lunar orbiter, three astronaut microfigures, and three stands for horizontal display. In other words, LEGO already gave builders a museum-quality shelf piece. The LED stand simply asks: what if the museum exhibit suddenly remembered it was a rocket?
The Real Saturn V Was Built for Drama
The original Saturn V was not subtle. NASA used it to send Apollo astronauts toward the Moon, and it remains one of the most famous machines in human history. At full scale, it stood 363 feet tall, weighed about 6.2 million pounds when fueled, and launched from Kennedy Space Center’s LC-39 pads. It flew 13 times between 1967 and 1973, supporting Apollo missions and Skylab.
Its three-stage design is part of what makes the LEGO version so satisfying. The first stage did the brutal work of lifting the enormous rocket away from Earth. The second stage pushed it nearly into orbit. The third stage placed the Apollo spacecraft into Earth orbit and then sent it toward the Moon. When you understand that sequence, the LED launch stand becomes more than a decoration. It is a small visual translation of a very large idea: controlled fire becoming forward motion.
What Makes an LED Stand for Lego Saturn V So Appealing?
It Turns a Static Model Into a Scene
A standard display says, “Here is the rocket.” An illuminated launch stand says, “Here is the rocket at the most exciting possible second.” That difference matters. The Saturn V is tall, clean, and elegant, but vertical display can feel a little museum-still. Add glowing exhaust below the engines, and suddenly the eye travels upward. The model feels taller, the white body looks brighter, and the black roll patterns pop like they are being photographed on a launch pad at night.
It Adds Atmosphere Without Altering the LEGO Set
One of the best things about a good Lego Saturn V lighting project is that it does not need to permanently modify the rocket. Many builders prefer to keep collectible LEGO sets intact. A freestanding LED base or acrylic support system can create the launch effect while leaving the original model untouched. That means you can enjoy the spectacle without turning your retired set into a science fair casualty.
It Blends LEGO, Electronics, and Display Design
The project sits at a sweet intersection: LEGO building, maker electronics, lighting design, and home display. For hobbyists, that is catnip with a USB cable. Addressable LEDs allow animation, color gradients, flickering exhaust, warm white flame, orange glow, and pulsing sequences. Diffusion materials soften the light so it looks less like a strip of LEDs and more like rocket exhaust. Clear acrylic provides support while staying visually quiet. When done well, the illusion is strong enough that the model appears to hover over controlled chaos.
Anatomy of a Great LEGO Saturn V LED Launch Stand
1. The Base: Stability Before Style
The Saturn V model is tall, narrow, and not something you want tipping over. A proper Saturn V display stand starts with stability. The base must be wide enough to resist wobble, heavy enough to feel planted, and designed so the rocket’s weight is carried safely. Builders often use acrylic sheets, wood bases, 3D-printed structures, or hybrid designs. The best version depends on the tools available, but the goal stays the same: keep the rocket upright and avoid recreating a failed landing in your dining room.
2. The Support Column: Invisible Strength
Clear acrylic tubing is a popular choice because it can hold the model while almost disappearing visually. It also gives LED strips something to wrap around or shine through. The clear column creates a “launch plume” core, allowing the Saturn V to stand above the glowing exhaust. Some makers add a discreet wall bracket or rear brace to prevent sway. That small extra support can be the difference between “majestic liftoff” and “why is the third stage under the couch?”
3. The Light Source: LEDs With Personality
Basic LED strips can work, but programmable addressable LEDs give the best effect. With individually controlled pixels, the stand can simulate ignition, rising flame, pulsing heat, and random flicker. Warm whites, amber, orange, red, and hints of blue can be blended to suggest energy without making the rocket look like it is launching from a nightclub. Subtlety matters. A Saturn V launch effect should say “historic spaceflight,” not “discount laser tag.”
4. The Diffuser: Making Light Look Like Exhaust
The secret sauce is diffusion. Cotton, fiberfill, pillow stuffing, translucent plastic, or carefully arranged cloud material can spread the light and hide individual LED points. This creates the illusion of smoke and flame around the base. The material should be arranged lightly, not packed like a winter coat. Too much density blocks the light; too little reveals the electronics. The best result looks messy in the exact way rocket exhaust should look messy.
5. Cable Management: The Unsung Hero
Nothing ruins a space-age display faster than a cable dangling across the table like a confused garden snake. A strong LED stand hides wires under the base, routes power cleanly, and keeps controllers accessible. If the stand uses USB power, the cable should exit at the rear. If it uses a microcontroller, the reset button or programming port should be reachable. Good cable management is not glamorous, but neither are launch delays.
Commercial Light Kits vs. DIY LED Stands
Builders generally have two paths: buy a ready-made lighting kit or build a custom launch stand. Commercial light kits are convenient. They usually include pre-sized components, clear instructions, and a predictable result. They are ideal for collectors who want display lighting without cutting acrylic, soldering wires, or learning why polarity matters at 11:48 p.m.
A DIY Lego Saturn V LED stand, however, offers more creative control. You can choose the height, base material, animation style, brightness, diffusion, and whether the rocket appears to be launching, hovering, or preparing to vaporize a very tiny launch pad. DIY also allows the stand to match your display space. A bookshelf setup may need a compact base. A dedicated cabinet may support a taller exhaust plume. A desk display may need dimmer lighting so it does not become the world’s nerdiest desk lamp during homework or Zoom calls.
Design Tips for a Better Launch Effect
Keep the Flame Gradient Natural
Real rocket exhaust is not a single color. For a convincing effect, place brighter white or pale yellow light near the engines, then blend into orange and red lower in the plume. A little variation makes the animation feel alive. Avoid cycling through rainbow colors unless your goal is “Saturn V attends a music festival.”
Do Not Overpower the Model
The LEGO rocket should remain the hero. The stand supports the story; it should not steal the show. If the LEDs are too bright, the viewer sees only glow and loses the fine details of the rocket body. A dimmer or adjustable controller is helpful because lighting that looks perfect at noon may feel like a tiny solar event at midnight.
Use Diffusion to Hide the Electronics
The viewer should notice the exhaust effect first, not the LED strip. Diffusion material should be shaped around the base in uneven layers, with some open spaces and some denser areas. This gives the plume depth. Think “billowing launch cloud,” not “cotton ball glued to science project.”
Protect the LEGO Model
LEDs should be low-heat and positioned so they do not warm the LEGO elements. The stand should support the model without stressing delicate sections. If cutting acrylic, drilling parts, or wiring electronics, use proper eye protection, careful handling, and adult supervision where needed. The goal is a display that looks dangerous, not one that actually is.
Why This Project Works So Well for Space Fans
The Saturn V is not just another rocket. It is a symbol of scale, teamwork, risk, and technical confidence. The LEGO model captures the shape and structure; the LED stand captures the moment. Together, they create an emotional display. It reminds people of Apollo 11, Moon missions, engineering ambition, and the strange magic of turning tiny plastic elements into something that feels historically enormous.
That is also why the project photographs so well. The white rocket body contrasts sharply with the warm launch glow. The exhaust plume adds motion to a still image. Shadows from the base create depth. Even a simple phone photo can look dramatic if the room is dim and the LED animation is paused at the right moment. The display becomes content-friendly without feeling like it was designed only for social media. It earns the camera’s attention.
Common Mistakes to Avoid
Making the Stand Too Tall
A tall exhaust plume looks exciting, but it raises the center of gravity and can make the model unstable. The stand should create drama without making the rocket feel like it is balancing on a glowing broomstick.
Using Harsh, Exposed LEDs
Visible LED dots can break the illusion. Diffusion is essential. If the individual LEDs are obvious, add more spacing, more soft material, or a translucent sleeve.
Ignoring Dust
Any LEGO display attracts dust. A launch plume made of fiber material can attract even more. Place the model where it can be cleaned gently, or consider a display case if the stand will live in a high-dust area. Space may be a vacuum, but your bedroom is absolutely not.
Forgetting Access to Power
Plan where the power cable goes before final assembly. A gorgeous stand that cannot reach an outlet is basically a sculpture of regret.
The Bigger Meaning: Display as Storytelling
At its best, an LED stand for Lego Saturn V is not about making a toy brighter. It is about storytelling. LEGO sets already invite imagination, but lighting adds mood, timing, and atmosphere. The Saturn V is especially suited to this treatment because its story is inseparable from liftoff. It was built to rise. A launch stand lets the model do visually what it cannot do physically.
This is why the concept continues to inspire builders years after the original LEGO Saturn V release. Some use acrylic and NeoPixels. Others use 3D printing and standard LED strips. Some prefer a clean museum-style column; others build full launch pads with towers, service arms, and flame trenches. The common thread is the desire to make the display feel alive.
Hands-On Experience: Living With a LEGO Saturn V LED Stand
The first thing you notice after setting up a LEGO Saturn V LED stand is that the rocket suddenly has presence. Not shelf presence. Launch presence. There is a difference. On a normal stand, the Saturn V is impressive because of its height and accuracy. On an LED launch stand, it feels like something is happening. Even when the LEDs are still, the glowing base gives the model a sense of stored energy, like it is politely waiting for permission to shake the windows.
Placement matters more than expected. On a low table, the rocket can look monumental, but it also becomes dangerously interesting to pets, younger siblings, and anyone who gestures with too much enthusiasm. A shelf or cabinet gives it authority. A corner with a dark wall behind it makes the lighting more dramatic. If the room has warm ambient light, the orange glow blends naturally. If the room is dark, the stand becomes the main attraction, and the Saturn V turns into a tiny Apollo-era lighthouse.
The best viewing angle is slightly below the rocket, looking upward. That angle makes the exhaust plume feel larger and the body look taller. It also hides some of the support structure if clear acrylic is used. From the side, the stand becomes more of a technical object; from the front, it becomes theater. That is part of the fun. The display has two personalities: engineering project by day, rocket launch by night.
Brightness control is surprisingly important. Full brightness is fun for about five minutes, especially when showing friends. After that, a softer glow usually looks more premium. A slow flicker or gentle pulse feels more realistic than a fast animation. The Saturn V was powerful, but it was not a disco ball with federal funding. A good lighting pattern should feel heavy, hot, and controlled.
Maintenance is simple but real. Dust will settle on the rocket body, the base, and any diffusion material. A soft brush or gentle air blower helps. Avoid tugging on the smoke-effect material because it may shift and reveal the LEDs underneath. If the stand is modular, occasional adjustments are easy. If everything is glued permanently, cleaning can become a delicate spacewalk without the cool suit.
The emotional payoff is the reason the project is worth it. People who are not LEGO fans still understand it immediately. They see the rocket, the glowing exhaust, and the upward motion implied by the display. Space fans appreciate the Apollo connection. LEGO fans appreciate the scale and build. Electronics fans notice the lighting. Everyone else simply says, “That looks awesome,” which is the universal language of successful display design.
After living with an illuminated Saturn V, a plain horizontal display can feel a little sleepy. The official stands are clean and practical, but the launch version gives the model a second life. It turns the set from an object into a moment. That is the magic of the project: it does not replace the LEGO design; it celebrates it louder, warmer, and with a glorious pretend plume of rocket fire.
Conclusion
An LED stand for Lego Saturn V succeeds because it respects both halves of the subject. It respects the LEGO model by keeping the rocket recognizable, stable, and intact. It respects the real Saturn V by emphasizing liftoff, staging, power, and drama. The best stands do not merely add light; they add context.
For collectors, the project creates a more striking display. For makers, it offers a satisfying blend of electronics, materials, and design. For space fans, it turns a famous rocket into a miniature tribute to Apollo history. And for anyone who has ever looked at a LEGO set and thought, “This is great, but what if it glowed like controlled thunder?” the answer is clear: build the stand, dim the room, and let the tiny giant fly.
Note: This article is based on publicly available product information, maker project coverage, LEGO review resources, and space history references. Source links are not embedded in the article body per publishing requirements.