Note: This publish-ready guide is based on real DIY Halloween decorating, outdoor hanging, painting, and home-safety practices commonly recommended by U.S. craft, home improvement, and safety organizations.
If your Halloween decorating style is “spooky, but I still have errands,” this easy Halloween coffin hanger with bats is the perfect project. It looks gothic enough to make your front door feel like it belongs to a very fashionable vampire, but it is simple enough to finish in an afternoon without turning your kitchen table into a crime scene of glitter, glue, and regret.
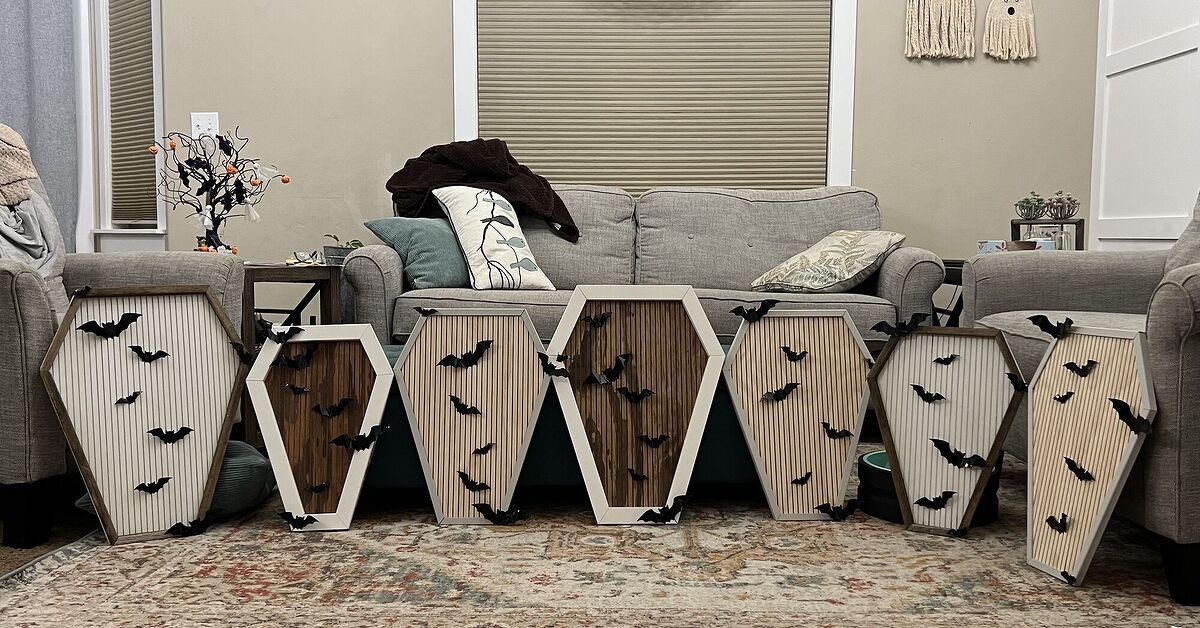
A coffin hanger is basically a lightweight coffin-shaped sign or wall accent that can hang on a door, porch wall, entryway, mantel, or party backdrop. Add a flutter of black bats, a distressed paint finish, and a sturdy ribbon or hook, and suddenly you have a Halloween decoration that says, “Welcome, mortals,” without requiring fog machines, animatronic zombies, or a second mortgage.
This tutorial focuses on a beginner-friendly version using thin plywood, foam board, or sturdy cardboard. You can choose the material based on where you plan to display it. For indoor decor, foam board or cardboard works beautifully. For covered porch decor, thin plywood or sealed craft wood is the better choice. The finished piece is lightweight, reusable, budget-friendly, and easy to customize with paint, paper bats, vinyl bats, faux moss, ribbon, twine, mini skeleton hands, or whatever spooky treasure has been lurking in your craft drawer since 2019.
Why a Coffin Hanger With Bats Works So Well for Halloween Decor
Halloween decorations often fall into two camps: cute pumpkins smiling like they know your Wi-Fi password, or terrifying props that make delivery drivers sprint back to the truck. A coffin hanger sits comfortably in the middle. It is spooky but stylish, dramatic but not overwhelming, and easy to blend with farmhouse, gothic, vintage, minimalist, or classic orange-and-black Halloween decor.
The coffin shape gives the project instant Halloween personality. Bats add movement and visual drama, especially when you layer them in different sizes. A few wings bent slightly forward can create a 3D effect, making the bats look like they are escaping from the coffin. That little detail takes the project from “I cut out shapes” to “I may have accidentally opened a portal.”
This DIY Halloween coffin hanger is also practical. It stores flat, weighs very little, and can be hung with a wreath hanger, outdoor-rated removable hook, ribbon, jute twine, or picture-hanging hardware. You can make it elegant with matte black and antique gold, rustic with gray dry brushing, or playful with purple bats and orange lettering. The coffin is merely the stage. The bats are the unpaid actors delivering the drama.
Materials You Will Need
Before you begin, gather your supplies. Nothing ruins a creative mood faster than realizing your hot glue gun is missing, your scissors are mysteriously sticky, and your only paintbrush has fossilized in a jar from last Christmas.
Basic Supplies
- Thin plywood, foam board, chipboard, or heavy cardboard
- Pencil and ruler
- Craft knife, utility knife, jigsaw, or scissors, depending on material
- Fine-grit sandpaper if using wood
- Black acrylic paint or exterior-grade black paint
- Gray, white, brown, or silver paint for distressing
- Paintbrushes or foam brushes
- Black cardstock, craft foam, or adhesive vinyl for bats
- Hot glue, craft glue, or strong double-sided adhesive
- Ribbon, twine, chain, or a sawtooth hanger
- Optional: clear outdoor sealant, faux moss, mini spiders, stencils, metallic paint, LED fairy lights
Best Material Choices
If you are making this Halloween coffin door hanger for indoor use, foam board is the fastest option. It cuts easily, paints well, and weighs almost nothing. For a covered porch, craft plywood is more durable. Use exterior paint if the hanger may face humidity or seasonal weather. For a temporary Halloween party decoration, heavy cardboard works fine and costs nearly nothing. In other words, you can be spooky on any budget, from “craft-store haul” to “I found a box in the garage and now it has a destiny.”
Step 1: Draw the Coffin Shape
Start by deciding the size of your coffin hanger. A good door-friendly size is about 18 to 24 inches tall and 10 to 14 inches wide. For a mantel or wall display, you can go smaller. For a porch statement piece, go larger, but keep the final weight in mind when choosing your hanger.
To draw a simple coffin, sketch a long rectangle first. Then angle the top corners inward to form the classic coffin shoulders. The top should be narrower than the widest point near the upper third. The bottom tapers slightly, but not so much that it looks like a confused necktie. Use a ruler to keep both sides even. If symmetry makes you nervous, draw half the coffin on folded paper, cut it out, unfold it, and trace the full shape onto your material.
For a beginner-friendly template, try these rough proportions: make the top about 6 inches wide, the widest point about 12 inches wide, the bottom about 8 inches wide, and the height around 22 inches. These measurements are flexible. Halloween is forgiving. Coffins, like cookies, still count even when slightly lopsided.
Step 2: Cut Out the Coffin Base
Cut the coffin shape using the tool that matches your material. Use scissors or a craft knife for cardboard and foam board. Use a jigsaw or small hand saw for plywood. If cutting wood, clamp it securely, wear eye protection, and keep fingers away from the blade path. Sand the edges afterward so the coffin looks finished and does not attack your hands like a tiny haunted splinter machine.
If you want a layered look, cut a second smaller coffin shape and glue it on top of the base. This creates dimension and makes the hanger look more like a wooden sign. You can also glue narrow strips around the edge to mimic coffin trim. Craft sticks, paint stirrers, or thin wood lattice strips work well for this. The trim adds structure and gives the project a handmade gothic charm.
Step 3: Paint the Coffin
Paint the entire coffin black for a classic Halloween base. Matte black looks moody and modern, while satin black gives a slight sheen. If you want a rustic haunted-house finish, let the black paint dry and lightly brush gray or white paint along the edges. Use a nearly dry brush and drag it over the surface so the color catches only the raised areas and corners.
For an aged wood effect, dab brown and gray paint randomly along the edges, then blend with a dry brush. This makes the coffin look like it was discovered in a moonlit attic, which is much more exciting than “I made it while eating pretzels.” Metallic silver or antique gold can also be added around the trim for a Victorian Halloween look.
If the coffin will hang outdoors on a covered porch, use exterior-grade paint or apply an outdoor-rated clear coat after the paint cures. Keep the finish thin and even. Heavy layers can drip, bubble, or make lightweight materials warp. Let everything dry completely before moving to the next step. Yes, waiting for paint to dry is boring. Consider it a suspense-building scene.
Step 4: Create the Bats
Bats are the star of this DIY Halloween hanger. You can use black cardstock, craft foam, felt, or adhesive vinyl. Cardstock is crisp and inexpensive. Craft foam is durable and slightly dimensional. Felt gives a soft, cozy-goth texture. Vinyl works especially well if you want the bats to stick directly onto the coffin or door.
Draw or print a basic bat template with outstretched wings. Make several sizes: small bats around 2 inches wide, medium bats around 4 inches wide, and one or two larger bats around 6 inches wide. Cutting multiple sizes creates movement, as if the bats are flying out of the coffin rather than standing in line for a school photo.
Fold each paper or foam bat gently down the center, then bend the wings slightly forward. This easy trick gives the bats a 3D look. For extra personality, layer two bats together with a tiny dot of glue at the body only, leaving the wings free. When light hits the display, the shadows make the bats look more animated.
Step 5: Arrange the Bat Swarm
Before gluing anything, place the bats on the coffin and experiment with the layout. A natural-looking swarm usually starts with a cluster near one corner or near the coffin opening, then spreads outward in a loose curve. Avoid placing every bat evenly spaced. Nature does not decorate with a ruler, and neither do dramatic Halloween bats.
Try positioning the largest bat near the lower or center area, then add smaller bats moving upward. You can make them look like they are flying out of the coffin, circling around a painted message, or escaping from behind a ribbon bow. Turn some bats diagonally so the design feels alive. A few tilted wings can make the whole piece feel more dynamic.
Once you like the placement, attach the bats with hot glue, craft glue, foam adhesive dots, or double-sided tape. Use hot glue for wood or foam bats. Use removable adhesive if you want to adjust the design later. If the hanger will be outside, choose a stronger adhesive and test one bat first. Outdoor humidity has a rude way of reminding us that not all glue is emotionally committed.
Step 6: Add a Halloween Message
A coffin hanger with bats looks great on its own, but a short phrase can make it even more fun. Consider painting, stenciling, or applying vinyl letters with one of these Halloween sayings:
- Enter If You Dare
- Rest in Pieces
- Welcome, Foolish Mortals
- Happy Haunting
- Bat House
- Open After Midnight
- The Coffin Club
Keep the lettering bold and easy to read. White, silver, orange, or metallic gold lettering pops nicely against a black coffin. If your bat swarm is busy, place the message in the center and let the bats fly around it. If you prefer a cleaner design, skip the words and let the silhouette do the talking. Sometimes a coffin covered in bats does not need to explain itself.
Step 7: Add Texture and Finishing Details
This is where your Halloween coffin hanger becomes delightfully extra. Glue a little faux moss along one corner for a graveyard look. Add a tiny plastic spider near the top. Wrap thin twine around the coffin like old rope. Dab metallic paint on the edges to imitate worn hardware. Attach a small skeleton hand near the side, as if someone inside is politely asking to be included in the festivities.
For a more elegant version, add a black satin bow at the top and use only a few glossy bats. For a rustic version, distress the paint heavily and use jute twine as the hanger. For a kid-friendly version, paint the coffin purple or orange and add smiling bats. For a gothic version, use matte black, deep burgundy ribbon, silver lettering, and a few dramatic oversized bats.
If adding lights, use only battery-operated LED fairy lights. Avoid open flames near paper, foam, dried florals, ribbon, or faux webbing. Halloween decor should be spooky because it looks haunted, not because the porch is actively smoking.
Step 8: Attach the Hanger
Turn the coffin over and attach your hanging method. For lightweight foam board or cardboard, glue ribbon or twine to the back and reinforce it with a square of cardboard. For plywood, use a sawtooth hanger, D-rings, or a small picture-hanging bracket. If the piece will hang on a front door, a wreath hanger is the easiest option.
For removable hooks, check the weight limit on the package and choose an outdoor-rated hook if the hanger will be exposed to changing temperatures or humidity. A finished foam board coffin may weigh less than a pound, while a plywood version with trim and decorations may weigh several pounds. Always weigh or estimate the project before hanging it. Gravity is not festive, and it does not care how cute your bats are.
Where to Display Your Halloween Coffin Hanger
This DIY Halloween decoration is flexible enough to use almost anywhere. Hang it on your front door as a spooky alternative to a wreath. Place it above a mantel with pumpkins and black candlesticks. Add it to a Halloween gallery wall with framed vintage prints. Hang it on a porch wall near lanterns and mums. Use it as a party photo backdrop with paper bats spreading across the wall behind it.
For outdoor display, keep the hanger in a covered area if it is made from foam board, cardboard, or paper. Plywood holds up better, but even wood lasts longer when protected from rain. If you live somewhere windy, secure the bottom with removable adhesive, floral wire, or a small loop of clear fishing line. The goal is “eerie flutter,” not “coffin hanger takes flight and joins the neighbor’s inflatable dragon.”
Common Mistakes to Avoid
Making the Base Too Heavy
A Halloween coffin hanger should be easy to hang. Thick wood can look great, but it may require stronger hardware. Thin plywood, foam board, or lightweight craft wood usually works better for doors.
Skipping the Dry Time
Paint and glue need time to cure. If you attach bats too soon, they may slide around or peel off. Let each layer dry before adding the next.
Using Indoor Adhesive Outdoors
If your coffin hanger will go outside, choose outdoor-rated adhesive, hooks, paint, and sealant whenever possible. Indoor tape may fail in heat, cold, or humidity.
Overcrowding the Design
Bats are wonderful, but too many can hide the coffin shape. Leave some open space so the silhouette remains clear.
Ignoring Walkway Safety
Do not hang decorations where they block doors, steps, railings, or walkways. Trick-or-treaters are often excited, costumed, and carrying candy buckets the size of small bathtubs. Keep the path clear.
Budget-Friendly Variations
You can make this easy Halloween coffin hanger with bats for very little money. Use a shipping box for the base, black construction paper for bats, leftover ribbon for hanging, and craft paint from a previous project. For a thriftier wood version, look for scrap plywood, old signs, or damaged picture frames that can be repurposed.
Dollar stores often carry foam bats, plastic spiders, faux moss, ribbon, and mini Halloween accents. Craft stores usually have seasonal wood cutouts and adhesive vinyl. Home improvement stores are better for plywood, sandpaper, exterior paint, hooks, and hanging hardware. Mix and match based on your budget and how long you want the piece to last.
Experience: What I Learned Making a Halloween Coffin Hanger With Bats
The first time I made a Halloween coffin hanger with bats, I approached it with the confidence of someone who had watched three craft videos and therefore believed I had achieved mastery. This confidence lasted approximately seven minutes. My first coffin shape looked less like a coffin and more like a very anxious pencil. The top was too narrow, the bottom was crooked, and one side had what I can only describe as a mysterious hip. Luckily, Halloween is the one season where weird shapes can be rebranded as “haunted.”
The biggest lesson was to create a paper template first. Drawing directly onto wood or foam board seems faster, but a template gives you a chance to adjust the proportions before cutting. Once I folded a piece of paper in half, drew half the coffin, cut it out, and unfolded it, the shape looked much better. Symmetry is not required for Halloween, but it does prevent your coffin from looking like it lost an argument with a lawn mower.
Another useful discovery was that the bats matter more than expected. At first, I cut all the bats the same size and lined them up neatly. The result looked less like a spooky swarm and more like a bat attendance chart. Once I made three sizes and angled them in different directions, the whole design came alive. Folding the wings slightly made the biggest difference. It created shadows and gave the hanger movement, especially near a porch light.
Paint also changed the personality of the project. Plain black looked good, but adding dry-brushed gray along the edges made it look older and more dimensional. A tiny bit of silver on the corners gave the impression of worn metal trim. The trick is to use less paint than you think. When dry brushing, wipe most of the paint off the brush before touching the coffin. If the brush looks almost too dry to work, it is probably perfect.
I also learned not to underestimate the hanger. A foam board version can hang from ribbon with no problem, but a wood version needs real hardware. One year, I used a weak adhesive hook for a heavier plywood coffin. It stayed up just long enough for me to admire it, take one photo, and feel proud. Then it slid down the door with the slow, tragic dignity of a vampire fainting at sunrise. After that, I checked weight limits and used a proper wreath hanger.
The best part of this project is how easy it is to personalize. I have made one version with elegant black bats and gold lettering, another with goofy cartoon bats for kids, and a third with faux moss and a tiny spider that looked much too pleased with itself. Each version had the same basic coffin shape, but the mood changed completely with color, texture, and layout.
For families, this is a great group craft. Adults can cut the base, while kids paint, trace bats, or decide where the swarm should fly. For a party, you can make mini coffin hangers as craft stations. For a front porch, pair the finished hanger with pumpkins, lanterns, mums, and a few extra paper bats on the wall or door. The result feels coordinated without looking like you hired a professional Halloween stylist named Vlad.
My favorite version used matte black paint, gray dry brushing, black foam bats, and a burgundy ribbon. It looked dramatic but not messy, spooky but still polished. More importantly, it survived the season and stored easily in a closet. When I pulled it out the next year, only one bat needed re-gluing. Considering the emotional journey of most holiday decorations, that felt like a victory.
If you are new to Halloween DIY projects, start simple. Make the coffin shape, paint it black, add five to seven bats, and hang it. You can always add more details later. The goal is not perfection. The goal is a decoration that makes you smile when you walk past it and maybe makes your guests say, “Wait, did you make that?” At which point you can casually say yes, as if you did not spend twenty minutes deciding whether one bat looked too judgmental.
Conclusion
Making an easy Halloween coffin hanger with bats is one of those rare DIY projects that looks impressive without demanding expert skills, expensive tools, or a haunted mansion inheritance. With a simple coffin base, a few painted details, and a swarm of handmade bats, you can create a spooky decoration for your front door, porch, mantel, or Halloween party wall.
The key is to keep the base lightweight, use varied bat sizes, bend the wings for dimension, and choose materials that match your display location. Indoors, paper and foam board are perfect. Outdoors, especially on a covered porch, sealed wood and stronger hanging hardware are smarter choices. Add ribbon, moss, lettering, LED lights, or metallic accents to match your Halloween style.
Whether your home decor leans creepy, cute, rustic, gothic, or “I bought pumpkins and now I am unstoppable,” this coffin hanger is easy to adapt. Best of all, it stores flat and can be reused year after year. That means your bats can return every October, ready to flap dramatically across your door like tiny seasonal employees who really understand the assignment.