Somewhere in a garage, attic, thrift store corner, or Facebook Marketplace listing, there is an old shutter waiting for a second career. It used to guard a window. Now it can guard your necklaces from becoming one giant metallic spaghetti monster. Turning an old shutter into a jewelry holder is one of those wonderfully practical DIY projects that looks charming, costs very little, and solves a problem almost every jewelry lover knows too well: tangled chains, missing earrings, and bracelets hiding like tiny fugitives in drawers.
A shutter already has the perfect bones for jewelry organization. The slats can hold earrings, the frame can support hooks, and the rustic texture adds instant character to a bedroom, closet, vanity wall, or dressing nook. Better yet, this project does not require advanced woodworking skills. If you can clean, sand lightly, drill a pilot hole, and twist in a hook, congratulationsyou are officially qualified.
This guide explains how to make a DIY shutter jewelry holder from start to finish, including how to choose the right shutter, prep it safely, add hooks and knobs, mount it securely, and style it so it looks intentional rather than “I found this in the shed and panicked.”
Why an Old Shutter Makes a Brilliant Jewelry Holder
A repurposed shutter jewelry holder works because it combines storage and display. Traditional jewelry boxes are useful, but they can also turn delicate pieces into a tiny treasure cave where necklaces knot together and earrings mysteriously divorce each other. A wall-mounted jewelry organizer keeps everything visible, accessible, and separated.
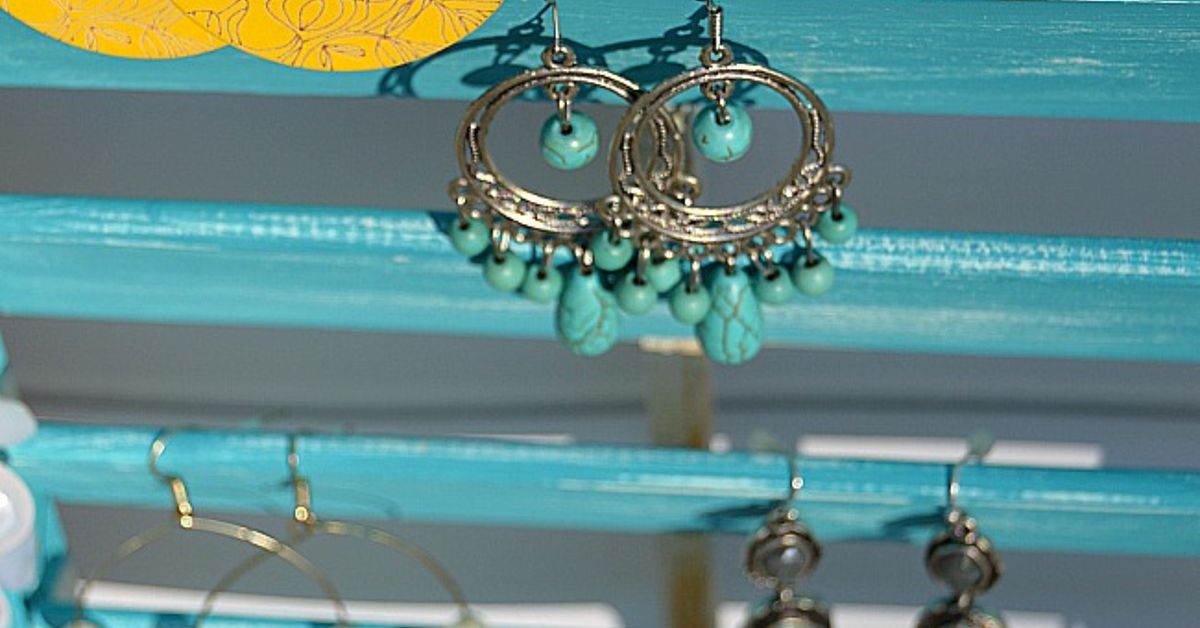
The slatted design is especially helpful. Hook earrings can hang directly from the louvers. Necklaces can be arranged on cup hooks or decorative knobs. Bracelets can rest on pegs. Rings can sit in a small attached dish or mini shelf. The shutter becomes a vertical storage station, saving drawer and counter space while adding vintage charm.
It also fits many decor styles. A white shutter feels coastal or cottage-inspired. A distressed wood shutter leans farmhouse. Matte black looks modern. Sage green or dusty blue gives the piece a soft, antique-store personality. In other words, the shutter is not picky. It will happily wear almost any design outfit you give it.
What You Need for This DIY Shutter Jewelry Holder
You can customize the supply list depending on your style, but these basics will cover most versions of the project.
Materials
- One old wooden shutter, interior shutter, or small louvered door
- Mild cleaner or degreasing soap
- Microfiber cloths or rags
- Fine-grit sandpaper or sanding sponge
- Primer, paint, stain, or clear sealer
- Cup hooks, S-hooks, screw hooks, or decorative knobs
- Small paper clips or wire clips for earrings, optional
- Picture-hanging hardware, D-rings, sawtooth hangers, or keyhole hangers
- Wall screws and drywall anchors, if not mounting into studs
- Optional small shelf, ring dish, or narrow wood ledge
Tools
- Drill and small drill bits
- Screwdriver
- Measuring tape
- Pencil
- Level
- Stud finder
- Paintbrush or small foam roller
- Protective gloves and mask if sanding
For a budget version, use bent paper clips or small S-hooks instead of buying dozens of jewelry hooks. For a more polished version, mix brass cup hooks with ceramic knobs or glass drawer pulls. This is the part where your jewelry holder becomes less “hardware aisle” and more “boutique display that happens to know where your hoops are.”
Step 1: Choose the Right Shutter
The best shutter for a jewelry holder is sturdy, relatively lightweight, and not too warped. Wooden shutters are usually easiest to paint, drill, and customize. Vinyl shutters can work, but they may not hold screw hooks as securely unless you reinforce them. Interior shutters, small cabinet shutters, and narrow louvered doors are excellent choices.
Before bringing home a vintage shutter, check for loose slats, cracks, odor, soft spots, water damage, and peeling paint. A little chippy paint can look beautiful, but flaking paint may need special handling. If the shutter is very old or you suspect it may have lead-based paint, do not aggressively sand it indoors. Use a lead test kit or consult a professional before disturbing the surface. Safety is not the glamorous part of DIY, but neither is breathing mystery dust from 1952.
Step 2: Clean It Thoroughly
Old shutters collect dust, spiderwebs, pollen, garage grime, and possibly the emotional residue of every house project ever abandoned. Start by wiping the shutter with a dry cloth or soft brush. Then clean it with mild soap and water or a gentle degreasing cleaner. Use a toothbrush or small detail brush to get between the slats.
Avoid soaking the wood. Too much water can swell old wood or loosen glue joints. Wipe the shutter dry and let it air out completely before painting or adding hardware. If the shutter smells musty, leave it in a dry, ventilated area for a day. A coat of primer can also help seal mild odors once the surface is clean and dry.
Step 3: Lightly Sand and Prep the Surface
If the finish is glossy, a light scuff sanding helps primer or paint adhere. Use fine-grit sandpaper and gentle pressure. The goal is not to erase the shutter’s personality; it is to give the new finish something to grip. Think of it as exfoliation, not demolition.
After sanding, wipe away dust with a tack cloth or damp microfiber cloth. Pay attention to corners, slat edges, and old hinge areas. If you want a rustic look, leave small dents and imperfections visible. If you want a cleaner modern look, fill holes with wood filler, sand smooth, and prime before painting.
Step 4: Paint, Stain, or Seal the Shutter
This is where the project starts to look like home decor instead of salvage yard treasure. Choose a finish based on your room style and jewelry collection.
Painted Finish
White, cream, black, navy, sage, blush, and soft gray are popular choices for a shutter jewelry organizer. Apply primer first if the shutter is raw wood, stained, glossy, or uneven in color. Then add two thin coats of paint. Thin coats dry smoother and prevent drips from collecting along the louvers.
Distressed Finish
For farmhouse or vintage decor, paint the shutter, let it dry, and lightly sand edges where natural wear would happen. Focus on corners, raised trim, and slat edges. The trick is restraint. If every inch is distressed, it may look less “antique charm” and more “survived a raccoon incident.”
Natural Wood Finish
If the shutter has beautiful grain, skip paint and use stain or clear sealer. A clear matte or satin finish protects the wood while keeping the aged look. Natural wood pairs especially well with brass hooks, black hooks, leather cord, and simple gold jewelry.
Step 5: Plan the Jewelry Layout Before Drilling
Before adding hooks, lay the shutter flat and arrange your jewelry on top. This helps you decide where everything should go. Long necklaces need more vertical space. Chunky bracelets need wider hooks. Stud earrings need a small tray, mesh insert, cork strip, or added mini shelf. Dangle earrings can hang from slats without much extra hardware.
Divide the shutter into zones:
- Top section: Long necklaces and statement pieces
- Middle slats: Earrings and lightweight chains
- Lower section: Bracelets, watches, or shorter necklaces
- Side frame: Extra hooks for rings, hair accessories, or keys
Spacing matters. Place hooks far enough apart so necklaces do not overlap too much. If you own many delicate chains, give them breathing room. Jewelry may be small, but it has a dramatic talent for tangling when crowded.
Step 6: Add Hooks, Knobs, and Earring Holders
Cup hooks are the easiest option for necklaces. Mark the hook locations with a pencil, drill small pilot holes, and twist the hooks into place. Pilot holes help prevent the wood from splitting and make installation easier. If the shutter frame is thin, choose shorter screw hooks so the tips do not poke through the back.
Decorative knobs create a boutique-style display and work well for heavier necklaces or bracelets. Drill holes through the frame or a horizontal rail, insert the knob screws, and tighten them from the back. If the screws are too long, use washers as spacers or cut the screws with the proper tool.
For earrings, the shutter slats are the star of the show. Hook earrings can hang directly over the louvers. For stud earrings, attach a strip of cork, wire mesh, or decorative fabric stretched over a small frame. You can also add a tiny shelf or small dish at the bottom for rings and backs. Nobody wants to crawl on the floor searching for one earring back while already late for dinner.
Step 7: Add a Small Shelf for Rings and Extras
A narrow shelf is optional, but it makes the jewelry holder more versatile. Cut a small piece of wood the width of the shutter, sand it smooth, and attach it with small brackets or wood screws. Place it near the bottom so it can hold rings, perfume samples, sunglasses, brooches, or a small bowl for everyday pieces.
If you want a no-cut version, attach a small premade spice rack, ledge shelf, or decorative tray. Just keep the weight reasonable and make sure the shelf is fastened securely. A shutter jewelry holder should display your accessories, not perform a dramatic shelf collapse at 2 a.m.
Step 8: Mount the Shutter Securely
Mounting is the step that separates a successful DIY project from wall art with trust issues. A shutter loaded with jewelry can become heavier than expected, especially if you add knobs, a shelf, or chunky necklaces. Whenever possible, screw the hanging hardware into wall studs. Use a stud finder, mark the studs, and choose screws long enough to bite securely into the framing.
If studs are not in the right spot, use drywall anchors rated for more than the expected weight. Do not rely on tiny nails or weak adhesive hooks for a loaded wooden shutter. Adhesive strips may be fine for lightweight decor, but jewelry holders get handled often. You will be lifting necklaces, replacing bracelets, and occasionally tugging on a chain that has developed a personal grudge against a hook.
Attach D-rings or a sturdy hanging rail to the back of the shutter. Use a level before making holes in the wall. If the shutter is tall, consider two mounting points instead of one. This keeps it from swinging every time you remove earrings.
Step 9: Organize Your Jewelry Like a Tiny Boutique
Once the shutter is mounted, organize jewelry by type, length, color, or how often you wear it. Put daily favorites at eye level. Hang longer necklaces on the bottom or outer edges. Keep delicate chains separate. Group earrings by metal tone or style. Place special-occasion pieces higher up if you do not reach for them often.
The best wall-mounted jewelry organizer is not just pretty; it should make your morning routine easier. If you can see your accessories, you are more likely to wear them. That necklace you forgot about in a drawer may suddenly become the hero of a plain T-shirt. That pair of earrings hiding since last summer may finally rejoin society.
Design Ideas for Different Styles
Farmhouse Shutter Jewelry Holder
Use a white or cream distressed shutter, bronze hooks, and a small reclaimed wood shelf. Add a tiny ceramic bowl for rings. This style looks great in bedrooms with linen bedding, woven baskets, and warm wood accents.
Coastal Jewelry Organizer
Paint the shutter soft blue, sea-glass green, or bright white. Use brushed nickel hooks and add a rope hanger if the piece is lightweight. Pair it with pearl earrings, shell accessories, and airy decor.
Modern Vintage Display
Paint the shutter matte black or charcoal and use brass hooks. Keep the layout symmetrical and simple. This version makes gold jewelry pop and looks polished above a vanity.
Boho Jewelry Holder
Leave the wood natural, add mismatched knobs, and tie small strips of fabric or leather cord along the lower rail. Use it for layered necklaces, beaded bracelets, and colorful earrings.
Common Mistakes to Avoid
The first mistake is skipping the cleaning step. Paint does not love dust, grease, or mystery attic film. The second is overcrowding the hooks. Jewelry needs space, especially necklaces. The third is mounting the shutter with hardware that is too weak. Remember, the piece may feel light before you add thirty necklaces and the bracelet collection you swore was “just a few.”
Another common issue is using hooks that are too large for the slats or too long for the frame. Always check the shutter thickness before buying hardware. If the screw points poke through the back, they can scratch the wall or prevent the shutter from sitting flat. Use shorter hooks, add a backing board, or place hooks only in thicker frame sections.
How to Maintain Your Shutter Jewelry Holder
Dust the shutter regularly with a soft cloth or small brush. Jewelry displays are beautiful, but they do collect dust faster than closed boxes. Remove all jewelry once in a while and wipe the slats. Check hooks and knobs every few months to make sure they remain tight. If the finish gets scratched, touch it up with leftover paint or embrace the extra patina. Vintage decor is very forgiving that way.
Keep valuable fine jewelry in a secure box if needed, especially pieces with high sentimental or financial value. A shutter holder is best for everyday jewelry, costume jewelry, statement necklaces, earrings, bracelets, and accessories you want to see and use often.
Experience Notes: What This Project Teaches You
One of the best things about turning an old shutter into a jewelry holder is that the project feels friendly from the beginning. It does not demand a garage full of tools, a professional workshop, or the emotional strength required to assemble flat-pack furniture with missing screws. It asks for patience, a little creativity, and the willingness to see potential in something old.
The first practical lesson is that preparation matters more than people expect. A shutter may look ready for paint, but once you start wiping it down, you often discover dust packed between the slats, old cobwebs in the corners, or a finish that feels slick. Cleaning and light sanding may not be the most exciting part, but they make the finished piece look cleaner and last longer. Skipping prep is tempting, but it usually shows later when paint chips or hooks loosen.
The second lesson is that layout changes everything. When you place hooks randomly, the holder may still function, but it can look cluttered. When you plan zones for necklaces, earrings, bracelets, and rings, the shutter becomes easier to use. It feels less like storage and more like a personal accessory wall. This is where people often realize they own twelve necklaces in almost the same style, which is not a flawit is a theme.
The third lesson is that small hardware choices create the personality of the project. Plain white hooks make the shutter clean and simple. Brass hooks feel warm and classic. Mismatched knobs make it playful and vintage. Crystal knobs add sparkle. Black hooks add contrast. You can make the same shutter look farmhouse, coastal, modern, romantic, or bohemian just by changing the finish and hardware.
Another useful experience is learning to mount things properly. Many DIY decorators start by underestimating weight. A single necklace is light. A whole collection of necklaces, bracelets, hooks, knobs, and a wooden shutter is not quite as innocent. Taking time to find studs or choose strong anchors gives peace of mind. It also prevents the deeply unpleasant sound of a project falling off the wall in the middle of the night like a haunted home improvement lesson.
Finally, this project teaches the joy of visible organization. A jewelry box hides everything. A shutter display turns accessories into decor. You start wearing pieces you forgot you owned because they are right there, smiling at you from the wall. It makes getting dressed quicker, adds charm to the room, and gives an old object a useful second life. That is the real magic of upcycling: not just saving money, but creating something that feels personal, practical, and a little bit clever.
Conclusion
Learning how to turn an old shutter into a jewelry holder is a simple, satisfying way to combine storage, style, and sustainability. With basic supplies, careful prep, secure mounting, and a thoughtful layout, an unused shutter can become a beautiful DIY jewelry organizer for necklaces, earrings, bracelets, rings, and everyday accessories. Whether you prefer rustic farmhouse charm, coastal softness, modern contrast, or colorful boho energy, this project is easy to customize and genuinely useful.
The result is more than a place to hang jewelry. It is a functional piece of wall decor, a clutter solution, and a reminder that old things often have another chapter left in them. Especially shutters. They may retire from window duty, but they can absolutely handle necklace management.