Learning how to knit on circular needles can feel a bit like meeting a friendly octopus: two needle tips, one cable, and somehow your yarn is supposed to become a hat. The good news? Circular knitting needles are far less mysterious than they look. In fact, once you understand how they work, they may become the most useful tool in your knitting bag.
Circular needles can be used for two big jobs: knitting flat pieces, such as scarves and blankets, and knitting in the round, such as hats, cowls, sleeves, socks, and seamless sweaters. That means one tool can do the work of many, which is excellent news for beginners who would rather buy yarn than collect a museum of needles.
This guide explains how to use circular knitting needles step by step, how to choose the right size and cable length, how to join in the round without twisting your stitches, and how to fix common beginner problems. Grab yarn, needles, and a stitch marker. Your future cozy project is waiting.
What Are Circular Knitting Needles?
Circular knitting needles are two short needle tips connected by a flexible cable. The tips do the knitting, while the cable holds the stitches. Instead of balancing a long straight needle under each arm like you are preparing for a tiny jousting tournament, your work rests comfortably on the cable.
Beginners often think circular needles are only for round projects. Not true. You can knit flat on circular needles by working across the row, turning your work, and knitting back the other way. You can also join the stitches into a circle and knit continuously in the round. This is how seamless tubes are made.
Why Beginners Should Try Circular Needles
Circular needles may look advanced, but they are surprisingly beginner-friendly. They keep the weight of your project closer to your lap, which is helpful for blankets, shawls, and sweaters. They are also easier to carry around because the connected cable keeps the needles together. One less needle lost in the couch is a victory for civilization.
They also open the door to seamless knitting. When you knit a hat or cowl in the round, you do not need to sew a side seam later. You simply keep knitting around and around until your project grows into shape. For stockinette stitch, this is especially nice because you knit every round instead of alternating knit rows and purl rows.
Choosing the Right Circular Needles
Needle Size
The needle size controls stitch size and fabric feel. For beginners, a medium or bulky yarn paired with a medium-to-large needle is easiest to see and handle. A US size 8 to 11 needle is often comfortable for practice, depending on your yarn label. Always check the yarn label or pattern recommendation before starting a real project.
Cable Length
Cable length matters more than beginners expect. If you are knitting in the round, the circular needle should usually be the same size as, or slightly shorter than, the circumference of your project. For example, a 16-inch circular needle is commonly used for many adult hats. A 24-inch or 32-inch needle is better for larger cowls, shawls, or sweater bodies.
If your cable is too long for the project, the stitches will stretch awkwardly and refuse to behave. If the cable is too short, the stitches will crowd together like shoppers on Black Friday. For tiny projects such as socks, sleeves, or baby hats, beginners can use the magic loop method with a long circular needle, or switch to double-pointed needles later.
Needle Material
Circular needles come in wood, bamboo, metal, and plastic. Bamboo and wood have more grip, which helps beginners keep stitches from sliding away. Metal needles are faster and smoother, but they can feel slippery when you are still learning. If your stitches keep escaping, try bamboo or wood before blaming your hands.
Supplies You Need Before You Start
- Circular knitting needles in the size required by your yarn or pattern
- Medium or bulky yarn in a light color so you can see the stitches
- A stitch marker to mark the beginning of the round
- Scissors
- A tapestry needle for weaving in ends
- A simple beginner pattern, such as a cowl or basic hat
For practice, choose smooth yarn. Fuzzy, dark, or novelty yarn may look exciting in the skein, but it can hide stitches like a magician hiding coins. Beginners deserve yarn that cooperates.
How to Knit Flat on Circular Needles
Before joining in the round, it helps to understand that circular needles can work just like straight needles. This is the easiest way to get comfortable with them.
- Cast on stitches using your preferred cast-on method.
- Slide the stitches onto the cable and needle tip so they are not crowded.
- Hold the needle with stitches in your left hand and the empty tip in your right hand.
- Knit across the row exactly as you would on straight needles.
- Turn your work when you reach the end of the row.
- Continue knitting back and forth until your piece is the desired length.
That is it. No secret handshake. No circular-needle initiation ceremony. You are simply using connected needles instead of separate ones.
How to Knit in the Round on Circular Needles
Now for the main event: knitting in the round. This method creates a seamless tube, which is perfect for cowls, hats, sleeves, and many sweater patterns.
Step 1: Cast On the Required Number of Stitches
Cast on the number of stitches your pattern requires. For practice, try casting on enough stitches to comfortably fit around the cable. If you are using a 16-inch circular needle, 60 to 80 stitches in worsted-weight yarn may be easier to manage than a tiny number of stitches.
Step 2: Spread the Stitches Around the Cable
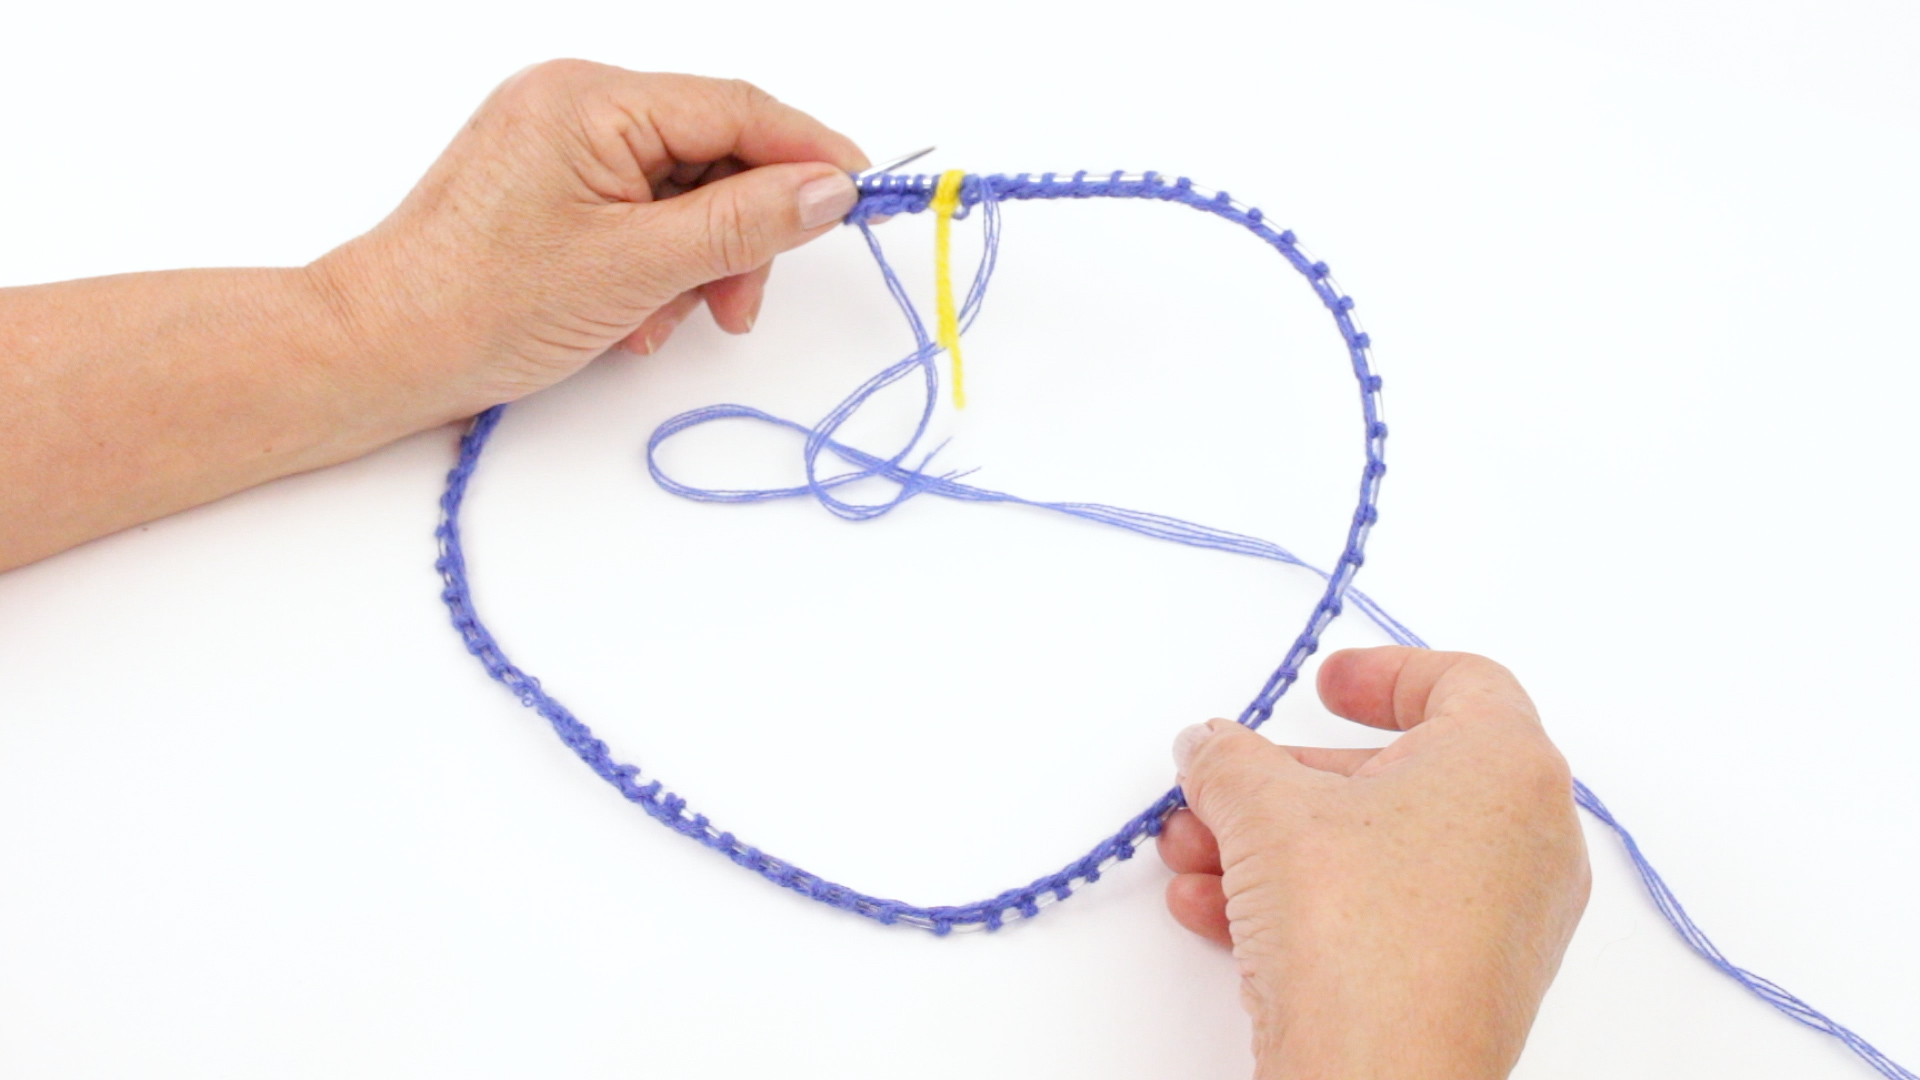
Move the stitches around the circular needle so they sit evenly along the cable. Make sure the cast-on edge is facing the same direction all the way around. The bottom bumps of the cast-on row should point inward or downward consistently.
Step 3: Check for Twists
This is the most important beginner step. Before joining, lay the circular needle on a table or hold it carefully in your hands. Check that no stitches twist around the cable. If you join twisted stitches, your project will form a permanent spiral. It may be artistic, but it will not be the hat you planned.
Step 4: Place a Stitch Marker
Place a stitch marker on the right needle tip before the first stitch of the round. This marker tells you where each round begins and ends. Without it, you may knit for a while and wonder whether time still exists.
Step 5: Join in the Round
Hold the needle with the working yarn in your right hand and the first cast-on stitch in your left hand. Insert the right needle into the first stitch on the left needle and knit it. Pull the working yarn gently snug after the first stitch to reduce the gap at the join.
Do not yank the yarn like you are starting a lawn mower. A gentle snug pull is enough. Too much tension can make the next round difficult.
Step 6: Keep Knitting Around
Continue knitting each stitch around the circle. When you reach the marker, slip it from the left needle to the right needle and begin the next round. Congratulations: you are officially knitting in the round.
Beginner Practice Project: Simple Circular Cowl
A cowl is one of the best first projects for circular needles because it is basically a cozy tube. No crown shaping, no sleeves, no complicated math pretending to be a pattern.
Materials
- One skein of bulky yarn
- 24-inch circular needles in the size recommended on the yarn label
- One stitch marker
- Tapestry needle
Easy Pattern
- Cast on enough stitches to fit comfortably around your 24-inch circular needle.
- Check carefully that the stitches are not twisted.
- Place a stitch marker and join in the round.
- Knit every round for a smooth stockinette-style tube.
- Continue until the cowl is the height you like.
- Bind off loosely.
- Weave in the yarn tails.
If the top edge rolls, do not panic. Stockinette stitch naturally curls. For a flatter edge, work a few rounds of ribbing at the beginning and end, such as knit 2, purl 2. Ribbing is like giving your project good posture.
Common Mistakes When Knitting on Circular Needles
Mistake 1: Twisted Stitches
A twisted join is the classic beginner mistake. The fix is prevention: check the cast-on edge before joining. Once you have worked several rounds, a twist cannot be repaired without ripping back. Annoying? Yes. Fatal? Only to your patience.
Mistake 2: A Gap at the Join
A small gap can appear where the first and last stitches meet. Pull the first few stitches gently snug, and make sure your cast-on is not too loose. You can also use the yarn tail later to tidy the join when weaving in ends.
Mistake 3: Cable Too Long
If your stitches cannot reach comfortably around the needle, your cable may be too long. Use a shorter circular needle, choose a larger project, or learn magic loop for small circumferences.
Mistake 4: Tight Tension
Many beginners grip the yarn tightly when learning circular needles. Tight stitches are harder to move from cable to needle tip. Relax your hands, take breaks, and let the stitches sit on the widest part of the needle before forming the next stitch.
Mistake 5: Losing the Beginning of the Round
Use a stitch marker every time. A marker is cheaper than confusion and more reliable than memory, especially when you are knitting while watching television.
What Is Magic Loop?
Magic loop is a technique for knitting small tubes with one long circular needle, often 32 inches or longer. Instead of needing the cable to match the project circumference, you divide the stitches into two sections and pull loops of cable out between them.
Magic loop is useful for socks, sleeves, mittens, and the top of hats when the stitch count gets smaller. Beginners do not need to learn it on day one, but it is worth knowing that it exists. Think of it as level two in the circular needle video game.
How to Read Circular Knitting Instructions
Patterns for circular knitting often use the word “round” instead of “row.” A round means you work all the way around the project and return to the stitch marker. If a pattern says “knit 10 rounds,” you knit around the circle ten times.
Another helpful abbreviation is “pm,” which means place marker. “SM” means slip marker. “K” means knit, and “P” means purl. Once you learn these basics, circular knitting patterns become much less intimidating.
Best Beginner Projects for Circular Needles
Start with projects that have simple shapes and minimal shaping. Good beginner-friendly choices include:
- A basic cowl
- A simple beanie
- A tube-style headband
- A flat scarf knitted on circular needles
- A baby blanket worked flat
- A beginner shawl
Avoid very small socks, lace charts, or complicated sweater shaping for your first circular project. There is no prize for choosing chaos early.
Helpful Tips for Better Circular Knitting
Use Light-Colored Yarn
Light yarn makes it easier to see stitches, mistakes, and twisted joins. Dark yarn is beautiful, but it can make beginners feel like they are knitting inside a cave.
Keep Your Stitches Near the Tips
Before knitting, slide stitches from the cable onto the left needle tip. If you try to knit directly from the cable, the size difference can create uneven tension.
Do Not Overfill the Needle
Too many stitches on a short circular needle can feel crowded. Too few stitches on a long cable can feel stretched. Match the cable length to the project whenever possible.
Count Your Rounds
Use a row counter, notebook, app, or tally marks. Counting rounds by memory is brave, but knitting has a way of humbling brave people.
Experience Notes: What Beginners Usually Learn the Hard Way
The first real experience most beginners have with circular needles is surprise. The needles look strange, but after a few rounds, the rhythm starts to make sense. At first, the cable may twist, the stitches may bunch up, and the join may look suspiciously messy. This is normal. Circular knitting has a short awkward phase, much like bangs after a home haircut.
One helpful lesson is to practice with a cowl before trying a hat. Hats are beginner-friendly, but they eventually require decreases at the crown, and that smaller circumference can force you to switch techniques. A cowl lets you stay on the same circular needle from beginning to end. You can focus on joining, knitting rounds, managing tension, and binding off without suddenly negotiating with a shrinking circle.
Another experience beginners often notice is that circular needles change how the project feels in your hands. Straight needles place the full weight of the fabric on the needles. Circular needles let the cable hold much of that weight in your lap. This can feel more relaxed, especially for larger projects. Many knitters eventually use circular needles even for flat knitting because they are portable and comfortable.
Tension is the next big lesson. New circular knitters often tighten the first stitch after the marker too much because they are trying to avoid a gap. A better approach is to knit the first two or three stitches with steady, normal tension, then gently snug the working yarn. The goal is neat, not strangled. Yarn likes encouragement, not panic.
Stitch markers also become surprisingly important. At the start, you may think, “I will remember where the round begins.” This confidence usually lasts until round three. A simple marker saves time and prevents accidental spiral knitting. If you do not have a marker, use a small loop of contrasting yarn. It may not look fancy, but it does the job.
Finally, beginners should remember that mistakes are part of the process. A twisted join teaches you to check before knitting. A tight round teaches you to relax your grip. A dropped stitch teaches you that a crochet hook is secretly a rescue tool. Every imperfect project builds skill. Circular needles may feel unusual at first, but with one simple cowl or hat, they quickly become familiar, practical, and oddly satisfying.
Conclusion
Learning how to knit on circular needles is one of the best upgrades a beginner knitter can make. With one flexible tool, you can knit flat scarves, cozy cowls, seamless hats, sweater bodies, sleeves, and more. Start with smooth yarn, a comfortable needle size, and a simple project. Check that your stitches are not twisted before joining, use a stitch marker, and keep your tension relaxed.
The first few rounds may feel clumsy, but do not let that fool you. Circular knitting becomes easier quickly, and soon the cable that once looked confusing will feel like a clever little helper. Begin with a cowl, practice steady stitches, and enjoy the moment when your knitting turns into an actual tube. It is a small miracle, but with better accessories.