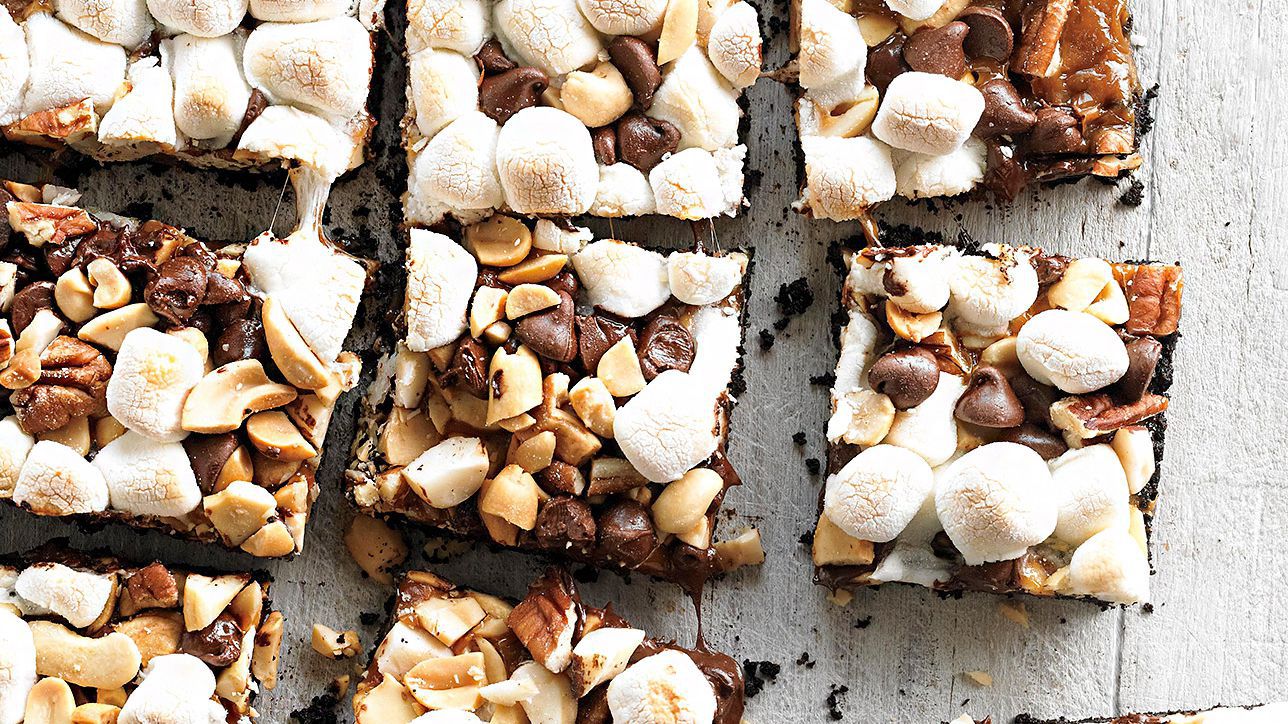
Some desserts whisper. Some desserts politely raise their hand. And then there are Chocolaty Caramel-Nut S’more Bars, which kick open the kitchen door wearing a marshmallow crown and shouting, “Who needs a campfire?” This recipe takes the classic American s’moregraham crackers, chocolate, and gooey marshmallowsand gives it a bakery-style upgrade with buttery caramel, toasted nuts, and a sliceable bar format that travels better than a sticky marshmallow on a twig.
These chocolate caramel s’mores bars are made for potlucks, summer parties, holiday trays, bake sales, movie nights, and those mysterious 9:47 p.m. dessert emergencies. The base is crisp and buttery, the middle is rich and melty, and the top brings toasted marshmallow drama without requiring anyone to stand around a fire arguing about whether “golden brown” or “accidentally charcoal” is the correct marshmallow style.
Why This Chocolaty Caramel-Nut S’more Bars Recipe Works
A good s’mores bar needs balance. Too much crust and it tastes like a snack cracker wearing a tuxedo. Too much marshmallow and it becomes a sticky weather event. Too much chocolateactually, let’s not pretend that is a real problembut even chocolate needs structure. This recipe works because each layer has a job.
The Graham Cracker Base Adds Crunch
The graham cracker crust gives the bars that familiar campfire-dessert flavor. Mixing graham cracker crumbs with melted butter and a little brown sugar creates a firm, cookie-like foundation that can hold caramel, chocolate, nuts, and marshmallows without collapsing into delicious chaos.
The Caramel Makes the Bars Gooey and Rich
Caramel is the secret handshake in this recipe. It adds buttery sweetness and a soft chew that makes every bite taste more indulgent. Salted caramel is especially good because it keeps the bars from becoming too sugary. Think of the salt as the tiny referee keeping the dessert from sprinting directly into candy-land.
The Nuts Bring Texture and Toasty Flavor
Pecans, walnuts, almonds, or peanuts all work here. Toasting the nuts first deepens their flavor and adds crunch. For the best result, choose one nut rather than tossing in the entire pantry. Pecans bring buttery warmth, walnuts add a slightly earthy note, almonds create a firmer crunch, and peanuts give the bars a candy-bar personality.
Ingredients for Chocolaty Caramel-Nut S’more Bars
For the Graham Cracker Crust
- 2 cups graham cracker crumbs
- 1/2 cup unsalted butter, melted
- 1/4 cup packed light brown sugar
- 1/4 teaspoon fine salt
For the Filling and Topping
- 1 1/2 cups semi-sweet chocolate chips or chopped milk chocolate
- 3/4 cup caramel sauce or soft caramel candies melted with 2 tablespoons heavy cream
- 3/4 cup chopped toasted pecans, walnuts, almonds, or peanuts
- 2 1/2 cups mini marshmallows
- 1/3 cup extra chocolate chips for topping
- Flaky sea salt, optional but highly recommended
Step-by-Step Instructions
Step 1: Prepare the Pan
Preheat the oven to 350°F. Line an 8-by-8-inch baking pan with parchment paper, leaving a little overhang on two sides. This overhang acts like dessert seat belts, helping you lift the bars out cleanly once they cool. Lightly grease the parchment to prevent any caramel-related negotiations later.
Step 2: Make the Graham Cracker Crust
In a medium bowl, combine the graham cracker crumbs, melted butter, brown sugar, and salt. Stir until the crumbs look evenly moistened, like damp sand at the beach but much more useful. Press the mixture firmly into the bottom of the prepared pan. Use the bottom of a measuring cup to pack it down evenly.
Bake the crust for 8 to 10 minutes, or until it smells lightly toasted. Do not skip this step. Pre-baking helps the crust stay crisp under all that caramel and chocolate. A soggy crust is still edible, but emotionally, we can do better.
Step 3: Add Chocolate and Caramel
Remove the crust from the oven and immediately sprinkle the chocolate chips over the warm base. Let them sit for 2 minutes, then gently spread the softened chocolate into an even layer. Pour the caramel over the chocolate and spread it carefully. If your caramel is thick, warm it slightly so it flows easily.
Step 4: Add the Nuts
Sprinkle the chopped toasted nuts evenly over the caramel layer. Press them down lightly so they settle into the caramel instead of rolling around like tiny edible marbles. This step adds crunch and helps every square taste complete.
Step 5: Add Marshmallows and Extra Chocolate
Scatter mini marshmallows over the nuts, then sprinkle the remaining chocolate chips on top. The marshmallows will puff, toast, and melt into the caramel-chocolate layer. The extra chocolate gives the surface a pretty, bakery-style finish.
Step 6: Bake Until Gooey and Golden
Return the pan to the oven and bake for 10 to 12 minutes, or until the marshmallows are puffed and lightly golden. For a deeper toasted look, place the pan under the broiler for 30 to 60 seconds, watching closely. Marshmallows go from golden to “campfire crime scene” very quickly, so do not walk away.
Step 7: Cool Before Slicing
Let the bars cool in the pan for at least 1 hour. For cleaner cuts, chill them for 20 to 30 minutes after cooling. Lift the bars out using the parchment paper and slice with a sharp knife. Wipe the knife between cuts if you want neat squares. Ignore this advice if you prefer rustic dessert geometry.
Recipe Tips for the Best S’more Bars
Use Good Chocolate
Milk chocolate gives these bars the most traditional s’mores flavor, while semi-sweet chocolate creates a richer, less sugary bite. Dark chocolate works beautifully if you want a more grown-up dessert. A mix of milk and semi-sweet chocolate is the sweet spot for most families.
Toast the Nuts First
Toasting nuts is a small step with a big payoff. Spread them on a baking sheet and toast at 350°F for 5 to 7 minutes, stirring once. When they smell warm and nutty, they are ready. Do not wait until they smell burned; that is your oven writing a resignation letter.
Choose Thick Caramel
Thin ice cream syrup can make the bars too soft. A thicker caramel sauce, dulce de leche, or melted soft caramels gives better structure. If using wrapped caramel candies, melt them gently with a splash of cream until smooth.
Let the Bars Cool Fully
Warm s’mores bars taste amazing, but they are difficult to slice. If presentation matters, cool them completely. If presentation does not matter, grab a spoon and call it “deconstructed.” Very trendy. Very convenient.
Flavor Variations
Salted Caramel Pecan S’more Bars
Use toasted pecans and finish the bars with flaky sea salt. This version tastes like a Southern candy shop met a campfire and they decided to open a bakery together.
Peanut Chocolate Caramel S’mores Bars
Use roasted peanuts and milk chocolate for a candy-bar-inspired twist. This is a great option for parties, as long as you clearly label the nuts for guests with allergies.
Dark Chocolate Almond S’mores Bars
Use dark chocolate and sliced almonds for a slightly less sweet version. Add a pinch of espresso powder to the crust if you want the chocolate flavor to taste deeper without making the bars taste like coffee.
Holiday S’mores Bars
Add a pinch of cinnamon to the graham cracker crust and use toasted walnuts. A drizzle of white chocolate on top makes the bars look festive enough for a cookie tray, even if they disappear before the tray reaches the table.
Storage and Make-Ahead Advice
Store Chocolaty Caramel-Nut S’more Bars in an airtight container at room temperature for up to 2 days if your kitchen is cool and dry. For longer storage, refrigerate them for up to 5 days. Place parchment paper between layers so the marshmallow topping does not stick.
These bars can also be made one day ahead. In fact, they slice more neatly after resting overnight. Bring them to room temperature before serving if you want the caramel to soften. For a warm dessert experience, microwave an individual square for 8 to 10 seconds. Any longer and the marshmallow may attempt to escape.
Allergy and Serving Notes
Because this recipe includes nuts, chocolate, butter, and graham crackers, it may contain or come into contact with common allergens such as tree nuts, peanuts, milk, soy, and wheat. If baking for a group, label the bars clearly. For a nut-free version, skip the nuts and use crushed pretzels or toasted coconut only if those ingredients are safe for your guests.
Cut the bars into 16 small squares for parties or 9 larger squares for dessert plates. They are rich, so smaller pieces usually work well. Of course, “small” is a flexible word when caramel is involved.
What to Serve With Chocolaty Caramel-Nut S’more Bars
These bars pair well with cold milk, hot coffee, iced coffee, black tea, or vanilla ice cream. For a summer dessert table, serve them with fresh strawberries or raspberries to balance the sweetness. For a cozy winter treat, add them to a platter with brownies, chocolate chip cookies, and peanut butter bars.
They also make an excellent bake-sale dessert because they are easy to portion, easy to package, and eye-catching. Wrap each square in parchment or place them in cupcake liners. Just remember that caramel can soften in warm weather, so keep them cool until serving.
Common Mistakes to Avoid
Using Too Much Caramel
More caramel sounds like a good idea until the bars refuse to hold their shape. Stick close to the amount in the recipe. You want gooey, not landslide.
Under-Baking the Crust
A pre-baked crust creates better texture. If you add toppings to an unbaked crumb crust, the bottom can become greasy or crumbly.
Cutting Too Soon
The bars need time to set. If you slice them hot, the layers may slide around. Still tasty? Absolutely. Neat enough for photos? Not unless your camera has a sense of humor.
Walking Away From the Broiler
Broiling marshmallows is fast. Stay close, keep the oven light on, and pull the pan as soon as the tops look golden. One minute can make the difference between toasted and toasted-to-another-dimension.
Experience Notes: What I Learned While Making Chocolaty Caramel-Nut S’more Bars
The first thing you learn when making Chocolaty Caramel-Nut S’more Bars is that the smell alone can cause people to wander into the kitchen with suspiciously casual expressions. “Oh, are you baking?” they ask, as if they did not follow the aroma trail like cartoon detectives. This recipe has that effect. The graham cracker crust smells buttery and nostalgic, the caramel adds a candy-shop warmth, and the marshmallows puff into a golden topping that looks cheerful even before the first slice is cut.
One practical lesson is that pressing the crust firmly matters more than it seems. A loose crust tastes fine, but it crumbles when sliced. Using the flat bottom of a measuring cup makes the crust compact and even. It is not glamorous, but neither is chasing graham cracker crumbs across the counter while pretending the bars are “intentionally rustic.”
Another important experience is learning how much caramel is enough. The temptation to pour on extra caramel is powerful. It stands there in the jar looking glossy and persuasive. But too much caramel makes the bars difficult to cut and even harder to transport. A moderate layer gives you that stretchy, gooey bite without turning the dessert into a sticky puzzle.
Toasting the nuts is also worth the effort. Raw nuts add crunch, but toasted nuts add personality. Pecans become buttery, almonds become fragrant, walnuts taste deeper, and peanuts bring a familiar sweet-salty snack flavor. When the nuts meet caramel and chocolate, the whole bar tastes more balanced. Without the nuts, the dessert is soft and sweet; with them, every bite has a little snap.
The marshmallow topping is where patience becomes a virtue. Mini marshmallows are easier to spread evenly than large marshmallows, and they toast beautifully. The key is to bake until they puff and then broil only if you want extra color. The broiler is useful, but it is also dramatic. Watch it closely. Marshmallows do not believe in second chances.
Cooling is the final test. Warm bars are wildly tempting, especially when the chocolate is soft and the caramel is still loose. But if you want clean squares, give them time. Once cooled, the layers settle into a chewy, crunchy, gooey structure that slices neatly and holds together. A chilled bar cuts even better, though it tastes best after sitting at room temperature for a few minutes.
These bars are especially good for gatherings because they feel playful but still look impressive. They are casual enough for a backyard cookout and rich enough for a dessert buffet. Kids love the marshmallow topping, adults appreciate the caramel and nuts, and everyone seems to agree that not needing a campfire is a major life improvement. No smoke in your eyes, no lost marshmallows, no one insisting they “meant” to burn theirs.
The best serving experience is to cut the bars small and let people come back for seconds. A small square delivers plenty of flavor, and smaller portions make the dessert table look generous. If you want to dress them up, drizzle melted chocolate over the cooled top or add a tiny pinch of flaky salt. That one pinch makes the chocolate taste deeper and the caramel taste more buttery.
In the end, this recipe proves that s’mores do not need to stay in the woods. They can move into a baking pan, put on a caramel jacket, invite some toasted nuts, and become a dessert that is easier to share and much less likely to involve mosquito bites.
Conclusion
Chocolaty Caramel-Nut S’more Bars are everything people love about classic s’mores, upgraded into a rich, chewy, sliceable dessert. The graham cracker crust brings crunch, the chocolate melts into a smooth layer, the caramel adds buttery sweetness, the nuts provide texture, and the marshmallows deliver that familiar toasted finish. Whether you make them for a party, a holiday tray, a bake sale, or a quiet night when dessert needs to do a little emotional heavy lifting, these bars are easy to love and even easier to disappear.
Note: This article is written as original, web-ready content in standard American English. It is designed for SEO use with natural keyword placement, practical baking guidance, and a complete recipe structure.