A Mac keyboard is one of those things you do not think about until it betrays you. One minute you are typing a polite email. The next minute your “E” key is acting like it has taken a personal day, your space bar feels crunchy, or your Magic Keyboard refuses to connect like it has joined a witness protection program.
The good news: testing a Mac or Apple keyboard is usually simple. You do not need to be a Genius Bar wizard, own a drawer full of tiny screwdrivers, or whisper motivational quotes to your MacBook. You just need a clear process. This guide explains how to test a Mac keyboard, check whether the issue is hardware or software, troubleshoot Apple Magic Keyboard problems, and decide when it is time for cleaning, settings changes, or professional repair.
Why You Should Test Your Mac Keyboard Before Replacing It
Keyboard problems can look dramatic, but the cause is not always a broken key. Sometimes the issue is a macOS setting, an incorrect input source, a Bluetooth connection problem, low battery, debris under a keycap, or a third-party app interfering with normal input.
Before you buy a new Apple keyboard or schedule a repair, test it carefully. A good keyboard test helps answer three important questions:
- Do all keys register when pressed?
- Are modifier keys like Command, Option, Control, Shift, Fn, or Globe working correctly?
- Is the issue physical, wireless, software-related, or caused by macOS settings?
That difference matters. A sticky key might need cleaning. A wrong symbol appearing on screen might mean the keyboard layout is set incorrectly. A Magic Keyboard that does not type at all might simply need charging or pairing again. A built-in MacBook keyboard that fails in Apple Diagnostics may need hardware service.
Step 1: Start With a Basic Typing Test
The fastest way to test a Mac keyboard is to open a simple text field and type every key. Use TextEdit, Notes, Pages, Spotlight, or even a browser search box. Avoid testing inside a complex app first because the app itself may use shortcuts, plugins, or custom input behavior.
Use This Quick Keyboard Test Pattern
Open TextEdit and type:
Then test spacing and navigation:
- Press the space bar repeatedly.
- Press Return and make sure a new line appears.
- Press Delete and confirm characters disappear.
- Use the arrow keys to move the cursor.
- Try Caps Lock and check whether the indicator changes.
If one letter does not appear, test it several times. Press it gently, then slightly off-center. Do not pound the key like you are trying to wake up a sleeping vending machine. If it only works when pressed at an angle, that points toward a physical key mechanism issue.
Step 2: Test Modifier Keys and Keyboard Shortcuts
Mac keyboards rely heavily on modifier keys. Command, Option, Control, Shift, Fn, and the Globe key can change what other keys do. If shortcuts stop working, the problem may not be the letter key. It may be the modifier key.
Try these common shortcuts:
- Command + C: copy selected text.
- Command + V: paste copied text.
- Command + A: select all text.
- Command + Tab: switch apps.
- Command + Space: open Spotlight.
- Shift + letter: type uppercase letters.
- Option + key: test special characters, such as Option + 2 or Option + E depending on your layout.
If letters work but shortcuts fail, focus on modifier keys. Also remember that Windows keyboards behave differently on macOS: the Alt key often maps to Option, and the Windows key often maps to Command. That is normal, not a keyboard ghost.
Step 3: Use Keyboard Viewer on Mac
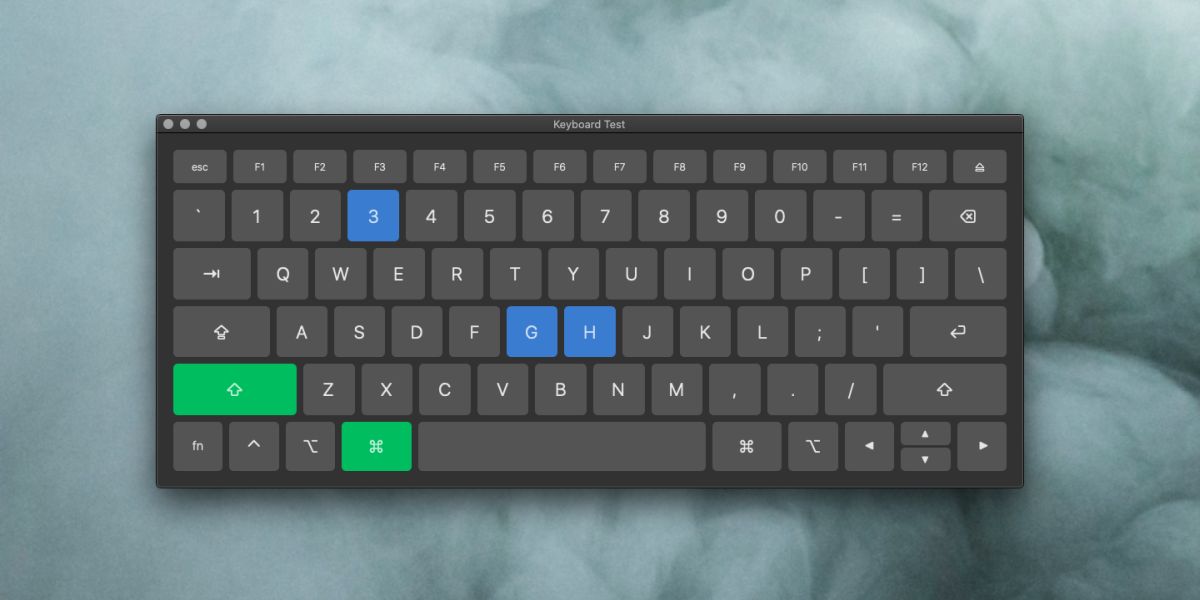
Keyboard Viewer is one of the best built-in tools for testing a Mac keyboard. It displays an on-screen keyboard so you can see whether macOS recognizes each key press.
How to Open Keyboard Viewer
- Go to Apple menu > System Settings.
- Choose Keyboard.
- Go to Text Input and click Edit.
- Turn on Show Input menu in menu bar.
- Click the Input menu in the menu bar.
- Select Show Keyboard Viewer.
Now press each key on your physical keyboard. The matching key should react on the on-screen keyboard. Test normal keys, number keys, punctuation, arrows, function keys, and modifiers. Hold Shift, Option, or Command and watch the Keyboard Viewer change. This is especially useful when you suspect the wrong characters are appearing because of a keyboard layout mismatch.
For example, if you press Shift + 2 expecting an “@” but get a quotation mark instead, your input source may be set to a different layout. That is not your keyboard being rebellious; it is macOS using a layout that does not match your physical keys.
Step 4: Check Input Source and Keyboard Layout
If the keyboard types the wrong symbols, check your input source. This happens often when a Mac is used in multiple languages, when a second keyboard has been connected, or after migration from another device.
How to Check Keyboard Layout on Mac
- Open System Settings.
- Click Keyboard.
- Go to Text Input and select Edit.
- Review your input sources.
- Select the correct layout, such as U.S., ABC, British, Vietnamese, or another layout that matches your physical keyboard.
After changing the input source, repeat the basic typing test. If the “wrong key” problem disappears, the keyboard is healthy. The settings were simply dressed in the wrong outfit.
Step 5: Check Accessibility Settings That Affect Keyboard Input
Some macOS accessibility features intentionally change how the keyboard behaves. They are useful when needed, but confusing when turned on accidentally.
Settings to Check
- Slow Keys: requires you to hold a key longer before it registers.
- Sticky Keys: lets modifier keys stay active after one press.
- Mouse Keys: uses the keyboard or numeric keypad to move the pointer, which can make keys seem broken.
- Full Keyboard Access: changes how you navigate controls using the keyboard.
Go to System Settings > Accessibility > Keyboard and review these options. Also check Accessibility > Pointer Control for Mouse Keys. If Slow Keys is enabled, a key may feel unresponsive because macOS is waiting for a longer press. If Mouse Keys is enabled, some number keys may stop acting like normal number keys.
Step 6: Test Your Keyboard in Safe Mode
Safe Mode helps determine whether a keyboard problem is caused by software that loads during normal startup. It disables certain startup items and performs basic checks while macOS starts.
How to Start an Apple Silicon Mac in Safe Mode
- Shut down your Mac completely.
- Press and hold the power button until startup options appear.
- Select your startup disk.
- Hold Shift and click Continue in Safe Mode.
How to Start an Intel Mac in Safe Mode
- Turn on or restart your Mac.
- Immediately press and hold Shift.
- Release the key when the login window appears.
Once in Safe Mode, test the keyboard again in TextEdit or Notes. If the keyboard works perfectly in Safe Mode but fails during normal startup, a login item, driver, background utility, keyboard remapping app, or other software conflict may be involved. Remove recently installed keyboard tools, automation apps, clipboard managers, or system customization utilities one at a time and test again.
Step 7: Run Apple Diagnostics
Apple Diagnostics can help detect hardware issues. It is especially useful when your built-in MacBook keyboard has multiple failing keys, no response at startup, or symptoms that continue even after checking settings and Safe Mode.
Apple Silicon Mac
- Shut down the Mac.
- Press and hold the power button until startup options load.
- When Options appears, release the power button.
- Press and hold Command + D until the Mac restarts into diagnostics.
Intel Mac
- Turn on the Mac.
- Immediately press and hold D.
- If that does not work, try Option + D to start diagnostics over the internet.
- Release the key when you see a progress bar or language screen.
Follow the on-screen instructions and write down any reference codes. Diagnostics does not catch every keyboard problem, especially intermittent sticky keys, but an error code gives you stronger evidence when contacting Apple Support or an Apple Authorized Service Provider.
Step 8: Test a Magic Keyboard or External Apple Keyboard
Testing an external Apple keyboard adds a few extra checks: connection, battery, Bluetooth pairing, and cable condition.
For a Wireless Magic Keyboard
- Make sure the keyboard is switched on.
- Connect it to your Mac with the proper cable to charge it.
- Open System Settings > Bluetooth.
- Confirm the keyboard appears in the device list.
- If it is listed but not working, disconnect it and reconnect.
- If needed, click the information button and choose Forget This Device, then pair it again.
When you connect a Magic Keyboard to your Mac with a cable, it can charge, and many models can be used while connected. If the keyboard works by cable but not wirelessly, the problem is likely Bluetooth pairing, battery, interference, or wireless settings rather than the keys themselves.
For a Wired Apple Keyboard
- Try a different USB port.
- Remove hubs or adapters temporarily.
- Inspect the cable for damage.
- Test the keyboard on another Mac if available.
- Test another keyboard on your Mac.
This comparison test is powerful. If Keyboard A fails on two Macs, Keyboard A is suspicious. If two keyboards fail on one Mac, your Mac, port, hub, settings, or software may be the culprit.
Step 9: Check Function Keys, Touch ID, and Top-Row Controls
Apple keyboards often include top-row keys for brightness, Mission Control, Spotlight, Dictation, Do Not Disturb, media playback, volume, and other system features. On many Apple keyboards, you can use the Fn or Globe key to switch between special functions and standard F1, F2, F3 behavior.
To test the top row, press each key and observe the result. Brightness should change the screen. Volume should show an on-screen indicator. Media keys should affect playback in supported apps. If the top row only works as F-keys, or only works as media keys, check System Settings > Keyboard for function key behavior.
For MacBook models with Touch ID, remember that Touch ID may not unlock the Mac after a full restart until you enter your password first. That is expected behavior. Test Touch ID after logging in normally.
Step 10: Clean Sticky or Unresponsive Keys Safely
If one or two keys feel sticky, repeat, or fail only sometimes, debris may be involved. Crumbs, dust, pet hair, and mysterious desk particles can get under key mechanisms. Your keyboard has seen things. Possibly sandwich-related things.
Safe Cleaning Basics
- Shut down the Mac before cleaning a built-in keyboard.
- Unplug external keyboards.
- Use a soft, lint-free cloth.
- Avoid getting moisture into openings.
- Do not spray liquid directly on the keyboard.
- Avoid harsh cleaners, abrasives, ammonia, and hydrogen peroxide.
For many MacBook keyboards, Apple recommends holding the notebook at an angle and using compressed air in a left-to-right motion, then rotating the notebook and repeating the process from different sides. The goal is to move debris out without forcing liquid or pressure into delicate parts.
Do not remove keycaps unless you know exactly what you are doing for your model. MacBook key mechanisms are delicate, and forcing a keycap can turn a small problem into a tiny plastic tragedy.
Step 11: Test After Restarting and Updating macOS
A restart is not glamorous, but it solves enough computer problems that it deserves its own little trophy. Restart your Mac, then test the keyboard again. If the issue began after installing an app, changing a setting, connecting a new device, or updating macOS, write down the timing.
Also check for macOS updates under System Settings > General > Software Update. Updates can include bug fixes for input, Bluetooth, accessibility, and hardware support. After updating, repeat your test pattern and check Keyboard Viewer again.
Step 12: Create a New User Account for Testing
If the keyboard works in Safe Mode but still misbehaves in your normal account, create a temporary test user.
- Open System Settings.
- Go to Users & Groups.
- Create a new standard or administrator test account.
- Log out of your main account.
- Log in to the test account and try the keyboard.
If the keyboard works in the new account, your main user profile may have a setting, login item, shortcut, input source, or app causing trouble. If it fails in every account, the issue is more likely system-wide or hardware-related.
How to Tell Whether It Is Hardware or Software
Use this simple decision guide:
Likely Software or Settings
- The keyboard works in Safe Mode.
- The keyboard works in a new user account.
- Keys type the wrong symbols but all keys register.
- Only shortcuts fail, not ordinary letters.
- Bluetooth reconnecting fixes the issue.
- Accessibility settings were enabled accidentally.
Likely Hardware
- Specific keys never register in Keyboard Viewer.
- Keys feel physically stuck, crunchy, loose, or uneven.
- The problem continues in Safe Mode and a new user account.
- The same external keyboard fails on multiple computers.
- Apple Diagnostics reports a hardware-related issue.
- There was liquid exposure, impact damage, or heavy debris.
Hardware issues usually need cleaning, repair, or replacement. Software issues can often be solved by adjusting settings, removing conflicting apps, updating macOS, or re-pairing Bluetooth devices.
Common Mac Keyboard Problems and What They Mean
One Key Does Not Work
Test with Keyboard Viewer. If every other key works and one key does not register, suspect debris or key mechanism damage. Try safe compressed-air cleaning. If it still fails, service may be needed.
Several Keys in One Area Do Not Work
A cluster of failed keys may point to internal keyboard hardware, liquid damage, or connector issues. Test in Safe Mode and Apple Diagnostics. If symptoms remain, contact repair support.
Keyboard Types the Wrong Characters
Check input source and keyboard layout. This is common with international layouts. Keyboard Viewer is the fastest way to confirm what macOS thinks your keyboard layout is.
Keyboard Feels Delayed
Check Slow Keys under Accessibility settings. Also close heavy apps and restart. If delay appears only in one app, the app may be the problem.
Magic Keyboard Will Not Connect
Charge it with the correct cable, turn it on, check Bluetooth, remove it from the device list, and pair again. If possible, test it on another Mac or iPad.
Shortcuts Do Not Work
Test modifier keys individually. Check custom keyboard shortcuts under System Settings. Also look for keyboard remapping apps or productivity tools that may override default shortcuts.
When to Contact Apple Support or a Repair Professional
Contact Apple Support or an Apple Authorized Service Provider if:
- The keyboard fails Apple Diagnostics.
- Important keys do not register in Keyboard Viewer.
- Liquid was spilled on the keyboard.
- Multiple keys fail across Safe Mode and a new user account.
- The keyboard is swollen, warped, cracked, or physically damaged.
- You rely on the Mac for school, business, coding, design, or daily work and cannot risk worsening the issue.
Before service, back up your Mac with Time Machine or another trusted backup method. Keyboard repairs can involve internal parts, and a backup protects your data from unexpected repair drama.
A Practical Testing Checklist
Use this checklist when you want a fast, reliable Mac keyboard test:
- Restart the Mac.
- Open TextEdit and type every letter, number, and symbol.
- Test space, Return, Delete, arrows, Caps Lock, and top-row keys.
- Test Command, Option, Control, Shift, Fn, and Globe.
- Open Keyboard Viewer and check whether each key registers.
- Confirm the correct input source and keyboard layout.
- Turn off Slow Keys, Mouse Keys, or unexpected accessibility settings.
- For Magic Keyboard, charge, reconnect, and re-pair Bluetooth.
- Boot into Safe Mode and test again.
- Run Apple Diagnostics if hardware failure is suspected.
- Clean sticky keys safely with compressed air if appropriate.
- Test with another keyboard or another Mac if possible.
Real-World Experience: What Testing a Mac Keyboard Actually Feels Like
In real life, testing a Mac or Apple keyboard is rarely a neat laboratory experiment. It usually begins with a small moment of confusion. You press a key. Nothing happens. You press it again. Still nothing. Then you press it harder, because apparently every human believes extra force is a valid troubleshooting method. It is not the best method, but it is emotionally understandable.
The most useful habit I have learned is to slow down and separate the symptoms. A keyboard that does not type at all is different from a keyboard that types the wrong characters. A Magic Keyboard that disconnects after a few minutes is different from a MacBook key that feels physically sticky. When you describe the problem clearly, the solution becomes much easier to find.
For example, if a user says, “My keyboard is broken,” that could mean ten different things. But if they say, “The built-in keyboard works in the login screen, but shortcuts fail after I open my design app,” that points toward software. If they say, “The S key works only when I press the bottom-left corner,” that sounds physical. If they say, “The numbers type, but the symbols are wrong,” that screams keyboard layout louder than a caps-locked email from your uncle.
Keyboard Viewer is the tool I would use first in almost every case. It removes guesswork. When you press a key and the on-screen version lights up, macOS is receiving the input. When it does not, you have stronger evidence that the key, keyboard connection, or hardware path is failing. It is also excellent for testing modifier keys because you can see layout changes when holding Shift or Option.
Another practical lesson: external keyboards are fantastic diagnostic tools. If your MacBook keyboard acts strange, plug in a USB keyboard or connect another Magic Keyboard. If the external keyboard works perfectly, the Mac itself may be fine and the built-in keyboard may need attention. If both keyboards fail in the same way, look at software, settings, input source, or accessibility features.
Bluetooth issues deserve patience. A Magic Keyboard may appear connected but still refuse to type. In that case, charge it, toggle Bluetooth, forget the device, pair it again, and test close to the Mac. Also remove unnecessary hubs or wireless clutter during testing. Bluetooth is usually reliable, but when it gets weird, it gets weird with confidence.
Cleaning is another area where gentle wins. People often want to pry off keycaps or flood the keyboard with cleaner. Please do not turn your keyboard into a tiny swimming pool. Shut things down, use a lint-free cloth, avoid moisture in openings, and use compressed air carefully when appropriate. If there was a sugary drink spill, professional repair is safer than hopeful wiping. Sugar under keys is basically keyboard cement with a cheerful flavor.
Finally, keep notes. Write down which keys fail, when the problem happens, whether Safe Mode changes anything, whether Keyboard Viewer detects the key, and whether an external keyboard works. If you eventually contact Apple Support or a repair provider, that information saves time. It also prevents the classic troubleshooting loop where everyone asks, “Did you restart it?” and you begin questioning the meaning of existence.
Conclusion
Testing a Mac or Apple keyboard is about moving from simple checks to deeper diagnostics. Start with a plain typing test. Then use Keyboard Viewer, check keyboard layout, review accessibility settings, test Bluetooth or cable connections, try Safe Mode, and run Apple Diagnostics when hardware trouble is likely.
Most keyboard problems fall into one of four categories: settings, software, connection, or physical hardware. Once you know which category you are dealing with, the fix becomes much less mysterious. And if the keyboard truly is damaged, you will have clear evidence before paying for repair or replacement. That is better than guessing, panicking, and angrily blaming the space bar for ruining your afternoon.