Some children treat bookmarks like responsible little librarians. Other childo personalize, and just unusual enough to avoid disappearing into the mysterious dimension where pencils, socks, and permission slips live.
This simple kids’ craft turns ordinary buttons into cheerful page markers using jumbo paper clips, ribbon, felt, or elastic. The finished bookmarks can encourage children to pick up a book, remember their page, and take pride in something they made themselves. They also work well as classroom activities, party favors, handmade gifts, library-program projects, and rainy-day entertainment.
Below, you will learn how to make several types of DIY button bookmarks, choose child-friendly materials, avoid common mistakes, and adapt the activity for different ages. No advanced crafting degree is required. A reasonably clear table and a button that has not rolled under the refrigerator will do nicely.
What Are Button Bookmarks?
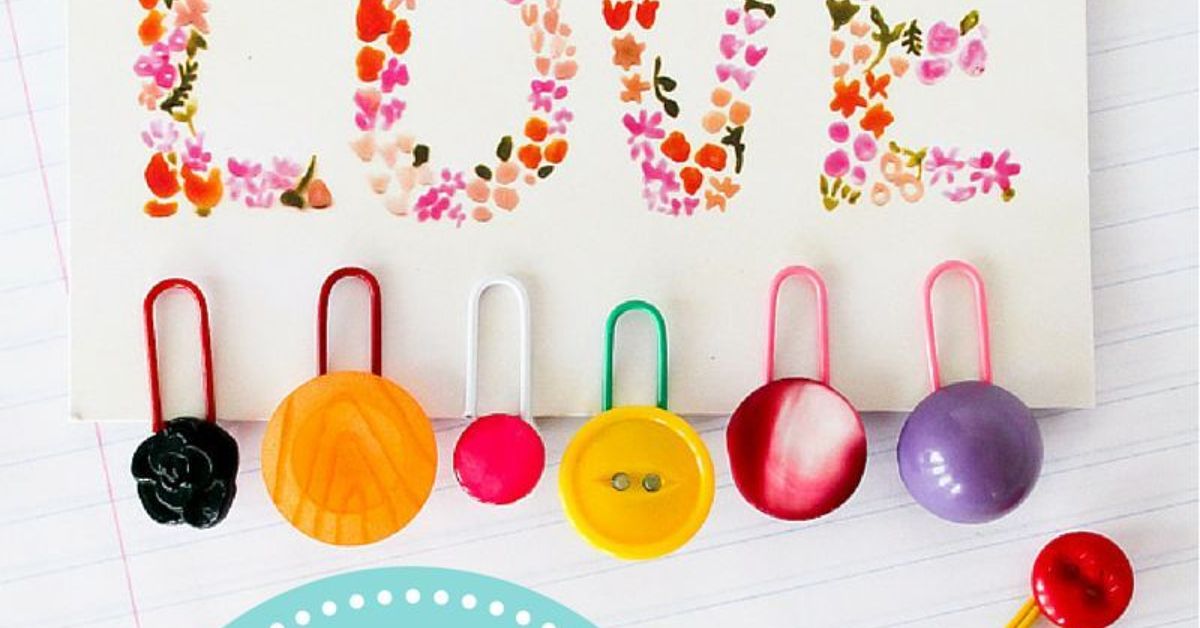
A button bookmark is a handmade page marker decorated with one or more buttons. The most common design uses a jumbo paper clip with a button attached at the top. The clip slides over one or several pages while the button remains visible above the book.
Another version uses ribbon, elastic, and a sewn-on button. The ribbon lies between the pages, while an elastic loop wraps around the button to hold the bookmark securely around a closed book. This style is especially useful for journals, planners, notebooks, and chapter books carried in backpacks.
Both versions are compact, reusable, and highly customizable. Children can choose buttons shaped like flowers, animals, stars, sports equipment, fruit, or simple colorful circles. A plain button can also become a tiny character with paint markers, felt ears, or a carefully drawn face.
Why Make Button Bookmarks With Kids?
They Connect Reading With Creativity
Children are often more interested in using an object when they helped create it. A handmade bookmark gives a book a personal accessory rather than making reading feel like another item on a checklist. The project can be paired with a new library book, a family read-aloud, or a classroom reading challenge.
Letting children match a bookmark to a favorite subject adds another layer of motivation. A dinosaur button belongs in a dinosaur book. A glittery moon can guard a space adventure. A tiny cupcake may mark a cookbook, although it cannot be trusted around the frosting chapter.
They Exercise Small Hand Movements
Sorting buttons, peeling adhesive dots, positioning decorations, cutting felt, threading ribbon, and sliding a clip onto a page all involve controlled hand movements. These actions give children a practical opportunity to work with their fingers and coordinate what their hands and eyes are doing.
The activity can be simplified for children who find cutting, sewing, or precise placement difficult. Adults can prepare the small pieces in advance, offer larger buttons, and use adhesive dots instead of liquid glue. The goal is a successful creative experience, not a surprise final exam in miniature engineering.
They Are Affordable and Easy to Prepare
Most button bookmark supplies are inexpensive and available at craft stores, office-supply stores, or around the home. A small collection of jumbo paper clips, leftover ribbon, felt scraps, and assorted buttons can produce many bookmarks.
The project also creates very little mess when glue dots or double-sided adhesive tabs are used. That makes it suitable for classrooms, libraries, birthday parties, homeschool groups, and kitchen tables whose owners are still recovering from the Great Glitter Incident.
Best Ages for This Craft
Button bookmarks are generally best suited to school-age children because buttons and other small craft pieces can present a choking risk to younger children. Children under three should not have access to loose buttons, beads, detachable decorations, or similar small parts.
Children ages five to seven can usually choose colors, arrange decorations, and press pieces onto pre-applied adhesive with close adult supervision. Adults should handle hot glue, sharp needles, and difficult cutting.
Older elementary-age children may be able to complete paperclip bookmarks independently with child-appropriate adhesive. Tweens can try ribbon-and-button designs that involve basic hand sewing, provided they understand how to use a needle safely.
Method One: Easy Button Paperclip Bookmarks
This is the quickest version and an excellent choice for a group craft. One bookmark can be assembled in a few minutes, although choosing the perfect button may take substantially longer. Craft decisions are serious business.
Supplies
- Jumbo paper clips with smooth edges
- Large, flat buttons
- Small felt circles or foam shapes
- Strong adhesive dots or child-safe craft glue
- Scissors
- Optional paint markers, stickers, or decorative shapes
Step 1: Choose a Paper Clip
Select a clean jumbo paper clip that slides smoothly over a page. Large clips are easier for children to handle and provide more room for decorations. Avoid bent, rusty, sharp, or rough clips that could scratch fingers or damage paper.
Step 2: Select the Button
Choose a button that is wider than the top of the paper clip but not so heavy that it pulls on the page. Flat-backed buttons are easiest to attach. Traditional buttons with holes also work, especially when supported by a felt backing.
Before gluing anything, place the button over the top of the clip and check its position. The decorated end should remain above the book when the clip is attached to a page.
Step 3: Add the Adhesive
Place a strong adhesive dot on the back of the button. Press the top of the paper clip into the adhesive. Add a small felt circle over the exposed adhesive and paper clip to create a sandwich: button in front, clip in the middle, and felt on the back.
If craft glue is used, apply only a small amount and allow the bookmark to dry completely on a flat surface. Too much glue can spread around the button and turn a neat project into a sticky archaeological site.
Step 4: Decorate
Children can add a face, initials, small felt leaves, paper ears, or tiny sticker details. Keep the decoration fairly flat so it does not catch on other objects in a backpack.
Step 5: Test the Bookmark
Once the adhesive is secure, slide the paper clip over several pages near the top or side of a book. Make sure the button stays upright and the clip does not bend or crease the paper.
Method Two: Ribbon and Button Bookmarks
A ribbon button bookmark wraps around a book and is less likely to fall out during travel. Because this version usually requires sewing, it is best for older children or for younger children working with an adult.
Supplies
- One length of ribbon
- One large button
- One small elastic hair tie
- Needle and strong thread
- Scissors
- Ruler or measuring tape
- Optional fabric glue for sealing ribbon ends
Step 1: Measure the Book
Wrap the ribbon vertically around a closed book from the front cover to the back. Cut it slightly shorter than the full distance around the book because the elastic loop will provide additional length and tension.
For a bookmark intended for several books, measure it around a medium-size chapter book. Elastic provides some flexibility, but one bookmark will not fit every object from a pocket notebook to an enormous illustrated encyclopedia.
Step 2: Attach the Elastic Loop
Place the hair elastic over one end of the ribbon. Fold approximately one inch of ribbon over the elastic and sew the folded section securely. An adult should supervise needle use and may complete this step for younger children.
Step 3: Sew on the Button
Fold the opposite ribbon end under slightly to prevent fraying. Sew the button firmly onto that end. Use several tight stitches and knot the thread securely on the back.
Step 4: Fit the Bookmark
Place the ribbon between the desired pages, close the book, and wrap the ribbon around the cover. Stretch the elastic loop over the button. The ribbon should lie flat without squeezing or bending the book.
Creative Button Bookmark Ideas
Book Character Themes
Use colored buttons and felt pieces to suggest a child’s favorite character without making the design bulky. A green button with pointed felt ears can become a friendly monster. A yellow button with round black ears can become a cheerful mouse. Children can also invent completely original reading companions.
Seasonal Designs
Orange buttons make easy pumpkins for fall. White buttons can become snowmen for winter. Flower-shaped buttons are ideal for spring, while bright fruit buttons add a summery look. Seasonal bookmarks make useful additions to classroom reading baskets and holiday gift bags.
Name and Initial Bookmarks
Personalized bookmarks are helpful in classrooms where supplies have a habit of wandering. Add a letter sticker, alphabet bead, or painted initial to the button. For privacy, use initials rather than a child’s full name when the bookmark may be carried in public.
Emotion Faces
Draw different expressions on large buttons with a suitable paint marker. Children can choose a happy, curious, sleepy, surprised, or determined bookmark to match their reading mood. The determined one is especially useful when a chapter ends with twelve unfamiliar vocabulary words.
Matching Bookmark Sets
Create pairs or collections based on a theme such as animals, planets, foods, sports, or colors. A set of handmade button bookmarks can become a small gift for classmates, teachers, grandparents, or young readers.
Important Safety Tips
Buttons, beads, and loose embellishments are small parts. Keep them away from babies and toddlers, and store unused materials in a closed container. Count the buttons before and after a group activity so stray pieces do not remain on the floor.
Use child-safe scissors when appropriate. Adults should handle hot glue guns, sharp needles, strong industrial adhesives, and any cutting tool not designed for children. A cool glue gun can still cause discomfort, so it should not automatically be treated like a harmless magic wand.
Choose nontoxic craft materials intended for the child’s age group. Follow the instructions and warnings printed on glue, paint, markers, and decorations. Never substitute button batteries for decorative buttons. A button battery is an electrical component and can cause a severe medical emergency if swallowed.
Inspect finished bookmarks regularly. Discard or repair any bookmark with a loose button, exposed wire, sharp paper clip, frayed ribbon, or peeling decoration. A handmade craft should mark a page, not launch spare parts across the living room.
How to Protect Books From Damage
A good bookmark should be thin, smooth, and gentle on paper. Choose rounded paper clips rather than clips with decorative wire edges. Do not attach heavy button stacks that pull on the page.
Slide a paperclip bookmark over a small group of pages instead of forcing it onto a single delicate sheet. Avoid placing thick button decorations deep inside the book before closing it. The button should sit outside the top or side edge so it does not press against the pages or strain the binding.
For valuable, antique, borrowed, or fragile books, use a plain acid-free paper bookmark instead. Button bookmarks are best for sturdy modern books, notebooks, journals, and planners.
Using Button Bookmarks in Classrooms and Libraries
Teachers and librarians can use this project as a reading-program activity, a book-fair station, or a reward that does not involve candy or tiny plastic trophies. Children can make a bookmark after selecting a new book, completing a reading goal, or recommending a story to a classmate.
For efficient group crafting, prepare separate trays for buttons, clips, felt backs, and decorations. Show one completed example, but avoid requiring every child to copy it. A demonstration teaches the construction method; creative freedom gives the bookmarks personality.
Write each child’s name on a paper plate or work mat and let finished bookmarks dry there. This prevents confusion when twenty nearly identical smiling ladybugs suddenly claim the same owner.
Common Problems and Easy Fixes
The Button Falls Off
The adhesive may be too weak, the button may be too heavy, or the surfaces may not have been clean. Use a strong craft adhesive suitable for the materials and support the back with felt or foam. Allow liquid glue to cure fully before testing.
The Bookmark Slides Out
Try a slightly smaller paper clip or clip it over two or three pages. For books carried in backpacks, use the ribbon-and-elastic version, which wraps around the closed cover.
The Paper Clip Bends the Page
Check whether the clip is too tight or has a rough edge. Replace it with a smooth, rounded jumbo clip. Never force the bookmark onto thick stacks of paper.
The Decoration Is Too Bulky
Remove extra layers and use one lightweight button with a thin felt backing. A bookmark does not need to resemble a parade float to be charming.
Experience Notes: What Families and Teachers Commonly Discover
Real-world button bookmark sessions tend to begin with careful instructions and quickly become negotiations over who gets the sparkly purple button. This is not necessarily a problem. Choosing materials is part of the creative process, and children often become more invested in the project when they can make meaningful decisions about colors, themes, and characters.
One helpful approach is to place buttons in shallow trays and organize them loosely by color or size. Children can see the choices without emptying an entire container onto the table. Giving each child a small work mat also creates a clear personal area and reduces accidental mixing. It will not eliminate all button trading, but it may prevent the craft table from becoming a tiny stock exchange.
Adults often discover that adhesive dots work better than liquid glue for younger elementary-age children. The dots are quick, controlled, and do not require a long drying period. However, they must be strong enough for the materials being joined. Lightweight plastic buttons generally stay attached more easily than thick metal or wooden decorations.
When liquid craft glue is used, children may assume that more glue means more strength. This theory usually produces a shiny puddle with a button floating in the middle. Demonstrating one small dot of glue before distributing supplies can save materials and cleanup time. Finished bookmarks should remain flat and untouched until completely dry.
Another common lesson is that the biggest button is not always the best button. Oversize decorations may look impressive on the table but feel awkward when attached to a book. Medium-size, flat buttons tend to balance visibility and practicality. Children can test an unglued design against a closed book before committing to it.
In classroom settings, the activity works smoothly when adults prepare the difficult steps in advance. Felt backing circles can be cut beforehand, paper clips can be inspected for sharp edges, and glue stations can be managed by an adult. Children still control the creative choices while spending less time waiting for help.
The project can also reveal different working styles. Some children choose a button instantly and finish in five minutes. Others arrange twelve possible combinations, ask for opinions, reject all opinions, and eventually return to the first design. Allowing enough time for both styles makes the activity more enjoyable.
Most importantly, the bookmark becomes more meaningful when it is used immediately. After the craft, invite each child to choose a book, read a few pages, and place the new bookmark. This simple transition connects the creative activity with its purpose. The bookmark is no longer merely a decorated paper clip; it becomes the keeper of an unfinished adventure.
Handmade button bookmarks are also memorable gifts because each one can reflect the recipient. A soccer button may suit a sports fan, while a flower or cat button may delight another reader. Children often enjoy making gifts when they can imagine the recipient using them, and a bookmark is practical without being complicated or expensive.
Not every finished piece will look polished, and that is perfectly fine. A slightly crooked button may still hold a page for years. The best result is not flawless symmetry. It is a child who can point to a useful object and say, with considerable satisfaction, “I made that.”
Conclusion
Button bookmarks for kids combine reading, creativity, and practical crafting in one small project. The easy paperclip version is ideal for quick activities, while ribbon-and-button bookmarks offer a secure option for books and journals carried on the go.
With suitable materials, age-appropriate supervision, and a little room for creative chaos, children can turn ordinary buttons into personalized reading accessories. The finished bookmarks make useful classroom projects, party favors, gifts, and reading companionsand they are considerably more reliable than remembering a page number for three weeks.