Shoes have a magical talent: they multiply when no one is watching. One day you have two pairs by the door, and the next day your entryway looks like a tiny footwear traffic jam. The good news is that you do not need a luxury walk-in closet, a custom mudroom, or a budget that makes your wallet hide under the couch. With a few smart materials, some creativity, and a little weekend energy, you can build cheap DIY shoe storage that looks organized, saves space, and keeps your floors from becoming a sneaker obstacle course.
These 18 cheap shoe storage ideas DIY are designed for real homes: small apartments, busy family entryways, bedroom closets, dorm rooms, mudrooms, and awkward corners that usually collect dust, bags, and one lonely flip-flop. The ideas below use affordable materials like wooden crates, PVC pipes, tension rods, baskets, peg rails, cardboard boxes, floating shelves, and repurposed furniture. Some require basic tools, while others are so simple you can finish them before your coffee gets cold.
The goal is not just to hide shoes. A good shoe storage system should make daily life easier. Your everyday sneakers should be easy to grab. Wet shoes should have a place to dry. Dress shoes should stay protected. Kids’ shoes should be stored low enough that children can help put them away. And yes, guests should be able to enter your home without performing an Olympic long jump over a pile of sandals.
Why DIY Shoe Storage Is Worth It
DIY shoe storage works because it can be customized to your space, your shoe collection, and your habits. Store-bought racks are convenient, but they often come in fixed sizes. A homemade shoe rack, crate wall, bench, or under-bed system lets you control the height, width, color, and style. You can also build around tricky areas, such as narrow hallways, under-stair spaces, closet floors, or the back of a door.
Another advantage is cost. Many of the best budget shoe storage ideas use items you may already own: baskets, old bookshelves, leftover wood, file sorters, tension rods, or storage bins. With a little paint or contact paper, even a basic crate can look intentional instead of “I found this in the garage and hoped for the best.”
18 Cheap DIY Shoe Storage Ideas
1. Wooden Crate Shoe Cubby Wall
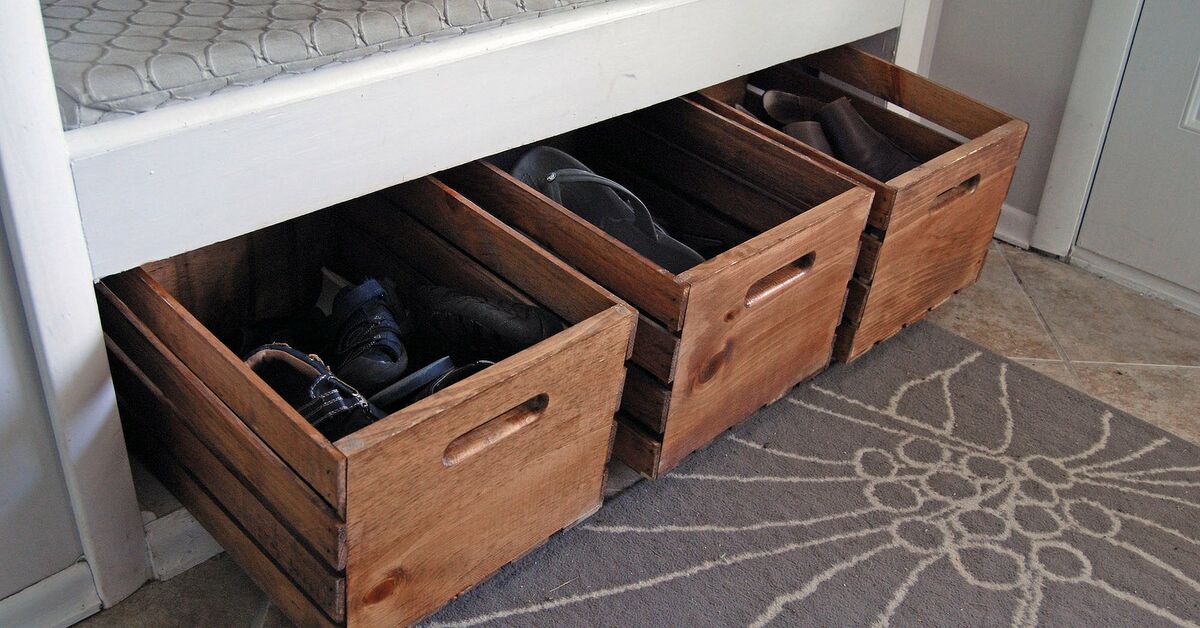
Wooden crates are one of the easiest materials for a cheap DIY shoe storage project. Stack several crates horizontally or vertically, then secure them together with screws or zip ties. Place the finished unit against an entryway wall, inside a closet, or beside a bedroom dresser. Each crate becomes a mini cubby for sneakers, sandals, or flats.
For a more polished look, sand the crates and paint them in one color. White gives a clean farmhouse feel, black looks modern, and natural stain works well in rustic or boho spaces. If you rent, keep the crates freestanding instead of attaching them to the wall.
2. PVC Pipe Shoe Organizer
PVC pipe is affordable, lightweight, and surprisingly stylish when arranged well. Cut large PVC pipes into equal lengths, wide enough to fit one shoe or a pair of slim shoes. Stack the tubes in a honeycomb or pyramid pattern, then glue them together with strong adhesive. Paint the finished organizer to match your room.
This idea works especially well for kids’ shoes, flip-flops, flats, and casual sneakers. It also turns shoe storage into a display, which is perfect if you want your closet to look organized without buying expensive shelves.
3. Under-Bed Rolling Shoe Trays
If your bedroom is small, the space under your bed is prime real estate. Build a low wooden tray with small caster wheels, or repurpose a shallow drawer from an old dresser. Add dividers if you want separate sections for different shoes. Slide the tray under the bed and pull it out whenever needed.
This DIY shoe storage idea is excellent for seasonal shoes, dress shoes, or pairs you do not wear every day. Add a fabric cover to keep dust away, especially if your shoes are made of suede or delicate materials.
4. Entryway Bench with Basket Storage
A bench makes an entryway more useful because it gives you a place to sit while putting on shoes. To make it storage-friendly, slide long baskets or bins underneath. You can build a simple bench from wood boards, use an old coffee table, or upgrade a basic store-bought bench with baskets.
Label each basket by family member or shoe type. For example: “Dad,” “School Shoes,” “Sandals,” or “Dog-Walking Sneakers.” A bench with baskets is cheap, flexible, and forgiving. Even when shoes are not perfectly lined up, they are at least contained. That is a win in any busy home.
5. Tension Rod Shoe Rack for Closets
Tension rods are not just for curtains. Place two rods parallel inside a closet, a small nook, or a cabinet. The heel or sole of each shoe can rest across the rods, creating a floating shelf effect. This works well for heels, flats, sandals, and lightweight shoes.
The best part is that tension rods do not require drilling, so they are renter-friendly. Measure your space carefully before buying rods, and choose sturdy ones that can hold the weight of your shoes. For heavier sneakers or boots, use wood shelves instead.
6. Over-the-Door Pocket Organizer
The back of a door is often wasted space. An over-the-door pocket organizer instantly creates vertical storage without taking up floor area. You can buy a basic fabric organizer or make one using canvas, strong fabric, and stitched pockets.
Use it for sandals, flats, kids’ shoes, slippers, socks, shoe polish, laces, and small accessories. In a dorm or apartment, this simple solution can free up the closet floor fast. Just avoid overloading it with heavy boots, unless you enjoy the thrilling sound of a door organizer giving up at midnight.
7. Ladder Shoe Rack
An old wooden ladder can become a charming shoe display. Lean it against a wall and place shoes on the steps. If the steps are narrow, add small wooden planks across each rung to create wider shelves. Sand and paint the ladder for a decorative finish.
This idea works beautifully for heels, ankle boots, and pretty shoes you do not mind showing off. It is less ideal for muddy sneakers unless your decorating style is “rainstorm chic.” Keep it in a bedroom, dressing area, or closet corner.
8. Floating Shelves for Shoes
Floating shelves are perfect for small spaces because they use wall area instead of floor area. Install a few shelves above a bench, behind a bedroom door, or inside a closet. Keep the spacing tall enough for sneakers and ankle boots.
For a clean look, store only your best-looking or most-used shoes on open shelves. Place seasonal or less attractive pairs in boxes elsewhere. Floating shelves can make shoes feel like part of the room design rather than evidence that your closet lost a battle.
9. Repurposed Bookshelf Shoe Station
A small bookshelf can become a shoe rack with almost no work. Remove a shelf if you need more height for boots, add peel-and-stick wallpaper to the back, and place baskets on the bottom shelf for loose accessories. You can also add small labels to each shelf.
This is one of the best cheap shoe storage ideas because used bookshelves are easy to find at thrift stores, yard sales, or in that mysterious corner of the garage where furniture goes to think about its life choices.
10. Cardboard Box Shoe Drawers
Before throwing away sturdy cardboard boxes, turn them into shoe drawers. Cover them with contact paper, wrapping paper, or fabric. Add a small rope handle or adhesive label holder to the front. Stack them inside a closet or under a bench.
This project is almost free and works well for lightweight shoes, seasonal footwear, or pairs you do not need daily. To make it more durable, reinforce the corners with packing tape before decorating. Clear labels help you avoid opening six boxes to find one pair of black flats.
11. Peg Rail and Hanging Basket Combo
A peg rail is a classic entryway organizer, and you can adapt it for shoe storage by hanging small baskets or fabric bins from sturdy hooks. Keep lightweight shoes, slippers, or kids’ sandals in the baskets. Use the upper pegs for bags, hats, or dog leashes.
This works best in narrow entryways where a bulky shoe cabinet would block traffic. Choose shallow baskets so the wall system stays slim and easy to walk past.
12. DIY Shoe Cabinet from an Old Dresser
If you have an old dresser, it can become closed shoe storage with a little creativity. Remove some drawers, add angled shelves or pull-out trays, and paint the outside. You can keep one drawer for socks, shoe care supplies, or winter accessories.
Closed storage is great for entryways because it hides clutter. It also protects shoes from dust and keeps the space looking more like a home and less like a locker room having an emotional moment.
13. Wire Basket Shoe Wall
Mount wire baskets on the wall near the floor for easy shoe storage. Each basket can hold one or two pairs, depending on size. This idea is especially useful for children because the baskets are open, visible, and easy to use.
Use wall anchors when mounting baskets, especially if the shoes are heavier. For a family entryway, assign one basket per person. Add name tags or small chalkboard labels for a neat, personalized touch.
14. Corner Shoe Tower
Awkward corners can become excellent shoe storage zones. Build a narrow triangular shelf tower or stack square crates diagonally into a corner. This keeps shoes off the main walkway and makes use of space that usually does nothing except collect dust and possibly a spider with strong opinions.
A corner shoe tower is ideal for bedrooms, closets, and mudrooms. Keep everyday shoes at waist level and less-used pairs higher or lower.
15. DIY Boot Tray with Pebbles
Wet boots need a landing zone. Make a simple boot tray using a shallow plastic or metal tray and a layer of smooth river stones. The stones lift shoes slightly so water can drain below instead of pooling around the soles.
Place the tray near the door during rainy or snowy months. This is less about displaying shoes and more about protecting your floors. It is cheap, practical, and oddly satisfying to look at when the stones are clean and evenly spread.
16. Closet Floor Shoe Risers
Many closets waste vertical space near the floor. Build simple shoe risers using scrap wood, small boards, or stackable shelves. A two-level riser can double your closet shoe storage without changing the closet structure.
Keep the most-used shoes on the top level and less-used pairs underneath. If the closet is deep, consider adding a pull-out tray so shoes in the back do not disappear into the shadowy land of forgotten footwear.
17. Magazine Holder Sandal Storage
Magazine holders are surprisingly useful for sandals, flip-flops, slippers, and slim flats. Place several holders on a closet shelf or entryway bench. Each holder keeps pairs upright and separated.
You can use plastic, metal, cardboard, or wooden file holders. Paint or cover them for a matching look. This is a great option for summer shoes, especially when sandals start sliding around like they are auditioning for a tiny shoe circus.
18. Shoe Storage Ottoman
A storage ottoman can hide shoes while doubling as seating. To make your own, repurpose a wooden crate, small trunk, or sturdy box. Add padding and fabric to the lid, then place dividers inside for shoes. Keep it at the foot of the bed, near the entryway, or inside a walk-in closet.
This idea is perfect when you want shoe storage that does not look like shoe storage. It is also helpful in small apartments where every item of furniture needs at least two jobs. Bonus points if the ottoman holds shoes, supports tired feet, and makes the room look more finished.
How to Choose the Best Cheap Shoe Storage Idea
Before choosing a project, count your shoes. Not the imaginary number you tell yourself, but the real number. Include sneakers, boots, sandals, slippers, work shoes, and the pair you forgot in the car. Then divide them into everyday, occasional, and seasonal categories.
Everyday shoes should live near the door or wherever you get ready. Occasional shoes can go in a closet. Seasonal shoes can be stored under the bed, on higher shelves, or in labeled boxes. This simple sorting step prevents your entryway from becoming a museum of every shoe you have ever owned.
Next, measure your space. Many shoe storage mistakes happen because people buy or build something too deep, too tall, or too wide. In a small entryway, a narrow wall-mounted system may work better than a bench. In a bedroom, under-bed trays may be more useful than open shelves. In a family mudroom, baskets and cubbies usually beat delicate display racks.
Cheap Materials That Work Well for DIY Shoe Storage
You do not need fancy materials to build a practical shoe organizer. Some of the best budget-friendly options include wooden crates, scrap plywood, PVC pipe, cardboard boxes, wire baskets, tension rods, peg rails, old bookshelves, dresser drawers, and plastic bins. Contact paper, paint, labels, and handles can make inexpensive materials look much more intentional.
If you are building with wood, sand rough edges and use a finish that can handle dirt and moisture. If you are storing wet shoes, choose washable materials like plastic trays, metal baskets, or sealed wood. If you are organizing delicate shoes, use boxes or soft dividers to prevent scuffs.
Common Shoe Storage Mistakes to Avoid
Keeping Too Many Shoes by the Door
The entryway should hold the shoes you wear most often, not your entire footwear biography. Keep two or three pairs per person near the door and move the rest to a closet or bedroom.
Using Storage That Is Hard to Maintain
If putting shoes away requires opening three doors, solving a puzzle, and whispering a secret password, nobody will do it. Choose simple systems: open baskets for kids, shelves for daily shoes, and labeled boxes for occasional pairs.
Ignoring Boots
Boots need taller storage. Leave extra shelf height or use boot trays. For tall boots, boot shapers or rolled magazines can help them stand upright and avoid creasing.
Forgetting About Cleaning
Shoes bring in dirt. Choose storage that is easy to wipe, shake out, or vacuum around. A beautiful white fabric bin may not stay beautiful if it becomes the permanent home of muddy soccer cleats.
Personal Experience: What Actually Works in Real Life
After trying several cheap DIY shoe storage ideas, the biggest lesson is simple: the best system is the one people will actually use. A perfectly styled shoe shelf looks great for photos, but if it takes too much effort, shoes will return to the floor faster than you can say, “Who left these here?”
In a small entryway, an open basket under a bench often works better than a complicated cabinet. It may not be the most glamorous solution, but it handles real life. People come home tired. Kids kick off shoes like tiny tornadoes. Guests do not want to study your storage rules before removing their sneakers. A basket gives everyone an easy target. Shoes go in, floor stays clear, peace is restored.
For closets, shelf risers and clear boxes are extremely helpful. Shelf risers make better use of vertical space, while clear boxes protect shoes and make them visible. The key is labeling or keeping the boxes transparent. Otherwise, you create a mystery box situation, and suddenly getting dressed becomes a low-budget treasure hunt.
Another practical discovery: shoe storage should match the season. In summer, sandals and flip-flops can live in magazine holders, baskets, or small cubbies. In winter, boot trays and taller shelves matter more. If you rotate shoes every few months, your storage stays lighter and easier to manage. This also helps you notice which shoes you never wear. If a pair has survived three seasons untouched, it may be time to donate it, unless it is reserved for a very specific imaginary occasion.
For families, assigning zones is a game changer. One basket, cubby, or shelf per person prevents the classic question: “Whose shoes are these?” Labels help, especially for children. Low storage works best for kids because they can reach it without help. When kids can put their own shoes away, adults get one tiny piece of sanity back, which is priceless and should honestly qualify for a home improvement award.
DIY projects also look better when you repeat materials. One random crate can look accidental. Four matching crates painted the same color look like a design choice. The same goes for baskets, labels, and boxes. Matching does not have to mean expensive. Dollar-store bins, thrifted baskets, or cardboard boxes covered in the same contact paper can create a clean, coordinated look.
One of the most underrated ideas is the boot tray. It is not fancy, but it solves a real problem. Wet shoes ruin floors, make entryways messy, and create that unpleasant “why is my sock damp?” moment. A tray with pebbles or a washable mat gives wet shoes a proper landing spot. It is especially useful near back doors, garage entrances, and mudrooms.
Finally, leave room to grow. A shoe organizer that is packed full on day one will fail quickly. Shoes need breathing room, and so do humans. Build or choose storage with a little extra capacity. That extra space makes the system easier to maintain and prevents every pair from being crammed together like commuters on a Monday morning train.
Conclusion
Cheap DIY shoe storage is not about building the fanciest organizer on the internet. It is about creating a system that fits your home, your habits, and your budget. Whether you use wooden crates, PVC pipes, baskets, floating shelves, tension rods, or an old dresser, the right project can turn messy floors into organized, functional space.
Start small. Choose one problem area, such as the entryway, closet floor, or under-bed space. Count your shoes, sort them by use, and build a storage solution that makes sense for daily life. When shoe storage is easy, visible, and convenient, people are much more likely to use it. And when people use it, your home feels calmer, cleaner, and less like your sneakers are staging a rebellion.