Steam is awesome… right up until it isn’t. Maybe you’re out of disk space, your backlog is
stressing you out, or the client keeps acting like it skipped coffee and refuses to launch.
Whatever the reason, you’ve reached the “I’m uninstalling Steam” stage – and now you want to
do it cleanly, without nuking things you might still need.
The good news: uninstalling Steam isn’t hard once you know where everything lives on Windows,
macOS, and Linux. The not-so-good news: if you click the wrong “Uninstall” without thinking,
you can wipe hundreds of gigabytes of games in one shot. Let’s avoid that, shall we?
Before You Uninstall Steam: Important Things to Know
Before you pick your uninstall method, spend two minutes on prep. It can save you hours of
downloads later.
1. Decide if you want to keep your game files
By default, uninstalling Steam from Windows using Settings or Control Panel removes the Steam
folder and everything inside it – including your installed games and some local save data.
Cloud saves usually survive because they’re stored online, but not every game supports cloud
sync.
- Want to keep games? Back up the
steamappsfolder first. - Want a totally clean slate? Let the uninstall remove the entire folder.
On a standard Windows install, your games live here:
C:\Program Files (x86)\Steam\steamapps
2. Sign out of Steam and close it completely
Make sure Steam isn’t running in the background, or Windows/macOS may complain during the
uninstall:
- Exit Steam from the menu: Steam > Exit.
- On Windows, check the system tray and right-click the Steam icon > Exit.
- On Mac, right-click (or Ctrl-click) the Dock icon and choose Quit.
3. Back up anything unique
Some games store screenshots, mods, or configuration files inside the Steam folder. If you’ve
spent a lot of time customizing things, consider copying these folders somewhere safe:
steamapps\common– game installation foldersuserdata– local save data per Steam account
Once you’ve done your prep, you’re ready to pick your uninstall method. Let’s go through the
four most useful ways to uninstall Steam, starting with Windows.
Method 1: Uninstall Steam from Windows Settings (Windows 10 & 11)
This is the “normal” way to uninstall Steam on a modern Windows PC. It uses the built-in Apps
& Features page and works on both Windows 10 and Windows 11.
Step 1: Close Steam completely
Exit Steam from the menu and make sure it’s not still running in the system tray. If you’re
paranoid (or just thorough), you can press Ctrl + Shift + Esc, open Task
Manager, and confirm there are no Steam processes left.
Step 2: Open Apps & Features
-
Windows 11: Press Windows + I to open Settings >
Apps > Installed apps. -
Windows 10: Press Windows + I >
Apps > Apps & features.
Step 3: Uninstall Steam
- Scroll through the list or use the search box to find Steam.
-
Click the three dots (Windows 11) or select Steam (Windows 10) and choose
Uninstall. - Confirm any prompts. The Steam uninstaller will launch.
- Follow the on-screen instructions to complete the uninstall.
Important: If your Steam library is in the default location, this process
usually removes your installed games too. If you moved your library to a different drive,
those files may stay where they are unless they’re inside the main Steam folder.
Step 4: Optional – remove leftover folders
After the uninstall completes, you can clean up any remaining Steam folders:
C:\Program Files (x86)\SteamC:\Program Files\Steam(less common)C:\Program Files (x86)\Common Files\Steam(if present)
If you’re planning to reinstall Steam later and want to reuse your games, skip deleting
steamapps and only remove the other Steam files.
Method 2: Uninstall Steam via Control Panel (Classic Windows)
If you’re on an older version of Windows or you just prefer the “old school” way, you can use
Control Panel’s Programs and Features view. This also works if Steam still shows up there but
not in Apps & Features.
Step 1: Open Programs and Features
-
Press the Windows key, type Control Panel, and press
Enter. -
Click Programs, then Programs and Features (or go
straight to Programs and Features if your view is set to icons).
Step 2: Uninstall Steam from the list
- In the list of installed programs, find Steam.
- Right-click it and choose Uninstall, or click once and hit the Uninstall button at the top.
- Follow the prompts in the Steam uninstaller.
This method is handy when Steam is partially broken but still registered as installed.
Sometimes, Control Panel will even notice if the uninstall data is missing and offer to
remove the entry from the list, which cleans up the “ghost” program without doing anything to
your files.
What if Steam won’t uninstall?
If the uninstaller fails or Steam’s entry is corrupted, you have two options:
- Use a reputable third-party uninstaller to clean up the entry and leftover files.
-
Manually delete the Steam folder (after backing up games) and then remove the broken entry
via Control Panel when it offers to “remove from list.”
Method 3: Uninstall Steam on a Mac
On macOS, uninstalling Steam is mostly about dragging the app to the Trash and then cleaning
up the support files that live in your Library. The app itself is small; your games and cache
are what really eat up space.
Step 1: Quit Steam
- Click Steam > Quit Steam in the menu bar.
-
Make sure it’s not still running in the background (no Steam icon with a dot under it in
the Dock).
Step 2: Delete the Steam app
- Open Finder.
- Go to the Applications folder.
- Drag Steam.app to the Trash.
This removes the application, but your games and data are stored elsewhere. If your only
goal is to stop Steam from launching, you could technically stop here – but you won’t gain
much disk space.
Step 3: Remove Steam’s support files
Now, let’s clean up the large stuff. In Finder:
- Click Go in the menu bar.
- Hold down the Option (Alt) key and choose Library.
-
Open Application Support and look for a folder named
Steam. -
If you’re sure you no longer need your games or local data, drag the entire
Steam folder to the Trash.
You can also remove smaller leftover files:
~/Library/Preferences/com.valvesoftware.Steam.plist~/Library/Caches/Steam(if present)
Empty the Trash to reclaim the space completely. If you prefer a one-click approach, a
trusted Mac uninstaller app can also find and remove these extras, but doing it manually
gives you more control.
Method 4: Uninstall Steam on Linux (or Do a Deep Clean)
If you’re running Steam on Linux, uninstalling it usually happens through your package
manager. The exact command depends on how you installed Steam.
Option 1: Uninstall through your software center
On many user-friendly distributions (Ubuntu, Pop!_OS, Linux Mint, etc.), you can:
- Open your Software Center or app store.
- Search for Steam.
- Click Remove or Uninstall.
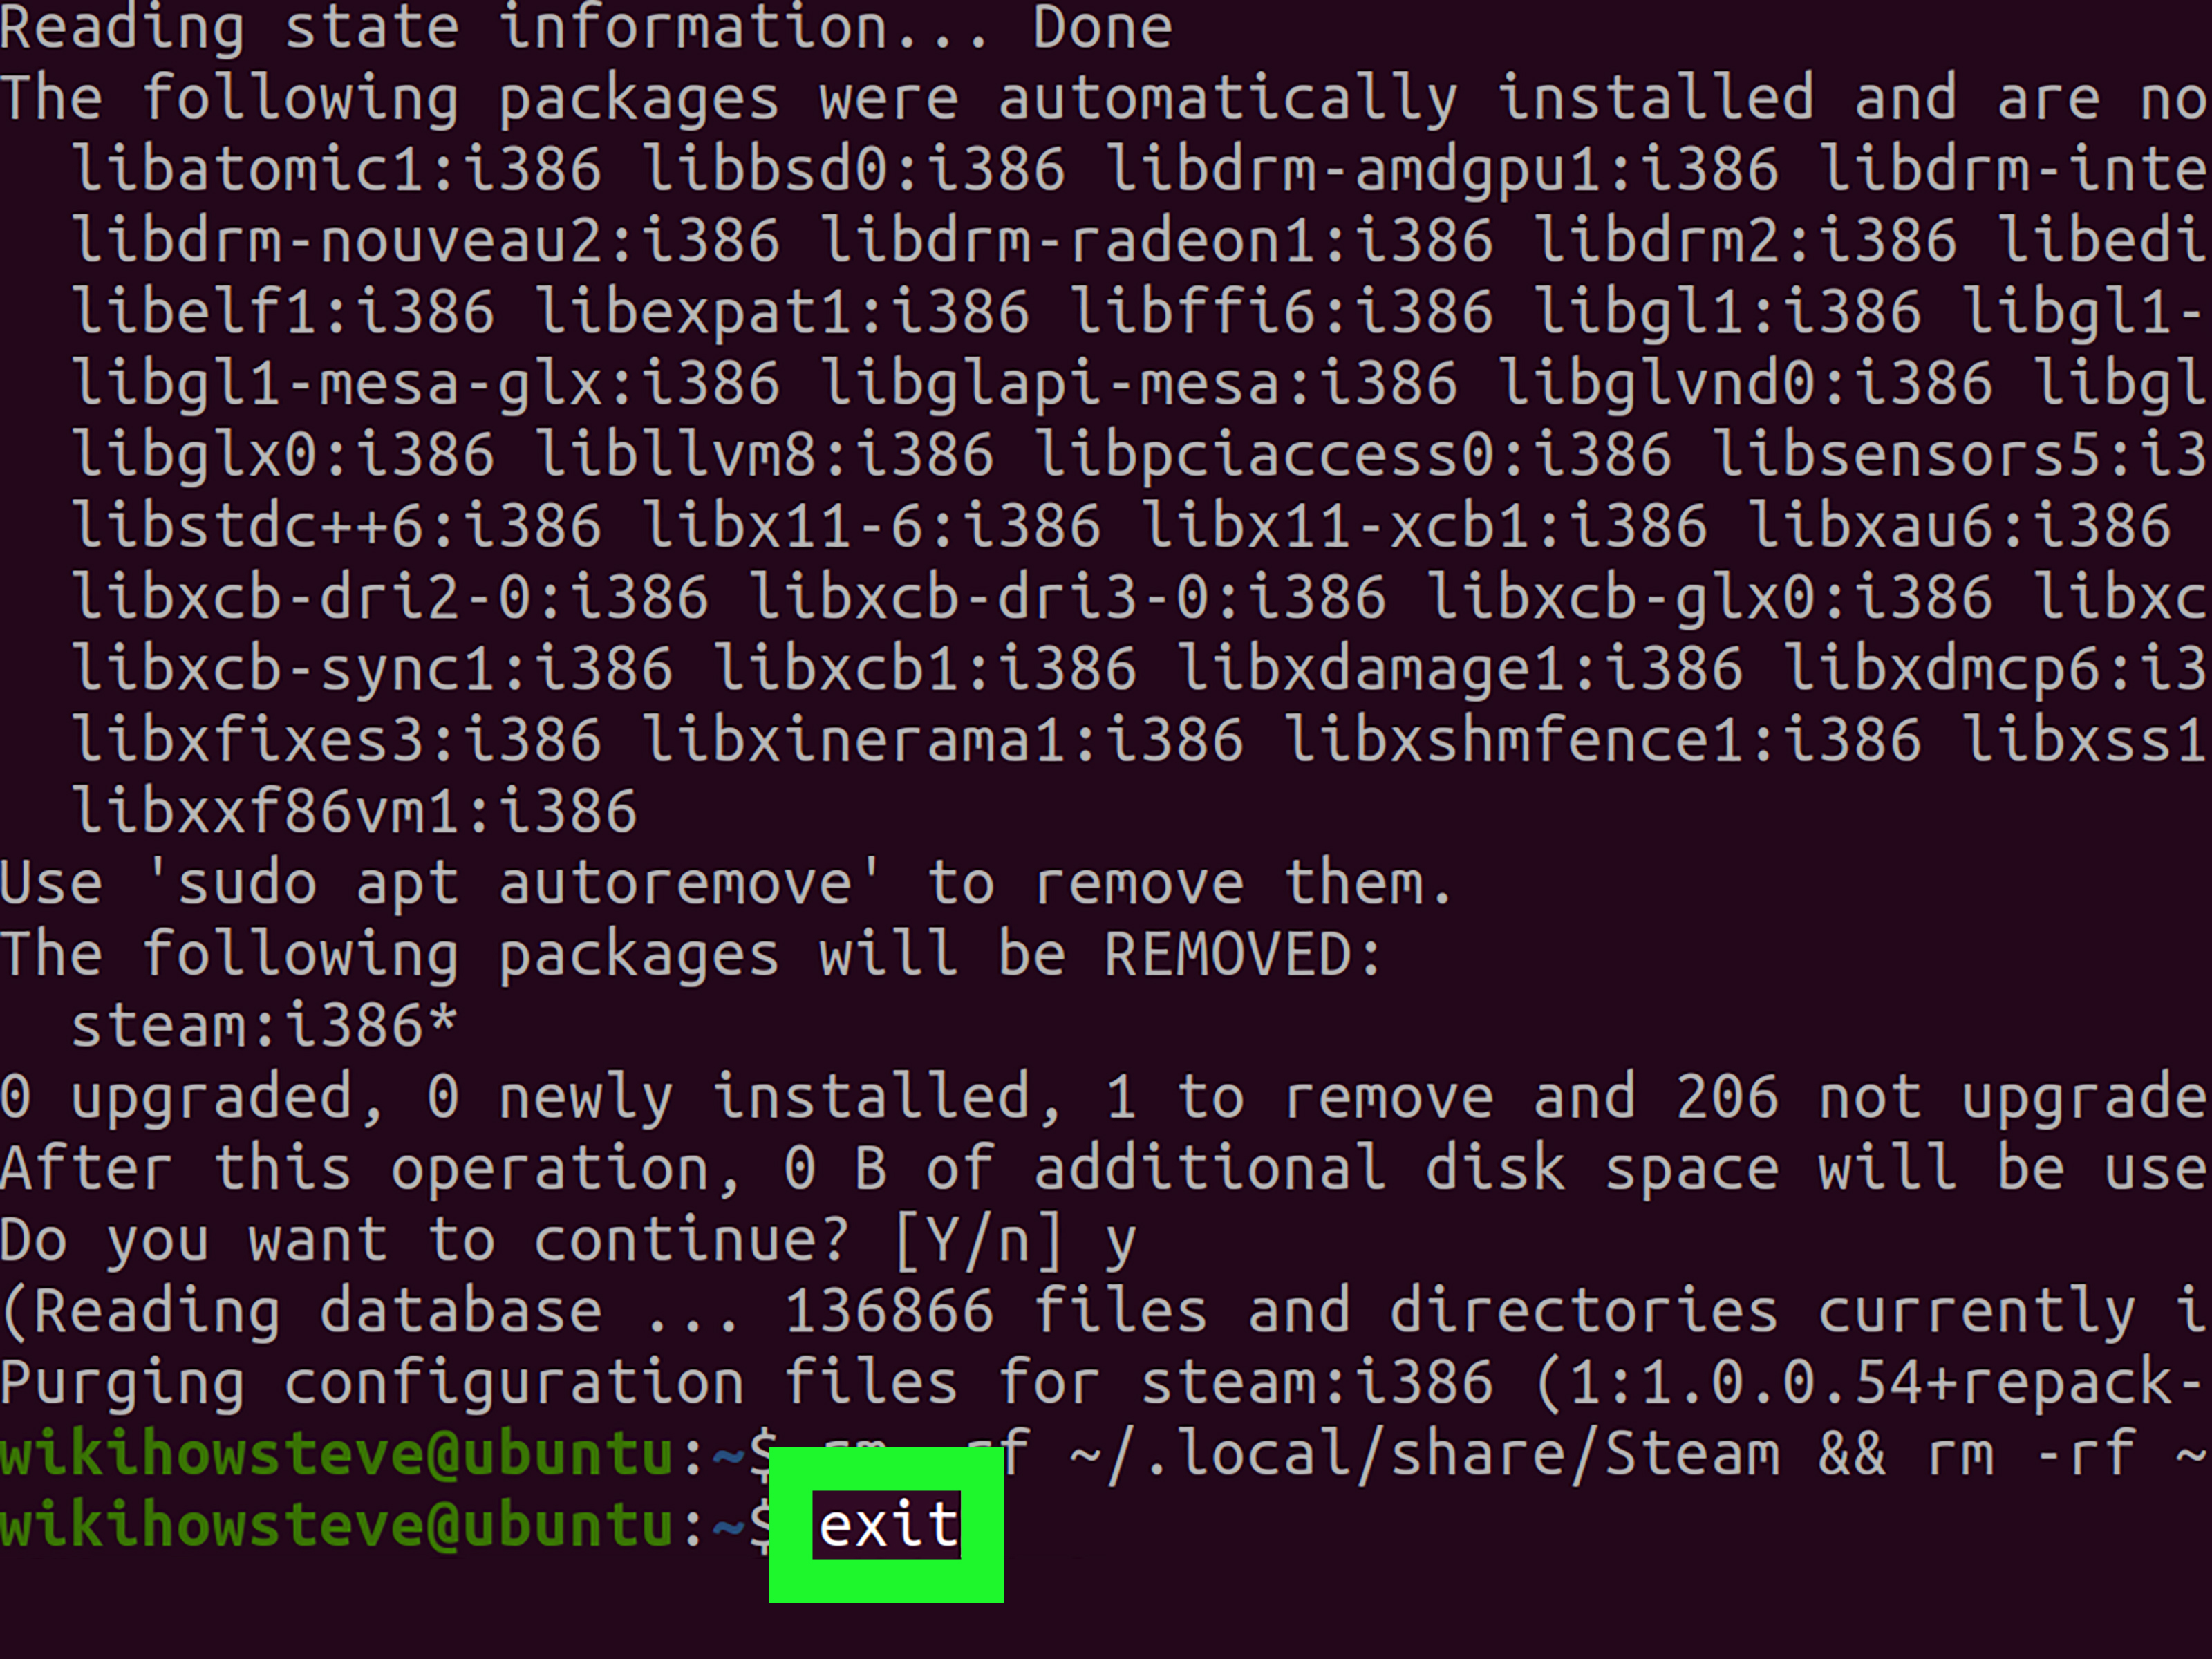
Option 2: Uninstall via the terminal
For Ubuntu-based systems where Steam was installed via the official package:
To remove configuration files as well:
Flatpak or other package formats use different commands (for example,
flatpak uninstall com.valvesoftware.Steam). Check how Steam was originally
installed if you’re unsure.
Deep-cleaning leftover Steam files on Linux
Steam’s user data is usually stored under your home folder:
~/.local/share/Steam~/.steam(symlink or folder, depending on setup)
After uninstalling, you can remove these folders to reclaim space. Just remember: this wipes
your installed games and local data stored there.
How to Uninstall Steam Games Without Removing Steam
Maybe you don’t actually hate Steam; maybe you just need room for one more massive open-world
game. In that case, uninstall individual games instead of ditching the entire client.
Uninstalling games from your Steam library (Windows, Mac, Linux)
- Open Steam and go to the Library tab.
- Right-click the game you want to remove.
- Select Manage > Uninstall.
- Confirm that you want to delete the local content.
The game remains in your library list, but the files on your drive are gone. If you want to
play again later, just click Install, and Steam will download it back.
Cleaning up “ghost” entries and shortcuts
Sometimes, uninstalled games leave behind shortcuts or entries in Windows:
-
Extra Start Menu shortcuts can be removed by right-clicking them and choosing
Open file location, then deleting the shortcut file. -
Old entries under Apps & Features usually disappear after a proper uninstall, but if
they don’t, a repair/uninstall cycle or a reputable uninstaller program can clean them up.
Troubleshooting: When Steam Refuses to Leave
Every now and then, Steam gets stubborn. Here’s what to try if the uninstall doesn’t go as
planned.
Steam doesn’t show up in Apps & Features, but the folder is still there
- Make sure Steam isn’t installed under a different user account.
-
If you’re 100% sure you don’t need anything inside the folder, manually delete the Steam
folder and its contents. - Restart your PC; any broken shortcuts or entries will usually disappear on their own.
Uninstall fails with an error message
- Restart your computer and try again.
-
Run Steam once as administrator, then close it and try uninstalling from Settings or
Control Panel again. -
If the uninstaller is missing or corrupted, a third-party uninstaller tool can scan for
leftovers and remove them.
You want to reinstall Steam later
If this is more of a “turn it off and on again” moment than a permanent breakup:
- Back up your
steamappsfolder (where your games live). - Uninstall Steam using one of the methods above.
- Reinstall Steam in the same location.
- Move your
steamappsfolder back if necessary.
When you launch Steam again, it should detect many of the existing games and verify them
instead of downloading them from scratch.
Conclusion: Pick the Uninstall Method That Fits Your Setup
Uninstalling Steam doesn’t have to be dramatic. Whether you’re on Windows, macOS, or Linux,
you’ve got a safe path to removing the client – and, if you plan ahead, you can keep the
games you care about or wipe absolutely everything and reclaim a ton of disk space.
The key steps are always the same: close Steam, decide what you want to keep, use the proper
uninstall method for your system, and then clean up any leftovers. Do that, and you’ll go from
“Why is my C: drive full?” to “Wow, I can install something new” in no time.
SEO Summary
meta_title:
4 Ways to Uninstall Steam Safely on Any Device
meta_description:
Learn 4 easy ways to uninstall Steam on Windows, Mac, and Linux without losing games or data.
sapo:
Want to uninstall Steam but worried about losing games, save files, or precious disk space?
This in-depth guide walks you through four safe ways to remove Steam on Windows, macOS, and
Linux, plus how to uninstall individual Steam games, clean up leftover files, and fix
stubborn uninstall issues. Whether you’re decluttering your PC, troubleshooting a glitchy
client, or planning a clean reinstall, you’ll learn exactly which folders matter, what
happens to your game library, and how to avoid common mistakes that cost hours of download
time. Read on before you click “Uninstall.”
keywords:
uninstall Steam, remove Steam Windows 11, uninstall Steam Mac, completely remove Steam games,
delete Steam client, uninstall Steam Linux, uninstall Steam safely
Real-World Experiences: Lessons Learned from Uninstalling Steam
Uninstalling Steam sounds simple until you meet the two extremes of PC gaming life: the
minimalist who thinks “I’ll just delete the folder” and the collector who has 3 TB of games
and zero idea where anything actually lives. Most uninstall horror stories fall somewhere
between those two.
One common experience goes like this: someone decides to “start fresh” after years of
downloading games during sales. Their C: drive is flashing red, Windows is nagging them about
low space, and they’re convinced uninstalling Steam will instantly solve everything. They go
into Settings, uninstall Steam, and feel very pleased… until they realize that the games they
actually wanted to keep are gone too. Re-downloading giant titles over a slow connection
suddenly makes “just cleaning up a bit” an all-weekend project.
On the other side, there’s the person who never quite commits to the uninstall. They delete a
few games, close Steam, and drag the app to the Trash (on Mac) or delete the desktop shortcut
(on Windows). Now they’re convinced Steam is gone… but their disk space hasn’t changed, and
they still see random Steam entries in search. That’s when they discover that games and user
data sit in separate folders and that simply removing the launcher doesn’t do much for
storage.
A lot of users only learn about the steamapps folder the hard way. It’s the
secret vault where your installed games live, and once you know about it, you start treating
it like a library instead of a trash pile. People who’ve gone through a painful uninstall
once usually handle things differently next time: they back up favorite games, use Library
> Manage > Uninstall for titles they truly don’t want, and only then remove the client
when they’re sure. It turns a chaotic purge into a controlled cleanup.
Another surprisingly common experience involves troubleshooting. Someone’s Steam client stops
working – maybe it won’t log in, crashes on launch, or refuses to update. The instinctive
reaction is “I’ll uninstall and reinstall Steam.” Sometimes that works, but quite a few users
discover that a full uninstall wasn’t necessary. Simply deleting everything in the Steam
folder except steam.exe and steamapps, then restarting Steam, can
rebuild core files without touching the games themselves. That’s a lot less painful than
watching your entire library vanish because you clicked the wrong button.
Mac users, in particular, often run into the “Why didn’t I get my space back?” problem. They
drag Steam to the Trash, empty it, and expect dozens of gigabytes to return instantly. When
Finder still reports a nearly full drive, confusion sets in. The eventual realization – that
the huge files live in ~/Library/Application Support/Steam – is usually followed
by a mix of relief (“There’s the missing space!”) and mild annoyance (“Why was it hidden in a
Library folder I never see?”). After that, many people get into the habit of checking Library
folders for large app support files whenever they remove big apps.
Linux users have their own flavor of this story. Steam might be installed through a software
center, a .deb package, or Flatpak. If you forget which method you used, uninstalling can
feel like detective work: commands fail, software centers don’t recognize the install, and
you’re left with a half-broken client. The experience teaches a useful habit: whenever you
install software through a package manager, make a mental note (or an actual note) of how you
installed it. It makes removing or repairing it much easier later.
The big takeaway from all these experiences is simple: uninstalling Steam is less about
clicking “Remove” and more about being intentional. Decide what you’re trying to achieve:
free up space, fix a broken client, move Steam to a different drive, or permanently step away
from your library. That goal will determine whether you back up the steamapps
folder, which folders you delete, and how aggressive you are with cleanup tools.
Once you’ve gone through the process once or twice, you stop being afraid of it. Steam
becomes just another app you can install, remove, and reinstall when needed. Your games are
tied to your account, not your current machine, so as long as you don’t delete things blindly,
you can always rebuild your library on a fresh system. And if you do accidentally wipe a few
games? Well, consider it Steam’s way of helping you finally decide what you actually want to
play.