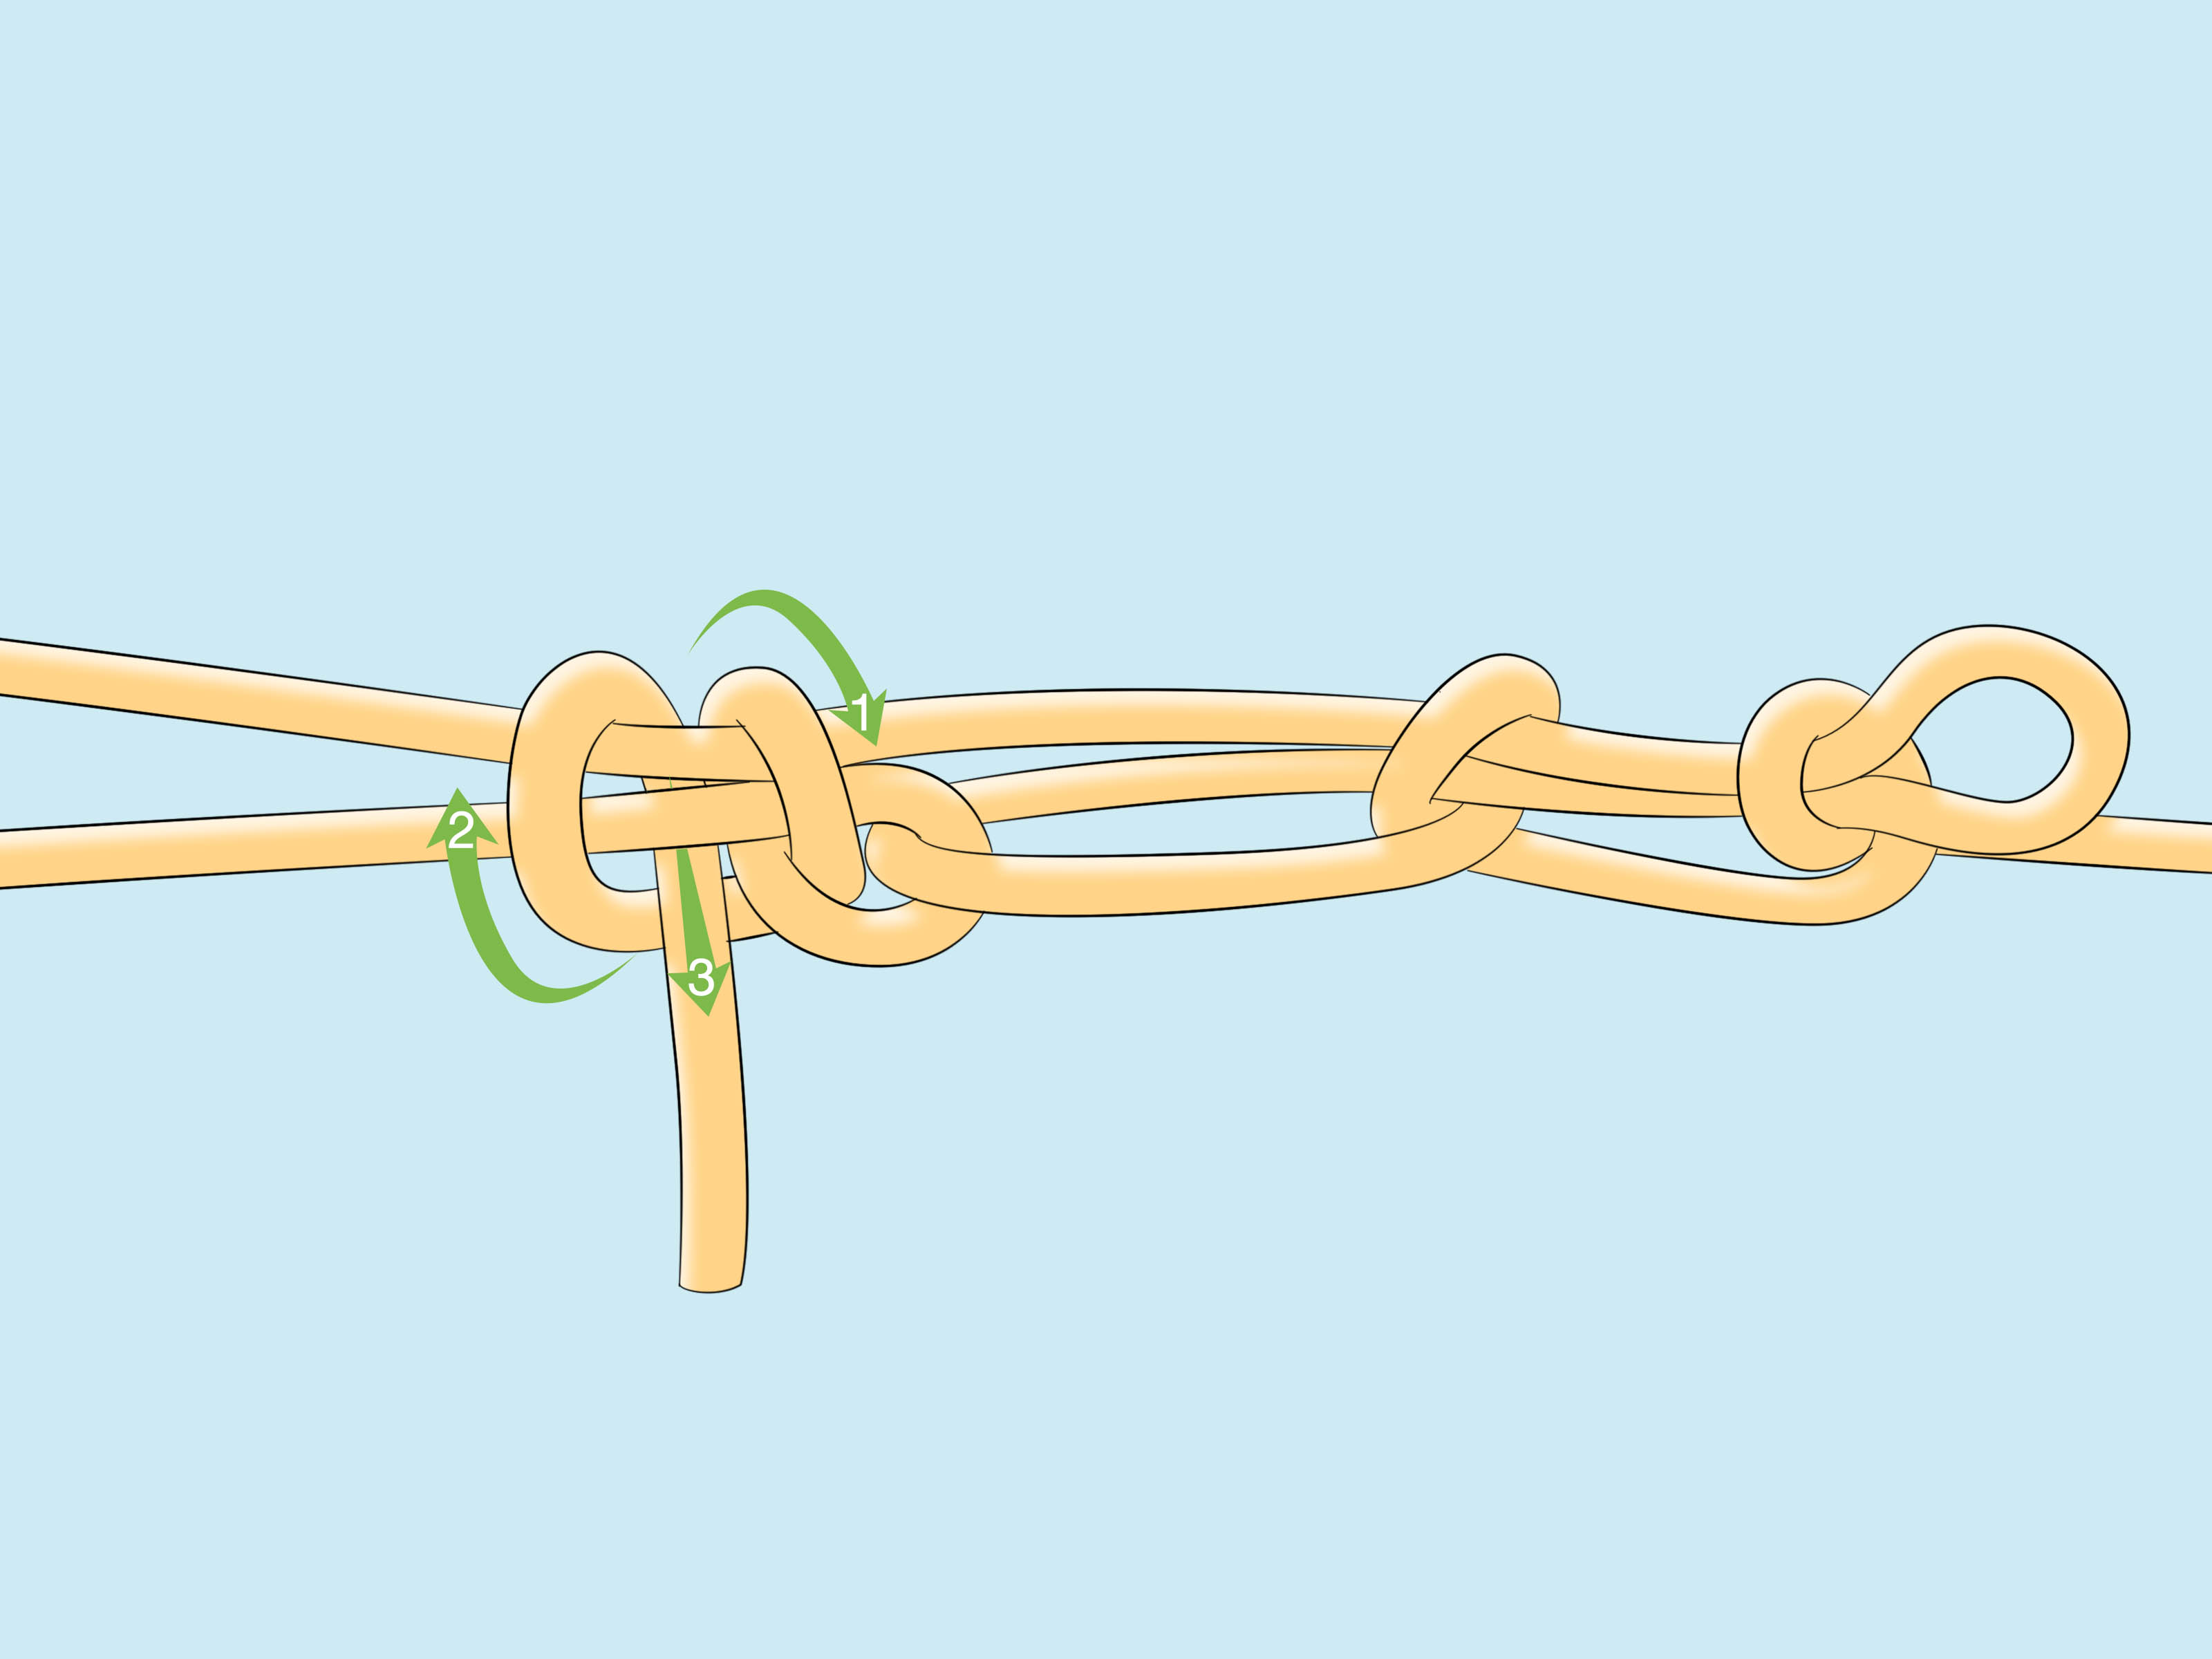
If you have ever tried to strap down a cooler, tarp, canoe, mattress, ladder, or suspiciously ambitious pile of camping gear with a sad little knot that immediately gave up, you already understand why the trucker’s hitch is famous. This knot is not just a knot. It is a tiny rope-powered tightening machine. It lets you pull a line tight with extra leverage, lock that tension in place, and still untie everything later without needing a toolbox, a prayer circle, or your strongest neighbor.
The trucker’s hitch is one of the most useful rope knots for camping, hauling, boating, yard work, and general “please do not fall off the roof rack” situations. It is commonly used to secure loads, tighten tarp ridgelines, tie down kayaks, stabilize tents, and create firm tension between two anchor points. The beauty of the knot is its simple mechanical advantage: the rope runs through a loop like a basic pulley system, helping you pull the line tighter than you could by hand alone.
In this guide, you will learn how to tie a trucker’s hitch in easy steps, how the knot works, where to use it, which mistakes to avoid, and how to practice until your fingers stop acting like confused spaghetti.
What Is a Trucker’s Hitch?
A trucker’s hitch is a compound knot system used to tension a rope. Instead of being one single knot, it usually has three parts: an anchor knot at one end, a loop in the standing part of the rope, and a finishing knot that locks everything after you pull it tight.
The main purpose of the trucker’s hitch is tension. It helps you cinch a rope down firmly around a load or between two fixed points. That is why it is popular with truck drivers, campers, paddlers, scouts, boaters, gardeners, and anyone who has ever tried to stop a tarp from flapping like an angry ghost at 2 a.m.
Why the Trucker’s Hitch Works So Well
The trucker’s hitch works because it creates a simple pulley-like system. When you pass the working end of the rope around an anchor point and then back through a loop in the rope, you gain extra pulling power. In ideal conditions, the setup can feel like it gives you much more control over tension. In the real world, friction reduces some of that advantage, but the hitch still gives you far better tightening ability than simply pulling a rope and tying a basic knot.
This is why the trucker’s hitch is especially helpful when tying down objects that need to stay snug: a tarp in the wind, a canoe on a rack, a load in a trailer, or a ridgeline between trees. It lets you tighten, hold, and finish the line neatly.
When Should You Use a Trucker’s Hitch?
Use a trucker’s hitch when you need a rope to be tight, adjustable, and secure. It is excellent for temporary tensioning jobs, especially outdoors.
Common Uses
- Securing a tarp over firewood, camping gear, or a trailer
- Tightening a tent guyline or tarp ridgeline
- Tying down a kayak, canoe, or paddleboard to a roof rack
- Holding lumber, ladders, or bulky items in place
- Creating a tight clothesline at camp
- Stabilizing light loads during transport
- Pulling a line tight between posts, trees, or stakes
Important note: Do not use a basic trucker’s hitch for climbing, towing vehicles, supporting people, overhead lifting, or any life-safety application. Rope, knots, anchor points, and loads can fail. For critical jobs, use rated equipment, proper cargo straps, and professional guidance.
Rope Terms You Should Know First
Before learning how to tie a trucker’s hitch, it helps to know a few simple rope terms. Nothing too dramatic. No nautical exam. Just enough vocabulary so the steps make sense.
Standing End
The standing end is the long part of the rope that usually stays connected to the first anchor point.
Working End
The working end is the loose end of the rope you use to tie, pull, wrap, and finish the hitch.
Bight
A bight is a U-shaped bend in the rope. You make a bight when you fold the rope without crossing the ends.
Loop
A loop is a circle made in the rope. In a trucker’s hitch, the loop acts like the pulley point.
Half Hitch
A half hitch is a simple finishing knot used to secure the working end around the standing part of the rope.
How to Tie a Trucker’s Hitch: Easy Steps
There are several trucker’s hitch variations. The version below is beginner-friendly, practical, and easy to remember. Once you understand the structure, you can experiment with stronger midline loops such as an alpine butterfly loop or directional figure-eight loop.
Step 1: Attach One End of the Rope to an Anchor
Start by tying one end of your rope to a fixed anchor point. This could be a roof rack, trailer rail, tree, post, stake, or tie-down point. A bowline, two half hitches, or a round turn with two half hitches can work well for this first connection.
Make sure the anchor point is solid. A perfect trucker’s hitch tied to a weak anchor is like putting racing tires on a shopping cart. Technically interesting, but not reliable.
Step 2: Run the Rope Over or Around the Load
Next, pass the rope over the item you want to secure or across the space you want to tighten. Keep the rope flat where possible, especially if you are tying down a kayak, canoe, or anything that can dent, crack, or deform. If the rope twists, straighten it before tightening.
Step 3: Make a Loop in the Standing Part
About two or three feet before the second anchor point, create a loop in the standing part of the rope. This loop is the heart of the trucker’s hitch. It will become the pulley-like point that gives the knot its tensioning power.
For a quick version, you can make a slippery half hitch loop. For a more secure and cleaner version, use an alpine butterfly loop or directional figure-eight loop. The loop should hold its shape when you pull through it. If it collapses or tightens into a jammed knot, start again and form it more carefully.
Step 4: Take the Working End Around the Second Anchor
Now take the working end of the rope around the second anchor point. This might be the other side of a roof rack, a trailer hook, a stake, a tree, or a tie-down ring. Bring the working end back toward the loop you made in Step 3.
At this point, your rope should form a triangle-like tensioning setup: first anchor, loop, second anchor, and working end coming back through the system.
Step 5: Feed the Working End Through the Loop
Pass the working end through the loop in the standing part of the rope. Pull it through smoothly. Now you have created the mechanical advantage that makes the trucker’s hitch so useful.
When you pull the working end, the rope tightens across the load. You should feel more control than with a regular knot. This is the moment when the trucker’s hitch earns its reputation and quietly makes bungee cords look nervous.
Step 6: Pull Down to Tighten
Pull the working end firmly until the rope is tight. Use steady pressure rather than sharp jerks. Watch the load as you tighten. If you are tying down a boat, plastic bin, furniture, or anything fragile, do not overdo it. The trucker’s hitch can create enough force to damage lighter materials.
The goal is secure, not crushed. Your kayak should not look like it is regretting all its life choices.
Step 7: Lock the Tension With a Half Hitch
While holding tension on the working end, pinch the rope near the loop to prevent slack from returning. Then tie a half hitch around the standing part below the loop. This locks the tension in place.
For extra security, tie a second half hitch. Many people prefer finishing with two half hitches because it makes the trucker’s hitch more stable under vibration, wind, and movement.
Step 8: Add a Quick-Release Finish If Needed
If you want the knot to untie easily, finish the last half hitch with a slipped bight. That means instead of pulling the entire working end through, you pull a folded bight through. Later, you can release the knot by pulling the loose tail.
This is useful for camping tarps, temporary loads, and situations where you know you will untie the rope soon. If the load will vibrate during travel, make sure the quick-release finish cannot accidentally shake loose.
Best Loop Options for a Trucker’s Hitch
The loop you choose affects how secure and easy-to-untie your trucker’s hitch will be. Beginners often learn with a slippery half hitch because it is fast. However, other loop knots may perform better under heavier tension.
Slippery Half Hitch Loop
This is quick and easy. It works for light-duty jobs such as tarps, camp lines, and temporary tie-downs. The downside is that it can tighten or jam if tied incorrectly.
Alpine Butterfly Loop
The alpine butterfly loop is strong, stable, and excellent for creating a loop in the middle of a rope. It is a great option when you want a loop that does not collapse under strain.
Directional Figure-Eight Loop
A directional figure-eight loop is another solid choice. It is commonly recommended for a trucker’s hitch because it handles pull in a specific direction and is relatively easy to inspect.
Common Mistakes to Avoid
Making the Loop Too Close to the Anchor
If your loop is too close to the second anchor point, you will not have enough room to pull and tension the rope. Place the loop far enough back so you have working space.
Using Weak or Stretchy Rope
Stretchy rope can make the load feel tight at first, then loosen as it moves. For tie-down work, use rope with limited stretch and enough strength for the job.
Forgetting the Finishing Hitches
The trucker’s hitch is not done when the rope feels tight. You must lock the tension with one or two half hitches. Otherwise, the whole system can loosen.
Overtightening the Load
This knot gives real pulling power. That is wonderful until you bend a rack, dent a soft object, or deform a kayak hull. Tighten gradually and check the load as you go.
Using It for Dangerous Loads
A trucker’s hitch is useful, but it is not magic. Do not use it as a substitute for rated cargo straps, chains, climbing gear, or professional rigging equipment when safety depends on certified hardware.
How to Untie a Trucker’s Hitch
To untie the hitch, release the finishing half hitches first. If you used a slipped finish, pull the quick-release tail. Once the finish is loose, remove the working end from the loop and pull the rope free from the anchor points.
If the knot has jammed, do not yank angrily unless you enjoy rope-based comedy. Instead, bend the knot back and forth to loosen the compressed turns. A properly dressed knot is much easier to untie than a messy one.
Trucker’s Hitch vs. Ratchet Strap
A trucker’s hitch and a ratchet strap both tighten loads, but they are not identical tools. A ratchet strap is usually better for heavy cargo, highway transport, and loads that require rated strength. A trucker’s hitch is excellent when you have rope, need fast field tension, and are working with moderate temporary loads.
Think of the trucker’s hitch as the clever outdoor problem-solver. Think of the ratchet strap as the purpose-built cargo professional. Both deserve respect. Neither should be used carelessly.
Practice Drill: Learn It in Five Minutes
The fastest way to learn the trucker’s hitch is to practice between two fixed points at waist height. Tie one end of the rope to a post, chair leg, fence rail, or rack. Make your loop in the standing part. Wrap the working end around the second anchor. Feed it through the loop. Pull tight. Finish with two half hitches.
Repeat this ten times slowly. Then repeat it five times without looking at instructions. Then try it with gloves on. If you can tie it with gloves, in wind, while mildly annoyed, congratulationsyou have entered the useful-knot club.
Safety Tips Before You Trust the Knot
- Inspect your rope for cuts, frays, stiffness, melted spots, or damaged fibers.
- Check that both anchor points are strong and smooth enough for rope contact.
- Use padding where rope touches fragile surfaces.
- Do not rely on a single rope for heavy, valuable, or dangerous loads.
- Stop after a short distance and recheck any transported load.
- Keep excess rope tied off so it cannot whip, drag, or tangle.
- Use rated straps or hardware when required by law, road conditions, or load weight.
Conclusion: The Trucker’s Hitch Is a Small Skill With Big Payoff
Learning how to tie a trucker’s hitch is one of those practical skills that pays you back again and again. It makes camping easier, hauling safer, tarps quieter, and roof-rack adventures less stressful. Once you understand the basic patternanchor, loop, wrap, pull, finishyou can use the hitch in dozens of everyday situations.
The key is not just tying it once. Practice until the steps feel natural. Learn a reliable loop, finish with secure half hitches, and respect the amount of force the knot can create. A well-tied trucker’s hitch should look neat, hold firm, and untie without a wrestling match.
Real-World Experience: What Using a Trucker’s Hitch Teaches You
The first thing most people learn from using a trucker’s hitch in real life is that rope behaves differently in your hands than it does in a diagram. On a clean illustration, every strand is polite. Outdoors, the rope is wet, twisted, dirty, stiff, too short, too long, or somehow wrapped around your ankle. That is why practice matters. The trucker’s hitch is simple once you understand it, but your hands need repetition before the movement feels automatic.
One useful experience comes from tying down a tarp. A loose tarp is basically a musical instrument designed by chaos. In a light breeze, it flaps. In a serious wind, it snaps, sags, and tries to become a kite. A trucker’s hitch lets you tighten the ridgeline enough to keep the tarp cleanly pitched. The trick is to tighten evenly. Pull one side too aggressively and the tarp may wrinkle, twist, or put too much strain on one grommet. A better method is to tension the main line first, then adjust the corners gradually.
Another common lesson comes from hauling a canoe or kayak. The trucker’s hitch can make the line very tight, which is helpful, but it also teaches restraint. Plastic and composite hulls can be damaged by pressure. Foam blocks can compress. Roof racks can shift if the line angle is poor. The best approach is to tighten until the boat cannot slide, then stop. Shake the boat gently, check the contact points, and use bow and stern lines when appropriate. More force is not always more safety. Sometimes it is just more force.
When securing lumber or ladders, the trucker’s hitch shows why clean rope management matters. If the rope crosses sharp edges, it can wear quickly. If the working end is left loose, it can whip in the wind. If the knot is tied in a messy pile, it may be hard to inspect. Good practice means dressing the knot so the strands lie neatly, checking that the loop is stable, and tying off extra rope. A tidy knot is easier to trust because you can actually see what it is doing.
Camping also reveals the value of a quick-release finish. After a rainy night, cold fingers do not appreciate jammed knots. Finishing the last half hitch with a slipped bight can make morning teardown much easier. However, for anything exposed to vibration or travel, the quick-release tail should be secured so it cannot shake loose. Convenience is wonderful, but only when it does not invite your load to leave dramatically.
The biggest experience-based tip is this: test the hitch before you depend on it. Pull on the line, bounce it lightly, check the anchors, and watch for slipping. A trucker’s hitch is reliable when tied correctly, but every setup is different. Rope type, anchor shape, weather, friction, and load movement all matter. The knot is a tool, not a guarantee. Used with care, it becomes one of the most satisfying and practical knots you can know.
Note: This guide is for general educational use. For climbing, towing, overhead lifting, highway cargo, or any life-safety situation, use rated equipment and follow applicable safety standards.