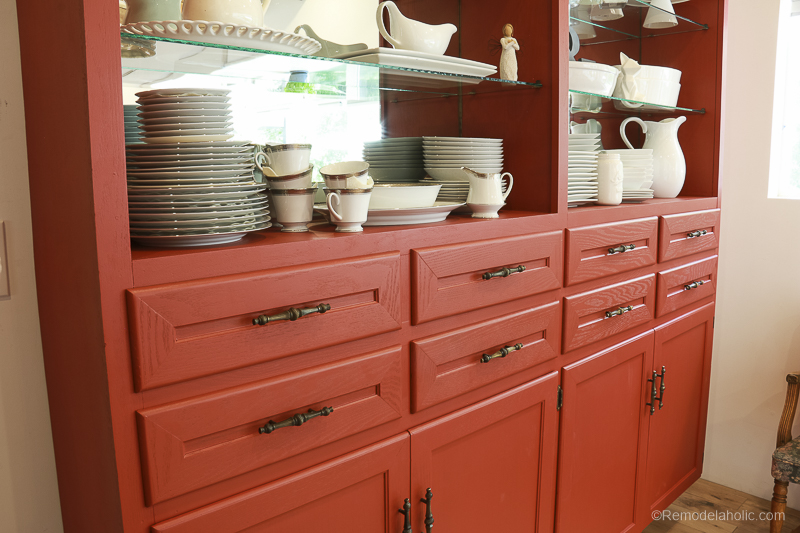
A dining room hutch is one of those pieces of furniture that can quietly run the whole roomor quietly ruin it. It stores the pretty plates, frames the serving area, shows off the glassware, and somehow collects every birthday candle, loose napkin ring, and “where should I put this?” object in the house. When the finish feels dated, dark, or heavier than a Thanksgiving food coma, a makeover can completely change the room.
The good news? You do not always need to sand, prime, or seal your hutch to get a beautiful painted finish. Yes, you read that correctly. No sanding. No priming. No sealer. No turning your garage into a dust storm. No pretending you enjoy prep work while secretly questioning every life decision that led you to own a hutch with twelve little doors.
This guide walks through a practical, beginner-friendly dining room hutch makeover using the right no-prep furniture paint, careful cleaning, smart application, and patient curing. The result can be fresh, durable, and stylish without the full furniture-refinishing marathon.
Note: This method is best for furniture with an intact, clean, stable surface. If your hutch is antique, peeling, flaking, or possibly coated with lead-based paint, test it before disturbing the finish and follow proper safety guidance. “No sanding” is convenient, but “no surprise lead dust” is even better.
Why Choose a No-Sanding Hutch Makeover?
Traditional furniture painting usually sounds like this: remove everything, sand every surface, wipe dust, prime, wait, paint, sand between coats, paint again, seal, wait, question reality, repeat. That process works, but it can be intimidating for busy homeowners who simply want the dining room to stop looking like it borrowed a hutch from 1994.
A no-sanding hutch makeover is appealing because it lowers the barrier to starting. Instead of stripping the piece to bare wood, you rely on a specialty paint designed to grip existing finishes. Chalk-style furniture paint, mineral paint, and true all-in-one cabinet or furniture paints are often used for this kind of project because they bond well to many previously finished surfaces with minimal prep.
The trick is understanding what “minimal prep” really means. It does not mean painting over dust, grease, candle wax, mystery syrup, or the ghost of every holiday buffet. It means you skip abrasive sanding and separate primer, but you still clean thoroughly, remove hardware, protect glass, apply thin coats, and let the paint cure.
Best Paint for a No-Sand, No-Prime, No-Sealer Hutch
For this project, choose a paint that clearly says it can be used on furniture without sanding or priming. Not all paints are built for this. Regular wall paint may look fine for a week and then scratch when someone places a serving bowl on the shelf. A dining room hutch needs a paint that can handle doors opening, drawers sliding, dishes moving, and guests saying, “Did you buy that new?” while touching it with snack fingers.
All-in-One Furniture Paint
All-in-one furniture paint is the easiest match for a no sanding, no priming, no sealer project. These paints are designed to combine bonding, color, and protective durability in one product. They are especially useful for hutches because a hutch has multiple surfaces: flat cabinet sides, decorative trim, shelves, doors, and often a buffet-style base.
If you want the least complicated route, this is your best choice. Look for labels that mention furniture, cabinets, built-in bonding technology, washable finish, or no topcoat required. A soft satin or low-luster finish usually looks polished without making the hutch look plastic.
Chalk-Style Furniture Paint
Chalk-style paint is popular for furniture makeovers because it is forgiving, thick, and matte. It can hide small imperfections and create a charming, hand-finished look. However, some chalk paints traditionally require wax or a topcoat for protection, especially on high-touch surfaces. If your title promise is “no sealer,” choose either a chalk-style paint that states no sealer is required or reserve chalk paint for lower-use display areas.
For a dining hutch, chalk-style paint can work beautifully on the upper display cabinet, decorative trim, and interior backing. For the buffet top where serving dishes land, an all-in-one paint may be the safer no-sealer option.
Mineral Paint
Mineral paints are another strong option. Many are self-leveling, durable, and made for furniture. They often have built-in protection and a smoother finish than chalk paint. If you prefer a modern hutch makeover rather than a rustic distressed look, mineral paint is worth considering.
Color Ideas for a Dining Room Hutch Makeover
The color you choose can make the hutch disappear gracefully into the room or become the star of the dining area. Both approaches work. The right answer depends on your space, lighting, and how dramatic you want the transformation to feel.
Warm White for a Classic Look
A warm white hutch feels timeless, clean, and easy to decorate around. It brightens dark dining rooms and makes glassware sparkle. Avoid stark white unless the room already has cool tones; creamy white, ivory, linen, or soft alabaster shades often look better with wood floors and warm lighting.
Sage Green for Soft Character
Sage green is a favorite for furniture makeovers because it feels calm, vintage, and current at the same time. On a dining room hutch, sage works especially well with brass hardware, white dishes, woven textures, and natural wood tables.
Charcoal or Navy for Drama
If your dining room needs contrast, charcoal, deep blue, or black-green can turn a bulky hutch into a designer-style statement piece. Dark colors also help older hutches look more intentional. Suddenly the heavy furniture is not outdated; it is “moody and curated.” That is the power of paint and a confident adjective.
Two-Tone Hutch Makeover
A two-tone finish can make a large hutch feel lighter. Try a neutral exterior with a darker interior, or paint the backing panel a contrasting color. A warm white hutch with a sage or navy interior gives depth without overwhelming the room.
Supplies You Need
You do not need a professional workshop. You need a clean workspace, good lighting, and tools that help the paint behave nicely. Gather these before you start:
- No-sand furniture paint or all-in-one cabinet paint
- Degreasing cleaner or mild dish soap solution
- Microfiber cloths
- Painter’s tape
- Drop cloth
- Screwdriver or drill for removing hardware
- Angled brush for trim and corners
- Small foam roller or microfiber roller for flat areas
- Small artist brush for detail work
- Painter’s pyramids or small blocks to lift doors
- Optional: new knobs, pulls, or backplate hardware
Step-by-Step: How to Paint a Dining Room Hutch with No Sanding, No Priming, No Sealer
Step 1: Empty and Inspect the Hutch
Remove dishes, glasses, drawers, shelf pegs, and hardware. This is the moment when you discover that one drawer contains seven table runners, two batteries, and a key that opens absolutely nothing. Set everything aside and inspect the furniture.
Look for loose veneer, sticky residue, cracked trim, or areas where the old finish is peeling. No-sanding paint can grip an intact finish, but it cannot magically glue down failing surfaces. If veneer is lifting, repair it first. If paint is already flaking, stop and test for lead if the piece may be old.
Step 2: Clean Like the Paint Depends on It
Because it does. Cleaning is the most important step in a no-sand furniture makeover. Dining room furniture collects oils from hands, food residue, furniture polish, dust, and invisible grime. Paint needs to touch the surface, not a thin layer of “holiday ham atmosphere.”
Use a degreasing cleaner or a mild mixture of dish soap and warm water. Wipe every surface you plan to paint, including edges, trim, drawer fronts, shelf lips, and door frames. Rinse with a clean damp cloth so no cleaner residue remains, then let the hutch dry completely.
Step 3: Tape Glass and Protect the Interior
If your hutch has glass doors, tape the glass carefully where it meets the frame. Use painter’s tape and press the edge down firmly with a fingernail or plastic card. If you are not painting the inside of the cabinet, tape off the interior edges too.
For hutches with removable shelves, take them out and paint them flat. This helps prevent drips along the shelf edges and makes the job much easier.
Step 4: Stir the Paint Thoroughly
Do not shake furniture paint unless the label says it is okay. Stir it slowly from the bottom of the can. Specialty paints can have pigments and bonding ingredients that settle, and you want an even finish from the first brushstroke to the last.
Step 5: Start with the Detailed Areas
Use an angled brush to paint trim, corners, molding, door frames, and carved details. Work in thin coats. Thick paint may feel satisfying at first, but it can leave ridges, drips, and brush marks. A hutch has many vertical surfaces, and gravity is not your painting assistant.
Brush with the grain or in the direction of the trim. Feather out edges so the rolled areas blend smoothly into the brushed sections.
Step 6: Roll the Flat Surfaces
Use a small foam or microfiber roller on the sides, drawer fronts, doors, and large flat panels. Roll lightly and avoid pressing hard. Too much pressure can create roller lines or tiny bubbles. Think “smooth and steady,” not “steamrolling a driveway.”
After rolling, check from different angles for missed spots or buildup along edges. Catching drips early is much easier than discovering them after they have dried into permanent furniture stalactites.
Step 7: Let the First Coat Dry
Follow the paint manufacturer’s drying time. Dry-to-touch does not mean ready-for-life. Furniture paint needs time between coats so it can bond properly. Humidity, temperature, and thick application can slow the process.
The first coat may look streaky, especially over dark wood. Do not panic. First coats are like first drafts: useful, necessary, and not always pretty.
Step 8: Apply the Second Coat
Apply a second thin coat using the same brush-and-roll method. Most hutches need two coats for full coverage. Dark colors may cover faster, while whites and pale neutrals may need a third coat in spots. Let each coat dry properly before adding another.
Step 9: Skip the Sealer, But Respect the Cure Time
If you chose a no-sealer furniture paint, you can skip wax, polyurethane, and clear coat. However, you cannot skip curing. Paint may feel dry within hours, but full durability develops over days or weeks depending on the product.
During the cure period, handle the hutch gently. Avoid sliding dishes across shelves, closing doors aggressively, or staging a buffet for twelve people on day two. Give the finish time to harden. Patience is cheaper than repainting.
Step 10: Reinstall Hardware and Style the Hutch
Once the paint is dry enough to handle, reinstall the hardware. New knobs or pulls can make a huge difference. Brushed brass warms up sage and navy. Matte black adds contrast to white. Antique bronze works beautifully with creamy neutrals.
When styling, avoid overloading the shelves. Let the new paint color breathe. Use stacks of white plates, clear glass, a few wood accents, framed art, or a small plant. A painted hutch looks best when it feels edited, not packed like a storage unit with doors.
Common Mistakes to Avoid
Painting Over Grease or Furniture Polish
This is the biggest reason no-sand paint fails. Furniture polish can create a slick barrier that prevents adhesion. Clean twice if the piece feels waxy or oily.
Choosing the Wrong Paint
Regular interior wall paint is not the same as furniture paint. For a no sanding, no priming, no sealer hutch makeover, the product matters. Choose paint specifically made for furniture, cabinets, or multi-surface adhesion.
Applying Coats Too Thick
Thick coats dry slowly and chip more easily. Thin coats look more professional and cure better.
Using the Hutch Too Soon
A painted hutch needs gentle treatment while it cures. Do not rush the styling stage if shelves still feel soft or tacky.
Real-Life Experience: What a No-Prep Hutch Makeover Actually Feels Like
The first time you paint a dining room hutch without sanding, it feels a little suspicious. Years of DIY advice have trained us to believe every successful furniture project must begin with sandpaper, a dust mask, and mild regret. So when you open a can of furniture paint that says no sanding, no priming, and no sealer, your brain may whisper, “Sure, and maybe the dishes will wash themselves too.”
In practice, the experience is surprisingly manageable. The hardest part is not painting; it is dealing with the size and personality of the hutch. A dining room hutch is not a tiny side table you can flip over with one hand. It has doors, drawers, shelves, glass panels, corners, trim, and at least one awkward spot where your brush suddenly becomes too large and your patience becomes too small.
The best experience comes from breaking the project into zones. Start with the top cabinet one day, then move to the base the next. Paint doors flat whenever possible. Keep a small artist brush nearby for the little inside corners where a normal brush leaves a blob. Use a roller for broad areas, but do not expect it to solve every problem. A hutch rewards slow, careful painting.
Cleaning also matters more than people expect. On many dining hutches, the dirtiest areas are around handles, lower doors, and the buffet ledge where serving dishes have been placed for years. Even if the piece looks clean, wipe it down thoroughly. If the cloth comes away gray or yellowish, that is not “vintage charm.” That is paint failure waiting politely for its invitation.
Another lesson: lighting changes everything. Paint one coat in poor lighting and you may wake up to streaks, missed trim, or a drip that dried in the exact center of the most visible door. Use bright light and look from the side, not just straight on. Satin and matte finishes hide a lot, but they do not hide every rushed brushstroke.
Color can also surprise you. A color that looks calm on a paint card can feel bold on a seven-foot hutch. If you are nervous, paint the inside backing first or test a hidden side. Warm white is forgiving, sage feels fresh, and deep charcoal can make an old hutch look expensive fast. Dark colors are especially satisfying because they turn dated orange wood into something that looks intentional and custom.
The no-sealer part is where patience becomes important. Even when the paint says no topcoat is required, the finish still needs time to cure. After painting, avoid loading heavy dishes immediately. Put felt pads under decorative items. Do not slide ceramic stacks across the shelves. Treat the hutch like fresh nail polish: technically dry, but not ready to open a pickle jar.
The payoff is worth it. A painted dining room hutch can make the entire room feel brighter, cleaner, and more personal. It saves money compared with buying new furniture, keeps a solid piece out of the landfill, and gives you the smug satisfaction of saying, “Oh, I painted that,” when someone compliments it. Try not to say it too dramatically. Or do. You earned it.
Conclusion
A dining room hutch makeover does not have to involve sanding, priming, sealing, or surrendering your weekend to dust. With the right furniture paint, careful cleaning, thin coats, and proper curing time, you can transform a dated hutch into a fresh focal point that fits your home beautifully.
The secret is not skipping every step. It is skipping the right steps while respecting the ones that matter. Clean well. Choose a paint designed for adhesion and durability. Apply it patiently. Let it cure. Then style your refreshed hutch with dishes, glassware, and a little well-earned pride.
Whether you choose warm white, soft sage, dramatic navy, or a two-tone finish, painting furniture with no sanding, no priming, and no sealer can be a practical, beautiful way to update your dining room without buying a new piece. Your hutch already has the storage, shape, and presence. Paint simply gives it a second actand possibly a better one.