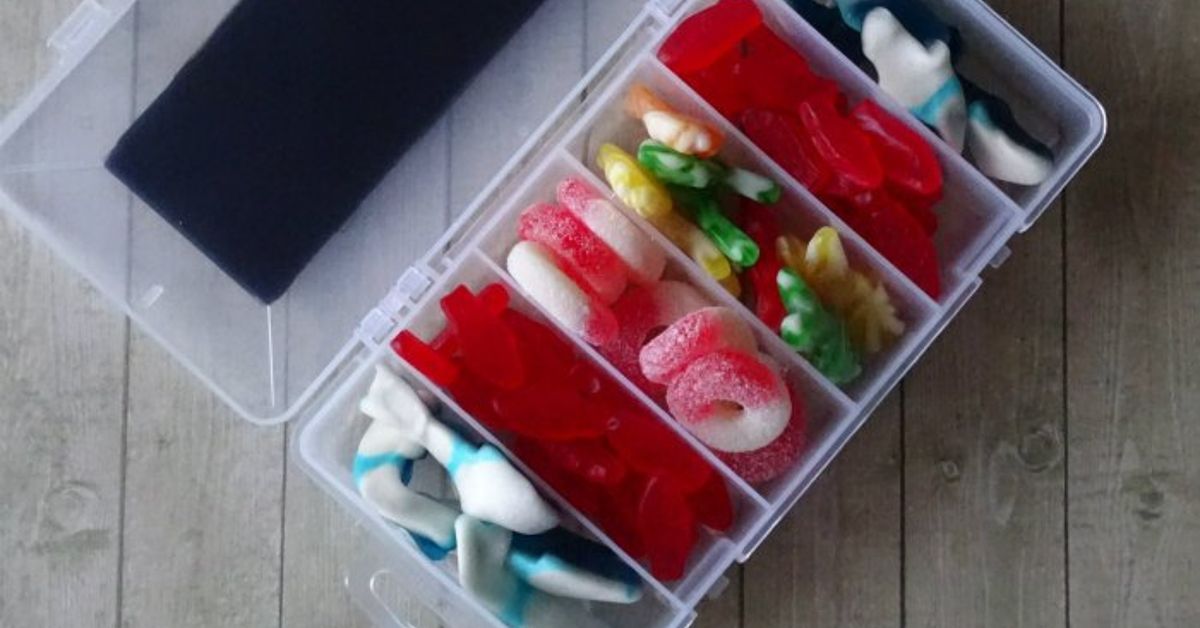
A "Hooked on You" DIY Candy Tackle Box is the kind of homemade gift that says, “I adore you,” while also saying, “Please enjoy these gummy worms arranged like tiny edible fishing bait.” Honestly, romance has never been so well-organized.
This sweet craft is a playful twist on a fishing tackle box, except instead of hooks, sinkers, and lures, you fill the compartments with colorful candy, chocolate, gummies, and little themed surprises. It works beautifully for Valentine’s Day, anniversaries, Father’s Day, birthdays, classroom gifts, road trips, fishing fans, or anyone who appreciates snacks with a pun attached. The phrase “Hooked on You” gives the box instant charm, and the compartment layout makes the whole thing look thoughtful without requiring professional-level crafting skills.
The best part? You can make this candy tackle box as simple, fancy, romantic, silly, kid-friendly, or snack-obsessed as you want. It is affordable, customizable, easy to assemble, and much more personal than grabbing a generic candy heart from the grocery store at 8:47 p.m. the night before Valentine’s Day. We have all been there. The fluorescent checkout aisle remembers.
What Is a "Hooked on You" DIY Candy Tackle Box?
A "Hooked on You" DIY Candy Tackle Box is a clean plastic organizer or tackle-style box filled with individually portioned candies and decorated with fishing-inspired details. Think gummy worms, Swedish Fish, sour belts, chocolate rocks, candy pearls, red licorice “fishing line,” and maybe a cute tag that says, “I’m hooked on you.” It is part candy gift, part craft project, part snack board, and part pun delivery system.
The idea became popular because it combines three things people love: personalized gifts, tiny compartments, and candy that looks suspiciously adorable when sorted by color. It also rides the wave of “snackle boxes,” which are portable snack boxes made from compartment containers. While snackle boxes often include crackers, cheese, dried fruit, meats, or road-trip snacks, a candy tackle box focuses on sweet treats and giftable presentation.
Why This DIY Gift Works So Well
There is a reason this project keeps swimming back into craft blogs, Pinterest boards, party favor ideas, and Valentine gift lists. It is cute without being complicated. It looks impressive without demanding a glue-gun marathon. And it can be built around the recipient’s actual favorite flavors, which is always better than guessing and accidentally buying the candy they politely tolerate.
It Feels Personal
Anyone can buy a boxed assortment, but a DIY candy tackle box lets you choose every treat. If your person loves sour candy, you can make it bright and tangy. If they prefer chocolate, you can create a mini chocolate treasure chest. If they are a fishing enthusiast, the theme lands perfectly. If they are not into fishing at all, the pun still works because candy has universal diplomatic power.
It Is Budget-Friendly
You do not need expensive supplies. A small plastic craft organizer, a few bags of candy, ribbon, paper tags, and stickers are enough. Dollar stores, craft stores, grocery stores, and big-box retailers usually carry everything needed for the project. You can make one larger box or several mini candy tackle boxes for party favors, classroom exchanges, coworkers, teammates, or family members.
It Looks Great in Photos
The divided compartments naturally create a neat, colorful layout. Red, pink, white, blue, yellow, and rainbow candies can be arranged into a bright pattern that looks like it took much longer than it did. This is the craft equivalent of wearing sunglasses indoors: instantly dramatic, slightly extra, and somehow effective.
Supplies You Will Need
Before you start, choose a brand-new, clean container that is safe for food contact or use wrapped candy only. Do not repurpose an actual used fishing tackle box unless your dream flavor profile is “lake water with a hint of metal hook.” A craft organizer or snack container with adjustable compartments is ideal.
Basic Supplies
- A new plastic tackle-style box or compartment organizer
- Assorted wrapped or unwrapped candy
- Food-safe cupcake liners or mini treat cups, optional
- Ribbon, twine, or baker’s string
- Printable or handwritten gift tag
- Stickers, paper fish cutouts, or heart decorations
- Small scoop or spoon for filling compartments
- Soap and warm water for cleaning the box before use
Best Candy Ideas for the Fishing Theme
The most charming candy choices are the ones that connect to the fishing idea. You do not need every candy to be themed, but a few clever options make the box feel intentional.
- Swedish Fish: The obvious star of the show.
- Gummy worms: Perfect “bait,” but much tastier than actual bait. Please do not confuse the two.
- Sour gummy worms: Great for a bright, playful compartment.
- Blue gummy sharks: Fun for an ocean-inspired version.
- Chocolate rocks: A cute “riverbed” detail.
- Licorice ropes: They can represent fishing line.
- Heart gummies: Ideal for Valentine’s Day.
- M&M’s or Skittles: Easy color fillers for small spaces.
- Conversation hearts: Classic, cheeky, and very on-theme for love gifts.
- Mini chocolate bars: Best for larger compartments.
Food Safety and Allergy Tips
Since this is a food gift, cleanliness matters. Wash and dry the container thoroughly before adding candy. If the box is not clearly intended for food, use wrapped candies or line the compartments with food-safe paper cups or treat bags. Keep candy away from craft glue, ink, glitter, and any decorations that are not food-safe.
Also consider allergies. Common major food allergens in the United States include milk, eggs, fish, crustacean shellfish, tree nuts, peanuts, wheat, soybeans, and sesame. Many candies contain milk, nuts, soy, wheat, or sesame ingredients, and some are made in facilities where cross-contact can happen. If you are gifting the box to a child, classroom, team, or group, check labels carefully and ask about allergies first. A cute candy box is wonderful. A mystery allergen box? Not so much.
How to Make a "Hooked on You" DIY Candy Tackle Box
This project is beginner-friendly and usually takes less than an hour once your supplies are ready. The biggest challenge is not eating the candy while assembling it. Stay strong. Or buy extra. That is called planning.
Step 1: Choose the Right Box
Look for a small to medium plastic organizer with secure latches and separate compartments. Adjustable dividers are helpful because you can create larger sections for chocolate bars and smaller ones for tiny candies. Clear lids are especially nice because the candy colors show through immediately.
For a romantic Valentine’s Day gift, a compact box with six to twelve compartments is usually enough. For a birthday, road trip, or family movie night, go bigger. For party favors, mini boxes are easier to duplicate and less expensive to fill.
Step 2: Clean and Dry Everything
Wash the container with warm, soapy water, rinse it well, and let it dry completely. Moisture can make candy sticky, cloudy, or stale. Nobody wants gummy worms that look like they have been through emotional turbulence.
Step 3: Plan Your Candy Layout
Before filling the box, place the candy bags on the table and group them by color, shape, flavor, or theme. A good layout balances large and small candies. For example, place red Swedish Fish in one corner, gummy worms in a long compartment, chocolate rocks in a smaller section, and colorful candies in the remaining spaces.
If the box is for Valentine’s Day, use pink, red, white, and chocolate tones. If it is for Father’s Day or a fishing trip, try blue, green, brown, and yellow candies for a lake-inspired palette. If it is for a kid’s birthday, go full rainbow. Children respect subtle color theory about as much as cats respect personal space.
Step 4: Fill the Compartments
Add candy one section at a time. Use a spoon or clean hands, and avoid overfilling. The lid should close without crushing the candy. If you are mixing wrapped and unwrapped candies, keep them in separate compartments for a cleaner look.
For extra polish, place mini cupcake liners in some compartments before adding small candies. This helps keep colors separated and gives the box a boutique candy-shop feel.
Step 5: Add a Tag or Label
The tag is where the project becomes unmistakably adorable. You can write:
- “Hooked on You”
- “You’re Quite the Catch”
- “Reel Sweet”
- “You’re My Favorite Fish in the Sea”
- “I’m Totally Hooked”
- “You’re O-Fish-Ally My Valentine”
Attach the tag with ribbon, twine, or a small piece of tape. You can also add a paper fish, heart sticker, or tiny bobber-inspired decoration to complete the look.
Step 6: Finish the Presentation
Tie ribbon around the box, add a bow, and tuck in a small card. If the box will travel, secure the latch with a decorative band or sticker. For a more polished gift, place the tackle box in a kraft gift bag with tissue paper and a matching card.
Creative Theme Variations
Once you understand the basic idea, you can adapt the candy tackle box for almost any occasion. The format is flexible, which is why it has become such a popular DIY gift idea.
Valentine’s Day Candy Tackle Box
Use heart gummies, chocolate kisses, conversation hearts, cinnamon candies, red licorice, strawberry gummies, and pink sour belts. Add a tag that says, “Hooked on You, Valentine.” This version is great for partners, kids, friends, teachers, or anyone who deserves sugar and admiration.
Father’s Day Fishing Candy Box
For dads, grandpas, uncles, or fishing buddies, choose a more outdoorsy look. Use gummy worms, chocolate rocks, peanut butter cups, caramel candies, trail-mix-style sweets, and fish-shaped gummies. Add a tag that says, “Dad, You’re Quite the Catch.” Bonus points if you pair it with a real fishing trip, though the candy may mysteriously disappear before you reach the lake.
Birthday Candy Tackle Box
Use the recipient’s favorite candy colors and flavors. Add a small birthday candle, confetti, or a mini note in one compartment. You can make one for a child, teen, coworker, or friend. It feels more thoughtful than a standard candy bag because every section looks curated.
Road Trip Snackle Box
For travel, mix candy with practical snacks such as pretzels, crackers, dried fruit, granola bites, or wrapped cookies. Choose shelf-stable items and avoid anything that melts easily in a warm car. Chocolate is delightful until it becomes a steering-wheel emergency.
Movie Night Candy Box
Fill the compartments with theater-style candy: chocolate pieces, sour gummies, licorice bites, mini cookies, marshmallows, and popcorn seasoning packets. Add a tag that says, “Reel Sweet Movie Night.” Yes, the pun is doing a lot of work here. Let it.
Design Tips for a Professional-Looking Candy Box
A DIY candy tackle box does not need to look expensive, but a few small choices can make it look more polished.
Stick to a Color Palette
Choose three to five main colors. Red, pink, white, and brown work well for Valentine’s Day. Blue, green, yellow, and orange feel more outdoorsy. Rainbow candy works for birthdays and kids’ gifts. A controlled palette keeps the box from looking like a candy aisle had a tiny explosion.
Use Repetition
Repeat shapes or colors across the box. For example, place red candies in opposite corners or use gummy fish in two separate compartments. Repetition helps the design feel balanced and intentional.
Mix Textures
Combine soft gummies, hard candies, chocolate, chewy ropes, crunchy candy-coated pieces, and smooth wrapped treats. Texture makes the box more interesting and gives the recipient variety.
Keep the Lid Clear
If the lid is transparent, avoid covering it completely with stickers. Let the candy show through. A single label or bow is usually enough. The candy is the star; the lid is just the stage manager.
Common Mistakes to Avoid
The project is simple, but a few mistakes can make it less successful. Avoid using a container that smells strongly of plastic, chemicals, or storage. Do not use a previously used toolbox, hardware organizer, or fishing tackle box for unwrapped candy. Avoid mixing strongly flavored candies, like mint, with delicate chocolates unless they are wrapped. Mint has main-character energy and will take over everything.
Do not overfill the compartments. A stuffed box may look generous, but crushed candy and broken lids are not festive. Also avoid adding perishable foods unless the box will be eaten immediately and stored properly. Cheese cubes, fruit, meats, and creamy treats belong in a different type of snackle box with temperature control, not in a Valentine candy gift that might sit on a desk all afternoon.
Who Should Receive a "Hooked on You" Candy Tackle Box?
This gift works for more people than you might expect. It is cute for a romantic partner, especially if they like fishing, camping, boating, outdoorsy humor, or candy with personality. It is also fun for kids because the compartments make the candy feel like treasure. Teachers, coaches, neighbors, coworkers, grandparents, and friends can all enjoy a smaller version.
For a teen, fill it with trendy sour candy, gummies, and mini chocolate bars. For a parent, choose nostalgic candy they loved growing up. For a fishing fan, lean into the bait-box look with gummy worms, fish shapes, and blue candy “water.” For someone with dietary restrictions, choose allergy-aware, gluten-free, nut-free, vegan, or sugar-free options based on their needs and labels.
How Much Does It Cost?
A small DIY candy tackle box can often be made on a modest budget. The container may cost a few dollars, and the candy cost depends on how many varieties you buy. To save money, choose candies sold in larger bags and divide them among multiple boxes. This is especially useful for classroom gifts, party favors, or family Valentine treats.
If you want a premium version, use gourmet gummies, artisan chocolates, personalized tags, and a higher-quality organizer. But the charm of this project is not about luxury. It is about effort, humor, and the joy of opening a tiny compartment to find gummy worms pretending to be bait.
Storage and Make-Ahead Tips
You can assemble most candy tackle boxes one to three days ahead if you use shelf-stable candy and keep the box closed in a cool, dry place. Avoid direct sunlight and heat, especially if you include chocolate. If you are using crunchy snacks, add them closer to the gifting time so they stay crisp.
For unwrapped candy, make sure the box is clean and completely dry. For gifting outside your household, wrapped candy is often the safest and neatest option. It also makes the box easier to share.
Experience Notes: What I Learned Making a "Hooked on You" DIY Candy Tackle Box
The first thing you learn while making a "Hooked on You" DIY Candy Tackle Box is that the container matters more than you think. A box with adjustable dividers gives you much more freedom than one with fixed tiny squares. Some candies are awkwardly shaped, and chocolate bars do not care about your design plan. They will sit diagonally like they own the place. Adjustable sections help you build a layout that feels organized instead of forced.
The second lesson is to buy more candy than you think you need. Not because the box requires mountains of sugar, but because variety makes the gift more exciting. One bag of gummies may technically fill the box, but six different candies make it feel like a mini candy shop. Also, a small amount of candy somehow disappears during assembly. Scientists call this “quality control.” I call it “the crafter’s tax.”
Color planning also makes a big difference. When I tested this idea, the best-looking boxes had a clear palette. Red Swedish Fish, pink hearts, white yogurt pretzels, brown chocolates, and a few bright gummy worms created a Valentine look without needing many decorations. The candy itself became the design. On the other hand, when every color went everywhere, the box still tasted great, but visually it looked like a birthday party and a fishing trip had collided in a very small parking lot.
Another helpful trick is to place the most recognizable themed candy near the front or center. Swedish Fish and gummy worms should be easy to see as soon as the lid opens. That instant “Oh, I get it!” reaction is part of the fun. Chocolate rocks, blue sour belts, and licorice ropes work well as supporting characters. Think of the box like a tiny stage: the fish and worms are the stars, the chocolates are the dependable best friends, and the ribbon is just there to look pretty.
Personalization is where the gift really becomes special. A handwritten tag often feels warmer than a perfect printed label. Adding the recipient’s name, a private joke, or a tiny message inside the lid makes the box feel less like a craft trend and more like a real gift. For example, “I’m hooked on you, Jake” is cute. “I’m hooked on you, even though you still think pineapple belongs on pizza” is unforgettable.
I also learned that wrapped candy is underrated. Unwrapped candy looks beautiful in compartments, but wrapped treats are cleaner, easier to share, and better for gifting outside the home. A mix of both can work well: wrapped chocolates in larger spaces, gummies in lined compartments, and small candies in paper cups. This keeps the box attractive while making it more practical.
Finally, presentation is not about perfection. A slightly uneven bow, a handwritten fish tag, or a playful pun can make the gift feel more charming. The goal is not to create a museum-quality candy display. The goal is to make someone smile, snack, and feel remembered. And if they laugh at the “Hooked on You” pun, congratulationsyou have officially reeled them in.
Conclusion
A "Hooked on You" DIY Candy Tackle Box is a sweet, clever, and easy gift that turns ordinary candy into something memorable. With a clean compartment box, a thoughtful candy selection, and a simple fishing-themed tag, you can create a personalized present for Valentine’s Day, birthdays, Father’s Day, road trips, parties, or just because. It is affordable, customizable, photo-friendly, and fun to make.
The real magic is in the details: choosing the recipient’s favorite treats, arranging the colors neatly, adding a pun-filled tag, and making sure the box feels made just for them. Whether you go romantic, funny, kid-friendly, or full fishing-fan mode, this DIY candy tackle box proves that homemade gifts do not have to be complicated to be meaningful. Sometimes all you need is a clean box, a handful of gummy worms, and the courage to commit to a really good pun.