If you’ve ever sent someone a Word document and gotten it back looking like a raccoon rearranged your furniture, this guide is for you. Fillable fields in Microsoft Word let you create forms people can actually complete without breaking your layout. Think job applications, intake forms, checklists, approvals, sign-off sheets, and the legendary “please stop emailing me screenshots of your answers” forms.
In Word, these fillable areas are usually created with content controls (like text boxes, check boxes, date pickers, and drop-down lists). Once you add them and protect the form, people can tab through the fields and fill things out neatly. The result: cleaner forms, faster responses, and fewer formatting crimes.
This guide walks you through exactly how to insert fillable fields in Word on both PC and Mac, how to protect the form, how to test it, and when you should switch to PDF tools instead. I’ll also share practical tips and real-world experience at the end so your forms don’t just work in theorythey work when your coworkers, clients, or family members touch them.
What Are Fillable Fields in Word?
Fillable fields are interactive areas in a Word document where users can enter or select information. In Microsoft Word, these are commonly added from the Developer tab and include:
- Plain Text or Rich Text fields for names, addresses, notes, etc.
- Check Box controls for yes/no or multi-select answers
- Combo Box and Drop-Down List controls for pre-set choices
- Date Picker controls for date fields
- Legacy Form Controls for older Word compatibility
A helpful way to think about them: they’re containers that tell Word what kind of information belongs in each spot, which makes your document more structured and easier to fill out consistently.
Before You Start
Choose the Right Format First
Before building your form, decide how people will complete it:
- Word form (.docx): Good if people will open the form in desktop Word and type directly into it.
- Fillable PDF: Better if the form will be shared widely, posted online, or completed by people on different devices without Word.
Important: Word is great for designing and creating a Word-based fillable form, but many teams recommend finishing interactive PDF fields in Adobe Acrobat when the final deliverable is a PDFespecially for accessibility and consistency.
Create a Clean Layout First
Build your labels and instructions before inserting fields. For example:
- Full Name:
- Email Address:
- Date of Birth:
- Preferred Contact Method:
You can use a simple table to align labels and fields cleanly (a very common trick), but avoid overcomplicated layouts if the form needs to be accessible.
How to Insert Fillable Fields in Word on PC
Step 1: Show the Developer Tab
The Developer tab is where the fillable form tools live, but Word hides it by default. To turn it on in Windows:
- Open Word.
- Go to File > Options.
- Select Customize Ribbon.
- Under Main Tabs, check Developer.
- Click OK.
Congratsyou just unlocked the secret panel where the form magic happens.
Step 2: Add Your Form Labels and Instructions
Type the labels users should see, such as:
- First Name
- Last Name
- Phone Number
- Department
- Start Date
Keep labels short and specific. “Name” is okay. “Please write your legal full name as shown on government-issued ID” is better as a note beneath the field, not the label.
Step 3: Insert Fillable Fields
Click where you want the field to appear, then use the Developer tab controls.
Text Fields
Use these for freeform answers:
- Rich Text Content Control users can format text (bold, italics, multiple paragraphs)
- Plain Text Content Control cleaner and usually better for forms
For most business forms, plain text is the safer choice because it keeps answers consistent and avoids surprise formatting.
Check Boxes
Use Check Box Content Control for things like:
- Subscribe to newsletter
- I agree to the terms
- Preferred contact methods (email / phone / text)
If you’re making a checklist, Word’s checkbox content control works nicely and can be copied down the page.
Drop-Down Lists and Combo Boxes
Use these when you want users to choose from a list:
- Drop-Down List user must pick from your options
- Combo Box user can pick from your list or type their own answer
Examples:
- Department: HR, Sales, Finance, IT
- Location: New York, Chicago, Remote
- Status: Full-Time, Part-Time, Contractor
Date Picker
Use the Date Picker Content Control for date fields. This keeps date formatting cleaner than letting everyone freestyle with “03/07,” “7 Mar,” and “next Tuesday.”
Legacy Controls
If your form must work with older Word versions, you can use Legacy Form Controls. They’re old-school, but sometimes that’s exactly what you need for compatibility.
Step 4: Customize Each Field
After inserting a field, click it and choose Properties (sometimes shown as Options depending on version/platform). This is where you can make your form feel polished instead of “default Word chaos.”
Useful customizations include:
- Title/Tag names (helpful for organization and accessibility)
- Placeholder text (like “Enter your full name”)
- Drop-down items (add, reorder, or remove choices)
- Date format for date pickers
- Lock settings to prevent editing/deleting controls
Bonus tip: content controls often show a border and temporary text while you edit, but those visual editing cues don’t print the same way as your final text. That’s a good thingit helps you build the form without cluttering the output.
Step 5: Protect the Form So Users Can Fill It (Not Redesign It)
This step is the one most people forget. If users can’t type into the fieldsor worse, they can edit your labelsyou probably skipped protection.
In Word for Windows, use one of these paths depending on your version:
- Developer > Restrict Editing (common in newer Word workflows)
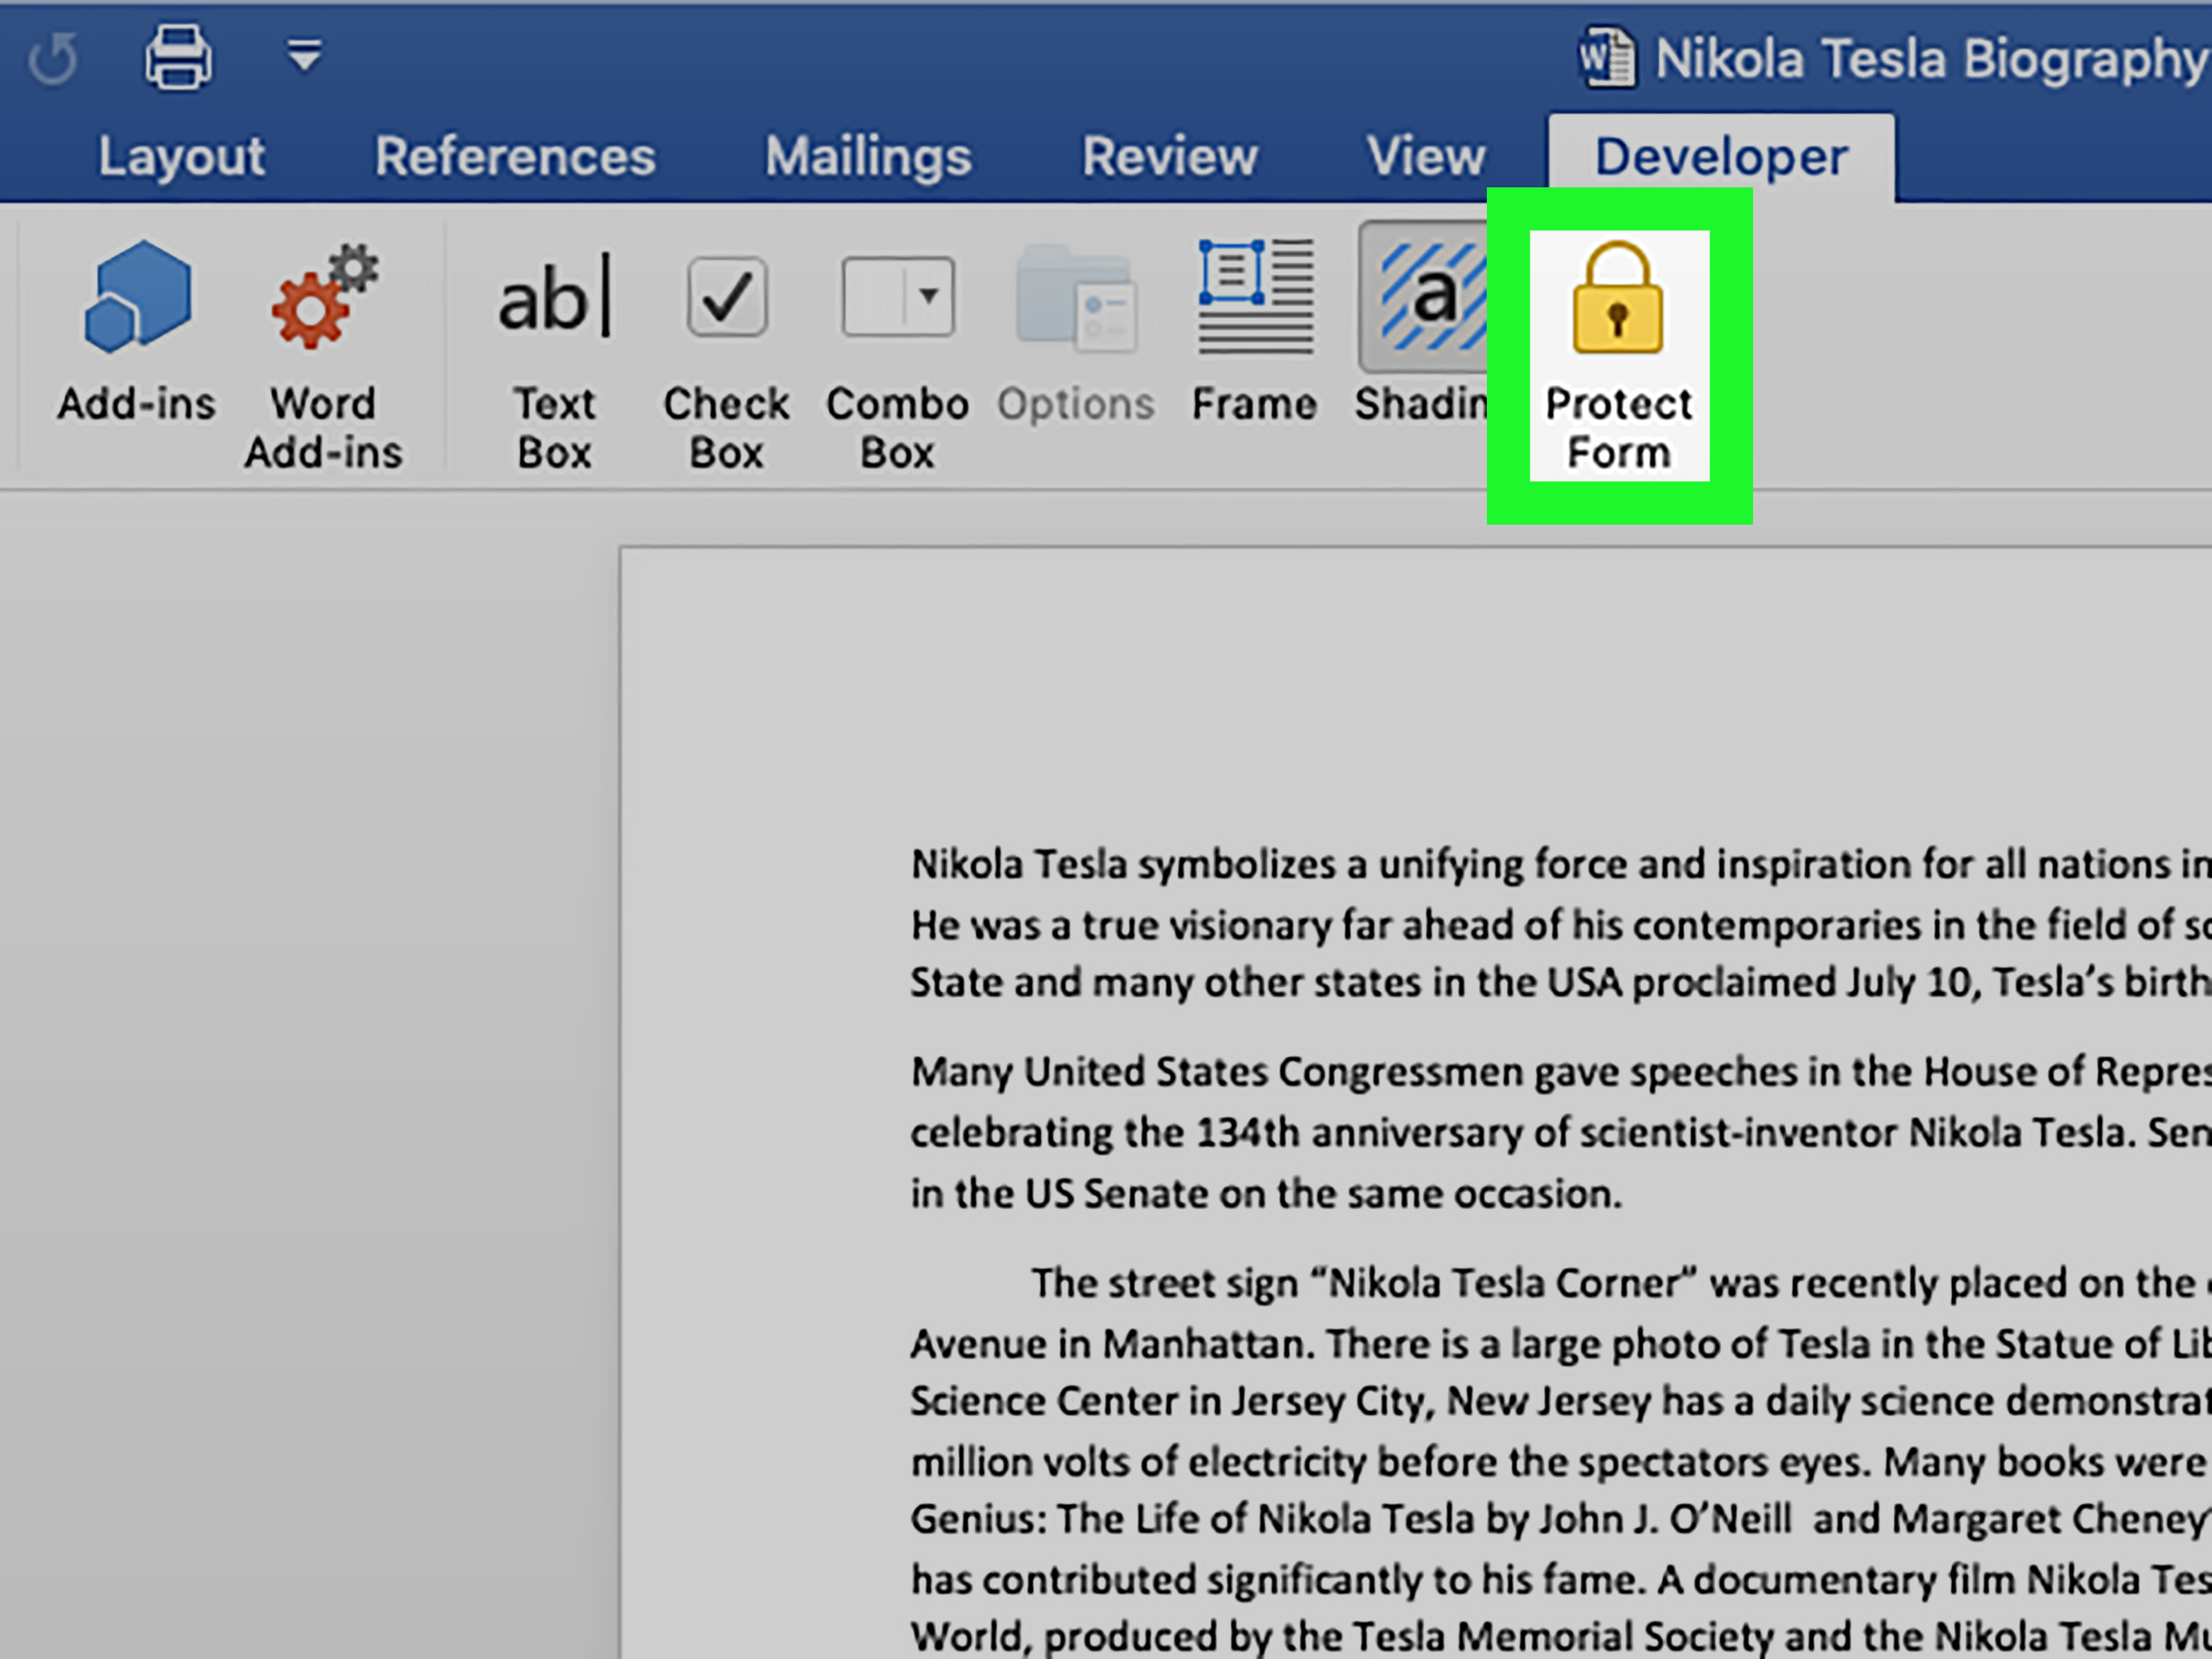
- Developer > Protect Form (shown in some Word interfaces)
With Restrict Editing, choose the option that allows users to fill in forms, then start enforcing protection. If needed, set a password (and store it somewhere safefuture you will be dramatic if you lose it).
Step 6: Test the Form
Before sending it out, test it like a user:
- Use Tab and Shift + Tab to move between fields.
- Type in text fields.
- Use Space to check and uncheck boxes.
- Try every drop-down and date field.
- Save a completed copy.
If anything behaves oddly, unprotect the form, fix the field properties, and test again. Ten minutes here can save you 37 “it doesn’t work” emails later.
How to Insert Fillable Fields in Word on Mac
The process on Mac is very similar, but Word for Mac has a few menu and version differences. Don’t panic. Your form is still very much possible.
Step 1: Show the Developer Tab on Mac
On Mac, Word’s settings layout varies by version. In many Mac setups, you can enable the Developer tab from Word preferences/ribbon customization. A commonly documented path is:
Preferences > Authoring and Proofing Tools > View > Ribbon > Show Developer Tab
If you don’t see that exact path, check Word’s ribbon customization/settings screen and enable Developer there. The feature existsthe path just likes to move around depending on the Word version.
Step 2: Add Labels and Insert Fields
Once the Developer tab is visible, the field insertion workflow is nearly the same as on PC:
- Type your labels and instructions.
- Click where the answer should go.
- Insert a field from the Developer tab:
- Text Box / Plain Text
- Check Box
- Combo Box / Drop-Down
- Date field (if available in your version)
- Open Properties or Options to customize it.
If you’re building a checkbox-based form on Mac, make sure you use the actual checkbox content control from the Developer tab, not just a symbol or bullet character. A typed “☐” looks nice, but it won’t behave like a real fillable checkbox.
Step 3: Protect the Form on Mac
This is where Mac users sometimes get tripped up because Word may show different protection commands depending on the build.
Common Mac methods include:
- Developer > Protect Form
- Tools > Protect Document from the macOS menu bar, then enable form protection
After protection is applied, users should be able to tab through the fields and fill them in without changing the rest of your document.
Step 4: Test the Mac Form the Same Way
Yes, again. Testing is not glamorous, but it is the reason your form looks professional.
- Tab through every field
- Check/uncheck boxes with keyboard and mouse
- Confirm placeholder text and instructions make sense
- Save and reopen the file
If a field won’t accept typing, the issue is usually one of these:
- The form isn’t protected yet
- You inserted a visual element instead of a real content control
- The field properties are locked too tightly
Best Practices for Better Fillable Forms
1) Use Plain Language Labels
Make labels obvious. “DOB” is fine for internal HR. For broader audiences, “Date of Birth (MM/DD/YYYY)” is better. Clear beats clever every time.
2) Add Helpful Placeholder Text
Temporary text helps users know what belongs in each field. Examples:
- “First and last name”
- “[email protected]”
- “Select one”
3) Tag Fields for Accessibility and Organization
In the field properties, add meaningful names/tags instead of leaving everything as “Text1” and “Text2.” This helps with maintenance and can improve accessibility workflows.
4) Use Headings and Logical Sections
Split longer forms into sections like Contact Information, Employment Details, and Approvals. This improves readability and makes the form easier to scan.
5) Test Keyboard Navigation
Not everyone fills forms with a mouse. Make sure users can move through the form with Tab and interact with checkboxes using Space. If the tab order feels weird, rearrange your fields or rebuild a few in the correct order.
6) Run Accessibility Checks
If the form is going to the public or a large organization, run Word’s built-in Accessibility Checker. It won’t catch everything, but it catches a lot of common problems.
7) Keep a Master Copy
Save two versions:
- Form_Master.docx (editable, unprotected backup)
- Form_Ready.docx (protected version you send out)
This saves you from the nightmare of editing a protected form while muttering at your screen.
Word Form vs Fillable PDF: Which Should You Use?
Here’s the honest answer: it depends on who is filling it out.
Use a Word Fillable Form If:
- Your audience already uses Microsoft Word desktop
- You need a quick internal form
- You want to edit the form often
- You’re collecting simple structured input
Use a Fillable PDF If:
- The form is public-facing
- Users may not have Word
- You need more consistent behavior across devices
- You need stronger PDF accessibility or distribution workflows
A practical workflow many teams use: build the layout in Word, then open the file in Adobe Acrobat and use Prepare Form so Acrobat can detect lines/labels and generate PDF form fields automatically. Then fine-tune the fields in Acrobat.
Common Problems and Fixes
Problem: I Don’t See the Developer Tab
Fix: Enable it in Word settings/ribbon customization. On Windows, it’s under File > Options > Customize Ribbon. On Mac, the path varies by version, but it’s in Word preferences/ribbon settings.
Problem: Users Can’t Type in the Fields
Fix: Apply form protection (Restrict Editing or Protect Form). In some Mac builds, use Tools > Protect Document.
Problem: My Checkboxes Aren’t Clickable
Fix: Use the Check Box Content Control, not a symbol. Also verify the form is protected correctly if your setup requires it.
Problem: I Need the Form as a PDF
Fix: Don’t assume Word fields will automatically become perfect interactive PDF fields. If the final goal is a true fillable PDF, use Acrobat’s form tools for the final interactive setup.
Problem: The Form Looks Fine, But It’s Confusing to Use
Fix: Add section headings, short instructions, and placeholder text. Usability problems are usually label problems, not software problems.
Problem: Can I Create Fillable Forms in Word for the Web?
Fix: You can generally view forms in Word for the web, but creating fillable forms is a desktop Word task. Build the form in the desktop app first.
500-Word Experience Section: What Actually Happens When You Build Real Word Forms
Here’s the part nobody tells you when you search “how to insert fillable fields in Word”: the technical steps are only half the job. The other half is dealing with real humans filling out your form. And real humans are wonderfully creative in the wrong ways.
The first time I built a fillable Word form, I made it look beautifulperfect alignment, nice spacing, fancy section headers, the whole thing. I sent it out proudly. Within an hour, one person printed it, filled it by hand, took a blurry photo, and emailed it back. Another person opened the form and somehow deleted half the labels because I forgot to protect it. A third person typed their answers next to the fields instead of inside them because my placeholder text was vague. That was the day I learned that a “working form” and a “user-proof form” are not the same thing.
After that, I changed my process. I started every form by planning the user journey: What are they trying to do? Which questions must be required? Which fields can be optional? Where will they probably hesitate? That mindset made the forms dramatically better. Instead of just inserting controls, I began writing tiny instructions under confusing fields. For example, under a date field I’d add “Use the picker or type MM/DD/YYYY.” Under a checkbox section, I’d write “Select all that apply.” These tiny notes reduced mistakes more than any formatting trick.
I also learned to test forms like a mildly impatient person. Not like the creator who already knows what everything means. I tab through the form quickly. I intentionally skip fields. I click checkboxes out of order. I try to type into a drop-down that shouldn’t accept typing. If I get confused during testing, someone else definitely will. That habit alone catches a surprising number of issues, especially tab order problems and awkward field placement.
One of the biggest practical lessons is choosing between Word and PDF early. For internal team forms, Word is fantastic because it’s fast to edit. But for anything public-facing, I now treat Word as the drafting tool and Acrobat as the finishing tool. Word is where I design the structure and labels. Acrobat is where I lock down the final PDF behavior. That split saves time because I stop forcing Word to be something it isn’t.
On Mac, the most common frustration I’ve seen is menu differences. A colleague follows a Windows tutorial exactly, then gets annoyed because their Mac version uses a different menu name. The fix is simple: don’t chase identical labelslook for the same function (Developer tab, field properties, form protection). Once you know the logic, the platform differences feel smaller.
My final rule is boring but powerful: always keep a clean master copy. Every single time. The moment you don’t, someone asks for “just one tiny change” and you’re stuck editing the protected version or rebuilding fields from scratch. Save the master, protect the copy, and future-you will sleep better.
Conclusion
Creating fillable fields in Word on PC or Mac is easier than it looks once you know the pattern: enable Developer tab, insert content controls, customize properties, protect the form, and test it. That workflow works for everything from simple checklists to more detailed intake forms.
If you’re building a form for internal use, Word is often all you need. If you’re publishing a form or sharing it widely, consider finishing in Acrobat for a stronger fillable PDF workflow. Either way, the key is to build for the people using the formnot just the person creating it.
And yes, always test it before you send it. Your inbox will thank you.