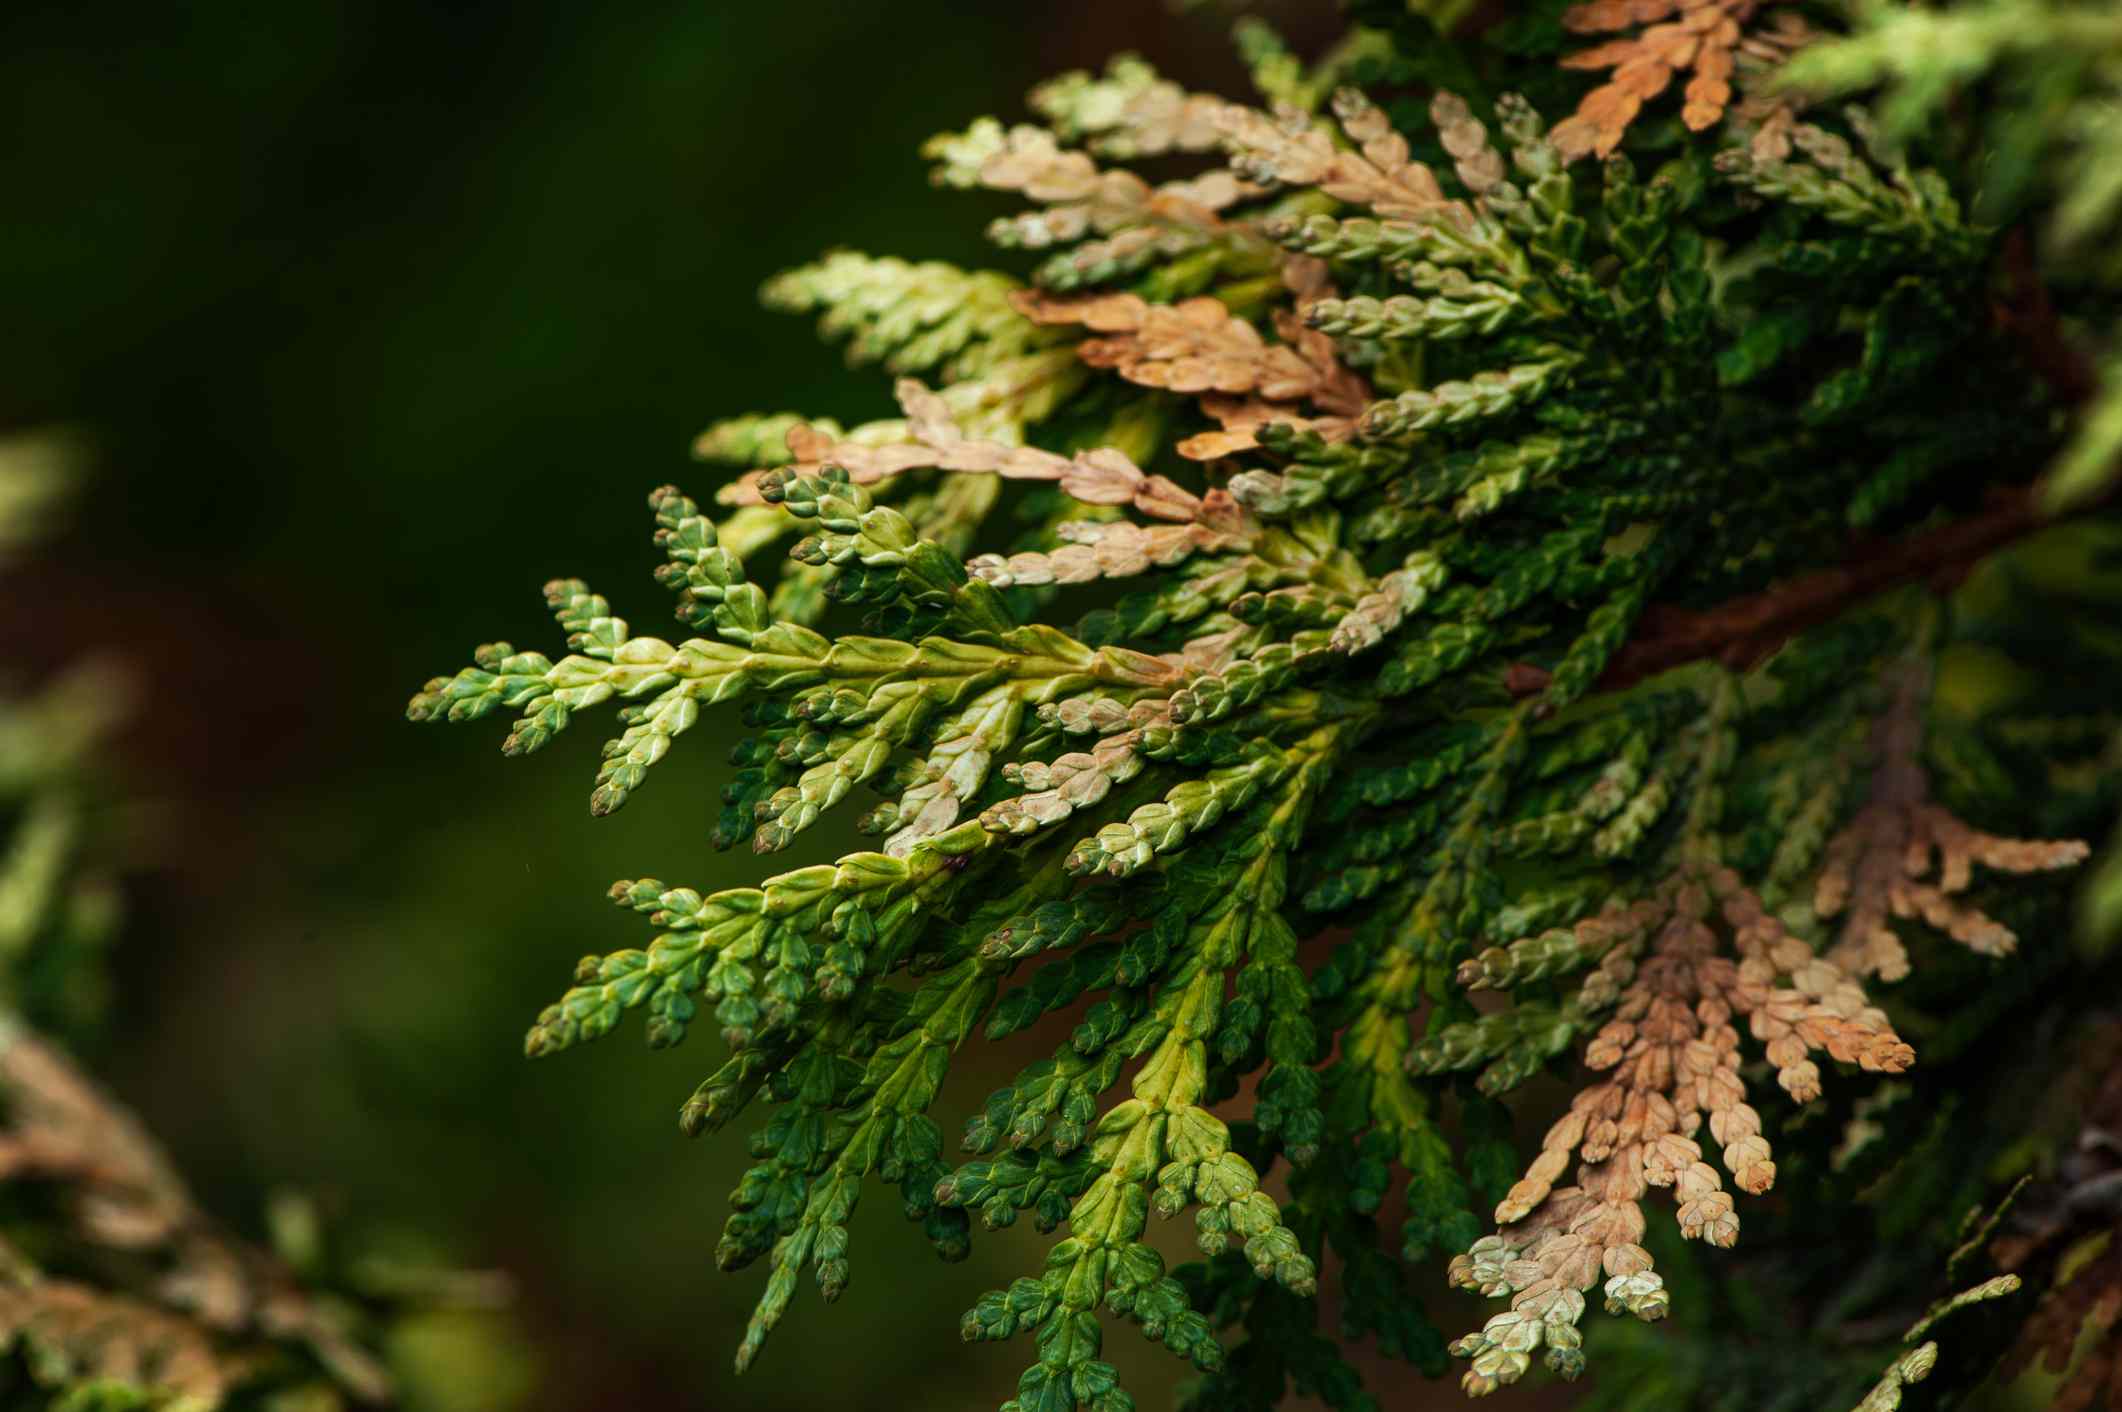
Cedar trees are supposed to look calm, green, and slightly smug all year long. So when one suddenly turns brown, it feels personal. Yesterday it was a handsome privacy screen; today it looks like it lost an argument with a toaster. The good news? A brown cedar tree is not always dead. The bad news? It is definitely trying to tell you something.
In many American landscapes, “cedar tree” is used casually for several evergreen plants, especially arborvitae, eastern red cedar, juniper, and other needled or scale-leaved evergreens. While these plants are tough, they are not made of plastic. They react to drought, wet soil, winter wind, pests, disease, road salt, and plain old seasonal needle drop. The trick is learning which kind of browning you are seeing before you grab the pruners like a dramatic gardener in a home makeover show.
This guide breaks down the six most common reasons your cedar tree is turning brown, how to diagnose the problem, and what you can do to help it recover. Some fixes are simple, like watering deeply or removing bagworms by hand. Others require patience, better drainage, or accepting that the tree has crossed the botanical rainbow bridge. Let’s inspect the evidence.
Quick Diagnosis: What Kind of Browning Are You Seeing?
Before choosing a treatment, look closely at where the browning appears. Cedar tree browning is easier to solve when you read the pattern like a plant detective with muddy shoes.
Brown on the Inside
If the inner foliage turns yellow, bronze, or brown in fall while the outer tips stay green, your cedar may be going through normal seasonal needle drop. Evergreens are evergreen, not immortal. They shed older interior foliage just as deciduous trees shed leaves, only with less confetti and more homeowner panic.
Brown on One Side
One-sided browning often points to winter burn, wind exposure, reflected heat, road salt, or damage from a nearby sidewalk, driveway, or building. The side facing winter wind, bright sun, or salty spray usually looks the worst.
Brown Tips or Branch Ends
Tip browning can be caused by winter injury, drought stress, salt, twig blight, or insect feeding. If the branch tips are crispy but the buds and inner stems are still alive, the cedar may push new growth later.
Random Brown Patches
Scattered brown patches may suggest bagworms, spider mites, fungal disease, animal damage, or localized root stress. This is where you need to inspect the foliage, stems, and soil instead of blaming “bad vibes.”
1. Winter Burn Is Drying Out the Foliage
Winter burn is one of the most common reasons cedar trees and arborvitae turn brown. It happens when evergreen foliage loses moisture during cold, windy, sunny weather faster than the roots can replace it. If the soil is frozen, dry, or the plant is newly installed, the tree cannot pull up enough water. The result is brown, tan, or bronze foliage, often on the south, southwest, or windward side.
Winter burn usually appears in late winter or early spring, which is rude because the damage often happened weeks earlier. The tree was quietly suffering while everyone else was drinking cocoa and ignoring the irrigation system.
Signs of Winter Burn
- Brown or bronze foliage appears in late winter or early spring.
- Damage is worse on the sunny or windy side of the tree.
- Branch tips may be brown while inner foliage remains greener.
- Areas protected by snow may look healthier than exposed areas.
- Newly planted cedars are hit harder than established trees.
How to Fix Winter Burn
Do not rush to prune in early spring. Brown foliage may not turn green again, but buds behind the damaged area may still be alive. Wait until new growth begins, then trim only dead tissue back to healthy green growth. If you prune too early, you may remove branches that were preparing a comeback tour.
Water deeply during dry fall weather until the ground freezes. Add a 2- to 3-inch layer of mulch around the root zone, keeping it a few inches away from the trunk. For exposed trees, use a burlap screen on the windy or sunny side during winter. Do not wrap the plant tightly like a holiday burrito; the goal is wind protection, not suffocation.
2. Drought Stress Is Making the Tree Thirsty
Cedar trees can look sturdy, but many types, especially arborvitae, prefer consistent moisture. When rainfall is low, summers are hot, or fall is dry, the tree may not show symptoms immediately. Browning can appear weeks or months later, which makes drought stress feel like a delayed invoice from Mother Nature.
Newly planted cedars are especially vulnerable because their root systems are not yet wide enough to explore the surrounding soil. Established trees can also suffer during extended dry periods, especially in compacted soil, sandy soil, or locations near foundations where rain does not soak in evenly.
Signs of Drought Stress
- Foliage looks dull, gray-green, tan, or brown.
- Outer tips may dry out first.
- Interior needle drop may be heavier than normal.
- Soil feels dry several inches below the surface.
- Browning may worsen after a hot summer or dry autumn.
How to Fix Drought Stress
Water slowly and deeply. A quick splash from the hose is like giving a thirsty person one polite teaspoon of water and expecting gratitude. Instead, soak the root zone long enough for moisture to reach 6 to 8 inches deep. Use a soaker hose or drip irrigation around the canopy area, not just at the trunk.
For newly planted cedars, check soil moisture two or three times per week during hot weather. For established trees, deep watering once every 7 to 10 days during dry spells is often better than frequent shallow watering. Mulch helps conserve moisture and keeps soil temperatures steadier. Just avoid piling mulch against the trunk, because “mulch volcanoes” are not landscaping; they are slow-motion tree sabotage.
3. Too Much Water or Poor Drainage Is Suffocating the Roots
Yes, cedars can turn brown from too little water and too much water. Plants enjoy keeping us humble. When soil stays soggy, roots cannot get enough oxygen. Over time, stressed roots decline or rot, and the top of the tree begins to yellow, wilt, thin, or brown.
Poor drainage is especially risky in heavy clay soil, low spots, compacted construction areas, and beds where downspouts empty directly into the root zone. Some fungal root diseases, including Phytophthora-type problems, are more likely when roots sit in wet conditions.
Signs of Overwatering or Root Rot
- Soil stays wet for days after rain or irrigation.
- Foliage yellows before turning brown.
- Branches decline from the bottom or one section at a time.
- The tree may look wilted even though the soil is wet.
- Roots may appear dark, mushy, or weak if inspected.
How to Fix Wet Soil Problems
First, stop automatic watering until you know how wet the soil actually is. Push a screwdriver or soil probe into the root zone. If the soil is muddy or smells sour, the tree does not need more water; it needs air and drainage.
Redirect downspouts, reduce irrigation frequency, and avoid planting cedars in low, soggy areas. If the tree was planted too deeply, gently remove excess soil from around the trunk flare. The trunk flare should be visible at the soil surface. For severe root rot, recovery is uncertain, and a certified arborist or local extension office can help confirm the diagnosis before you spend money on treatments that may not work.
4. Bagworms Are Eating the Foliage
Bagworms are sneaky little caterpillars that carry cone-shaped bags made of silk and plant material. On cedar, arborvitae, and juniper, the bags can look like tiny ornaments, except the decoration theme is “your hedge is in danger.” They feed on foliage and can cause brown patches, thinning, and even serious defoliation if ignored.
Bagworms are easiest to control when they are young. By late summer, the bags are larger, tougher, and harder to treat. On small trees, handpicking is often the most practical control. It is not glamorous, but gardening rarely is. Anyone who says otherwise has never cleaned sap off a pair of pruning shears.
Signs of Bagworms
- Small spindle-shaped bags hang from branches.
- Brown patches appear where foliage has been eaten.
- Damage may start small and spread quickly.
- Bags blend into the plant and may look like cones.
- Severe infestations can strip foliage from branches.
How to Fix Bagworm Damage
Pick off bags by hand in fall, winter, or early spring and destroy them. Do not toss them politely on the ground; that is not pest control, it is bagworm relocation. If young caterpillars are active in late spring or early summer, products containing Bacillus thuringiensis var. kurstaki, often called Bt, may help when applied according to label directions. Larger caterpillars may require other labeled controls, but timing matters.
After removing bagworms, prune dead tips lightly, water the tree during dry periods, and avoid heavy fertilizing. Brown areas on evergreens do not always fill back in, especially if branches lost all green tissue. If some green growth remains, the tree has a better chance of recovering.
5. Spider Mites Are Causing Bronzing and Stippling
Spider mites are tiny, but their damage can be annoyingly dramatic. They feed by piercing plant tissue and sucking out cell contents, causing fine yellow speckling, bronzing, dull foliage, and eventual browning. On arborvitae and related evergreens, mite damage can be mistaken for drought stress or disease.
Because spider mites are extremely small, you may not see them at first glance. A simple test helps: hold a white sheet of paper under a branch and tap the foliage. If tiny moving dots fall onto the paper and start wandering around like they own the place, mites may be present.
Signs of Spider Mites
- Foliage looks speckled, faded, bronze, or dusty.
- Damage may be worse during dry weather.
- Fine webbing may appear during heavy infestations.
- Tiny mites can be detected by tapping branches over white paper.
- Brown areas may not recover if feeding damage is severe.
How to Fix Spider Mite Damage
Start with the least aggressive option. A strong spray of water can knock mites off small trees and reduce dusty conditions that favor outbreaks. Insecticidal soap or horticultural oil may help on smaller plants when mites are active, but always follow the label and avoid spraying during extreme heat. Oils and soaps can injure foliage if used at the wrong time, especially when temperatures are high.
Avoid unnecessary broad-spectrum insecticides, which can kill beneficial predators and allow mite populations to rebound. In other words, do not accidentally fire the security team and then wonder why the burglars came back.
6. Disease, Salt, or Natural Needle Drop Is Changing the Color
Sometimes cedar browning is not caused by one obvious villain. It may come from fungal twig blights, de-icing salt, transplant stress, or normal seasonal shedding. These causes can look similar from a distance, so close inspection matters.
Fungal Twig Blight
Stressed cedars and arborvitae may develop twig blights that turn branch tips yellow, brown, or gray. Pestalotiopsis-type blight, for example, often attacks plants already weakened by drought, winter injury, crowding, or poor growing conditions. You may see small dark fruiting bodies on dead tissue, though a lab diagnosis is the best way to confirm the exact disease.
To manage twig blight, prune out dead tips during dry weather, disinfect tools between cuts if disease is suspected, improve air circulation, and avoid overhead watering. Fungicides are rarely a magic eraser once damage is visible; cultural care is usually the foundation.
De-Icing Salt Damage
If the brown side of the tree faces a road, driveway, or sidewalk, salt may be involved. Salt spray and salty runoff can burn foliage, damage buds, and stress roots. The browning often appears on the side closest to the salt source.
To reduce salt injury, shovel salty snow away from cedars, use plant-safe de-icing options when possible, flush soil with water in spring if drainage allows, and install a burlap screen between the plant and the road or walkway.
Normal Seasonal Needle Drop
Healthy evergreens shed older interior foliage, especially in fall. This is normal when the browning is mostly inside the plant and the outer branch tips remain green. Rake or gently remove dead interior foliage to improve airflow. Do not panic-prune the entire tree into a sad green pencil.
How to Tell If a Brown Cedar Tree Is Dead
A cedar tree that is completely brown from top to bottom is unlikely to recover. Evergreens do not usually regrow from old bare wood the way some deciduous shrubs do. However, partial browning is not always fatal.
Try the scratch test. Use your fingernail or a clean knife to gently scrape a small section of bark on a questionable twig. Green tissue underneath suggests that part is still alive. Brown, dry, brittle tissue usually means it is dead. Check several branches before making a decision, because one dead branch does not condemn the whole tree.
Also look for flexible twigs and live buds. If buds are plump and stems bend rather than snap, the tree may recover. If the branches are brittle, the foliage is fully brown, and there is no green tissue anywhere, it may be time to replace the tree and hold a brief but tasteful memorial service.
Best Practices to Keep Cedar Trees Green
Prevention is easier than resurrection. A cedar tree planted in the right place with steady care is far less likely to turn brown every time the weather gets moody.
Plant in the Right Location
Choose a site with good drainage, adequate sunlight, and protection from harsh winter wind when possible. Avoid placing cedars directly where road salt, roof runoff, or reflected heat will punish them year after year.
Water Deeply, Not Dramatically
Deep watering encourages deeper roots. Shallow watering creates shallow expectations. During dry weather, soak the root zone rather than sprinkling the foliage. Newly planted trees need consistent attention for at least the first one to two growing seasons.
Mulch Correctly
Use organic mulch to conserve moisture and moderate soil temperature. Keep mulch several inches away from the trunk to prevent rot and pest issues. A flat donut is good. A mulch volcano is bad. This is one of the few times donuts beat volcanoes.
Inspect Monthly
Look for bagworms, mites, broken branches, dead tips, and changes in soil moisture. Early detection turns a big problem into a weekend chore instead of a landscaping emergency.
Prune Lightly
Prune dead or damaged growth back to living tissue, but avoid cutting deeply into old bare wood. Many cedars and arborvitae will not refill large empty holes quickly, if at all.
Real-World Experience: What Homeowners Usually Notice First
In real landscapes, cedar browning rarely arrives with a neat label. Most homeowners first notice one strange patch while taking out the trash, walking the dog, or admiring the hedge with the quiet satisfaction of someone who believes they finally made one perfect landscaping decision. Then the patch gets bigger, and suddenly the tree becomes the main character in the yard.
One common experience is the “spring surprise.” The cedar looked fine in December, survived the holidays without complaint, and then turned brown in March or April. This often points to winter burn or drought stress from the previous fall. The plant did not suddenly become dramatic; it simply showed the damage after weeks of cold wind, frozen soil, and low moisture. Homeowners in windy neighborhoods, open lots, and areas with bright reflected sunlight often see the worst browning on one side.
Another familiar situation is the new hedge that browns after planting. The trees looked perfect at the nursery, then started fading a few weeks later. This is often transplant stress mixed with watering confusion. Many people water the trunk instead of the root ball, or they water every day without checking drainage. The result can be either dry roots or soggy roots, both of which lead to unhappy foliage. The best habit is to check soil moisture with a finger, trowel, or probe before watering. Guessing is fine for birthday presents, not root zones.
Bagworms create a different kind of homeowner regret. At first, the bags look harmless, almost like little natural ornaments. By the time the tree has brown patches, the caterpillars may have already done serious feeding. People often say, “I thought those were part of the tree.” That is exactly what bagworms are counting on, assuming caterpillars have strategic meetings, which honestly seems possible.
Spider mites are even trickier because they are nearly invisible. Homeowners usually notice a dusty, bronzed, tired look before they ever see a pest. The white-paper test is one of the simplest field tricks: tap the branch, watch for moving specks, and suddenly the mystery has legs. Tiny legs, but still.
Salt damage is also common in suburban and urban yards. A cedar near a driveway may brown only on the side facing plowed snow. The fix is not just pruning; it is changing the conditions. Move salty snow away, protect the plant with a winter barrier, and consider more salt-tolerant plants in high-exposure spots.
The biggest lesson from real yards is patience. A partly brown cedar does not always need immediate removal. Give it time through spring, check for live buds, improve watering, remove pests, and prune carefully. But also be realistic. If the tree is completely brown and brittle, it probably will not return to its former green glory. Gardening is part science, part observation, and part learning not to take plant behavior personally.
Conclusion
A cedar tree turning brown is not always a disaster, but it is always a message. Winter burn, drought stress, wet soil, bagworms, spider mites, disease, salt damage, and seasonal needle drop can all change a cedar’s color. The best fix starts with diagnosis: look at the pattern, check the soil, inspect for pests, and avoid the urge to prune first and ask questions later.
Healthy cedar care is refreshingly practical. Water deeply during dry periods, mulch properly, protect exposed trees in winter, improve drainage, remove bagworms early, monitor mites, and prune only what is truly dead. With the right response, many partially brown cedars can stabilize and continue serving as privacy screens, windbreaks, and neighborhood squirrel apartment complexes for years to come.