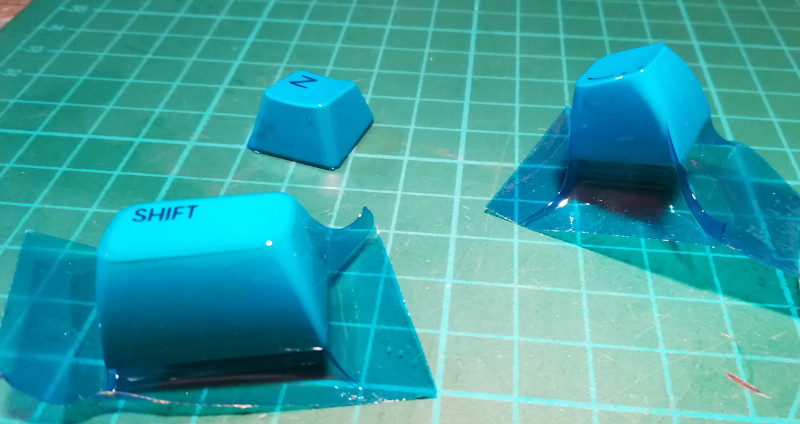
Vacuum forming key cap covers sounds like one of those maker ideas that should work beautifully on paper. You heat a thin plastic sheet, pull it down over a keyboard key with vacuum pressure, let it cool, trim the excess, and suddenly you have a protective, colorful, removable skin for your aging keycaps. Simple, right? In the same way “just fix the printer” is simple until the printer develops a personal grudge.
The idea is especially tempting in the retrocomputing world, where old keyboards are not merely input devices. They are historical artifacts, design statements, and occasionally crumb museums. Vintage keycaps can yellow, crack, lose legends, develop shine, or simply become impossible to replace without selling a kidney to a collector named “CommodoreWizard1979.” So the thought of vacuum forming thin covers over existing keycaps has real appeal: preserve the original plastic, add color, and avoid permanent modification.
But as the project title admits with admirable honesty, vacuum forming key cap covers doesn’t quite work outat least not easily. The concept is clever, the early results can look promising, and the failure is not a dead end. It is a useful case study in what happens when a manufacturing process meets tiny, steep-sided, detail-heavy objects that were never designed to be shrink-wrapped like leftovers.
What Is Vacuum Forming, in Plain English?
Vacuum forming is a type of thermoforming. A flat thermoplastic sheet is clamped in place, heated until it becomes flexible, and pulled around or into a mold by vacuum pressure. Once the plastic cools, it keeps the new shape. The method is used for packaging trays, product shells, costume parts, prototypes, model making, and plenty of DIY experiments.
It works best when the object has smooth contours, reasonable draft angles, and enough airflow for the vacuum to pull the plastic tightly into the details. That last part matters. Vacuum forming is not magic; it is airflow, heat, timing, material behavior, and tool design pretending to be magic when everything goes right.
Why Keycaps Make the Process Difficult
A keyboard keycap is small, sharply defined, and full of geometry that likes to embarrass casual manufacturing plans. It has vertical walls, a top surface, corners, a hollow underside, legends, texture, and often a sculpted profile. On a full keyboard, the keys also sit close together, which creates narrow gaps where hot plastic can bridge instead of forming cleanly around each key.
That is where the dream starts to wobble. The plastic may stretch too thin at the top corners, wrinkle between adjacent keys, fail to capture the sides, or cool before the vacuum has pulled it into all the tiny spaces. A single keycap is hard enough. A keyboard full of keycaps is a miniature city of forming problems.
The Big Idea: Protective Covers for Old Keycaps
The maker logic behind vacuum forming key cap covers is solid. Many retro keycaps are made from older plastics that have lived through decades of sunlight, hand oils, cleaning products, heat, and dust. ABS keycaps, common in many keyboards, can become shiny with wear and may yellow over time. PBT keycaps are generally more durable and wear-resistant, but vintage keyboards do not always give collectors the luxury of choosing modern materials.
A thin translucent cover could theoretically protect the original keycap while letting the printed legend remain visible. It could also provide a new color layer without paint. That matters because paint on keycaps often wears badly. Your fingers are relentless little polishing machines. Type enough, and a poorly coated keycap starts looking like it survived a tiny archaeological dig.
Vacuum forming also has one attractive advantage: reversibility. A collector may not want to repaint or permanently modify rare caps. A formed cover, if made well, could be removed later. In theory, that makes it ideal for retro keyboard restoration, custom cyberdeck builds, chiptune rigs, cosplay props, or display machines where visual impact matters.
Why the First Attempts Look Promising
Small test pieces can be encouraging. A single keycap wrapped in a thin, colored film may come out looking surprisingly clean. The plastic hugs the top, bends around the sides, and creates a glossy protective shell. If the film is translucent, the original label can still show through. For a moment, the idea feels like a breakthrough.
This is common in prototyping. The first test proves that the concept is not ridiculous. Then the second, third, and fourth tests reveal that “not ridiculous” is a very different thing from “repeatable, durable, and ready for a full keyboard.” The small-scale success is real, but it does not automatically solve the bigger technical problems.
The Scale Problem
One keycap gives the plastic room to stretch. Many keycaps placed close together create valleys. In those valleys, hot plastic may not flow down cleanly. Instead, it can form webs, wrinkles, or suspended bridges between high points. The closer the keys are, the more likely the sheet is to connect across gaps rather than dive neatly into them.
This is why vacuum forming full keyboard surfaces is much harder than forming one isolated object. The keyboard is not one simple mold; it is dozens of tiny molds arranged in a grid, each one asking the plastic to move in a slightly different way.
Where Vacuum Forming Key Cap Covers Goes Wrong
When vacuum forming fails, it usually does not fail politely. It creates wrinkles, bubbles, soft corners, thin spots, distorted edges, and occasionally a plastic sheet that looks like it has lost a fight with a waffle iron. Keycap covers add their own special chaos.
1. Webbing Between Keys
Webbing is one of the most common vacuum-forming defects. It happens when plastic folds or wrinkles instead of stretching evenly into the shape. On a keyboard, the gaps between keys are perfect webbing traps. The plastic catches between raised key tops, creating unwanted folds that ruin the clean, individual cover effect.
Webbing can be caused by uneven heating, poor timing, mold spacing, excessive material, insufficient vacuum, or geometry that simply asks too much of the sheet. In normal thermoforming, designers can modify the mold. With vintage keycaps, the object is already fixed. The keyboard does not care about your process window. It has vintage dignity.
2. Loss of Detail Around Legends and Edges
Even if the plastic pulls over the top of a keycap, capturing fine detail is another challenge. Legends may remain visible through translucent film, but the film can soften contrast, distort edges, or create glare. If the cover is too thick, the key may look bulky. If it is too thin, it may tear, wrinkle, or wear quickly.
Keycap legends are not just decorative. They are the whole point of many vintage boards. If the cover makes the legends cloudy or uneven, the restoration begins to look less like preservation and more like the keyboard is wearing foggy swim goggles.
3. Fit and Typing Feel
Keycaps are designed with specific dimensions so they can move freely without rubbing neighboring keys or the keyboard case. Add a plastic skin, and those tolerances change. A cover may interfere with key travel, create friction, or make the keyboard feel mushy. Even a fraction of a millimeter can matter when keys are packed closely together.
There is also the question of sound. Keyboard enthusiasts care deeply about typing sound, sometimes with the intensity of wine critics describing a grape. A thin plastic cover can change the pitch, surface feel, and impact noise. That might be acceptable for a display piece, but less pleasant for a daily driver.
4. Durability Under Real Fingers
A vacuum-formed cover may look fine on day one. The real test is day thirty. Human fingers bring oils, pressure, heat, and repeated friction. A cover that is not mechanically locked in place may shift. Edges may lift. Corners may crack. A glossy film may scratch. A colored film may fade or wear unevenly.
This is where vinyl wrapping sometimes has an advantage over paint, especially for decorative keyboard projects. A flexible film can survive repeated touch better than a surface coating, but it still needs excellent adhesion, proper trimming, and careful forming to avoid ugly edges.
Material Choice: The Tiny Detail That Becomes a Giant Problem
The plastic sheet used for vacuum forming matters enormously. Different thermoplastics soften at different temperatures, stretch differently, and cool at different speeds. For keycap covers, the material must be thin, flexible, translucent if legends need to remain visible, resistant to finger wear, and able to form around sharp corners without turning into plastic lasagna.
Common vacuum-forming materials include ABS, PETG, polystyrene, acrylic, polycarbonate, PVC, and other thermoplastics. But “can be vacuum formed” does not mean “is good for keycap covers.” The cover material must also behave well at small scale. It must not shrink unpredictably, grip too tightly, release poorly, or produce unsafe fumes when heated.
That last point deserves a bright yellow caution sign. Makers should avoid heating unknown plastics and should use proper ventilation. Some plastics can release unpleasant or harmful fumes when overheated. A hobby project is not improved by turning the workshop into a chemistry lesson with consequences.
Why Mold Design Matters Even When the Mold Is Just a Keycap
In professional vacuum forming, mold design includes draft angles, vent holes, surface finish, spacing, and release strategy. Keycaps were not designed as vacuum-forming molds. They were designed to be pressed by fingers. That mismatch explains much of the trouble.
A keycap has steep sides and tight corners. The plastic has to stretch over the top and down the sides, which can thin the material near edges. If air is trapped, details will not form sharply. If the plastic grips too tightly, removing the cover can be difficult. If the keycap surface is textured, the cover may pick up some texture unevenly or create trapped air pockets.
Could Vent Holes Help?
In normal vacuum forming, tiny vent holes are often placed in corners or areas where air needs to escape. On a rare vintage keycap, drilling vent holes is usually not an option unless your restoration philosophy is “make collectors scream.” For experiments, a sacrificial keycap or 3D-printed dummy key could be used as a mold instead.
A 3D-printed keycap-shaped mold could include proper venting, draft adjustments, and spacing. That would shift the project away from forming directly over original keycaps and toward making separate covers that are later fitted. It adds complexity, but it may improve repeatability.
Better Alternatives to Vacuum Formed Key Cap Covers
Vacuum forming is not the only path to refreshed keycaps. Depending on the goal, other methods may be more practical.
Replacement Keycaps
For modern mechanical keyboards with common MX-style stems, replacement keycaps are often the easiest solution. ABS, PBT, double-shot, dye-sublimated, and specialty keycap sets are widely available. The challenge is compatibility: layout, stem type, row profile, stabilizers, and legend style must match.
For vintage boards, replacement caps may be rare or unavailable. That is where restoration gets spicy.
Cleaning and Retrobright
Yellowed plastic can sometimes be improved using cleaning and whitening techniques, though results vary and may not be permanent. Retrobright methods are popular in retrocomputing communities, but they require care, patience, and realistic expectations. Overdoing chemical or UV treatments can create uneven results or damage plastic.
Vinyl Wraps and Films
Vinyl wrapping individual caps or keyboard surfaces can work for decorative projects. It may handle wear better than paint when applied well. However, trimming around tiny caps is tedious, and poor edge work looks messy fast.
Resin Casting and 3D Printing
For missing or broken keycaps, resin casting or 3D printing may be more suitable. These methods can reproduce shapes, but they introduce their own problems: stem accuracy, surface finish, shrinkage, legend reproduction, and color matching. No method gets a free lunch. In keyboard restoration, lunch is always paid in sanding.
What This Project Teaches Makers
The best maker projects are not always the ones that work immediately. Sometimes the most useful projects are the ones that fail in public and explain why. Vacuum forming key cap covers is a perfect example because the failure is informative, not foolish.
The concept identifies a real need: protecting and recoloring old keycaps without permanent modification. It tests a plausible process. It gets partial success. Then it exposes the practical limitations: webbing, detail loss, fit issues, durability concerns, and the difficulty of scaling from one key to a whole keyboard.
That is valuable engineering. A failed prototype is not wasted effort if it narrows the problem. In this case, the next version might need stronger vacuum, better heating control, improved spacing, thinner or more suitable film, a dedicated forming table, dummy molds, or a hybrid process that combines forming with trimming and fitting.
Could Vacuum Forming Key Cap Covers Ever Work?
Yes, but probably not as a quick weekend trick for every keyboard. The approach may work best for display keyboards, single accent keys, novelty builds, or carefully prepared keycap molds. It is less likely to be ideal for a heavily used daily keyboard unless the covers are extremely well formed and trimmed.
A more successful workflow might involve removing keycaps, spacing them farther apart on a vacuum table, using a film with proven forming behavior, carefully controlling heat, and testing several thicknesses. Another option would be forming covers over replica molds instead of original caps, then trimming and fitting them individually.
That sounds labor-intensive because it is. But retrocomputing people have been known to spend three hours matching the beige color of a spacebar, so “labor-intensive” is not automatically a dealbreaker.
Conclusion: A Failure Worth Keeping on the Workbench
Vacuum forming key cap covers doesn’t quite work out because the idea sits at the intersection of tiny geometry, aging plastics, strict keyboard tolerances, and the stubborn physics of hot plastic. The process can create promising results on individual keys, but full-keyboard application introduces webbing, fit problems, inconsistent detail, and durability questions.
Still, the experiment is worth attention. It shows how creative restoration can be when replacement parts are scarce and original hardware deserves preservation. It also reminds makers that a failed prototype can be more useful than a perfect product photo. The keyboard restoration community needs experiments like this: clever, imperfect, and just strange enough to make everyone lean closer and say, “Wait, could that work?”
Additional Experience Notes: What It Feels Like to Try This Kind of Project
Anyone who has experimented with small-scale vacuum forming knows the emotional arc. First comes confidence. You watch a few demonstrations, see a hot plastic sheet sag gracefully, and think, “I understand this ancient craft.” Then you try it yourself and discover that plastic has moods.
With key cap covers, the first hands-on lesson is that small objects are not automatically easier. A big, smooth shape gives plastic room to move. A keycap gives it corners, walls, texture, and almost no forgiveness. The sheet may look perfectly heated, but the moment vacuum pressure hits, it chooses one corner to behave badly. One side forms nicely while another side wrinkles like a shirt left in a backpack since Tuesday.
The second lesson is that timing is everything. Pull the sheet too early and it will not stretch enough. Wait too long and it becomes floppy, overheated, or prone to webbing. With keycaps, that timing window can feel ridiculously narrow. You are trying to hit the sweet spot between “too stiff” and “congratulations, you made a tiny plastic curtain.”
The third lesson is that trimming is not a minor finishing step. It is half the battle. A formed cover may look good while still attached to the surrounding sheet. Once you start cutting it free, the edge quality determines whether it looks like a clean protective cap or a snack wrapper clinging to a keyboard. Sharp blades, patience, and repeatable trim lines matter. So does accepting that your first few pieces may belong in the “learning pile,” also known as the small plastic cemetery near the workbench.
The fourth lesson is about expectations. If the goal is a museum-grade restoration, vacuum-formed covers may not be the right tool. If the goal is experimentation, color testing, display customization, or learning how plastics behave, the project is excellent. It teaches heat control, material choice, mold geometry, airflow, and finishing in a compact format. Every failed pull explains something.
One practical experience-based approach is to start with sacrificial keycaps, not rare originals. Test one cap at a time. Try different film thicknesses. Keep notes on heating time, sheet distance, room temperature, vacuum strength, and results. The notes may feel excessive until the one good pull happens and you desperately want to repeat it. Without notes, you are left squinting at the machine like it owes you a confession.
It also helps to separate the visual goal from the functional goal. A cover that looks fantastic in photos may not survive daily typing. A cover that survives typing may be too thick or cloudy for vintage legends. A cover that forms beautifully may still interfere with neighboring keys. The best result is not simply “it formed.” The best result is “it formed, fits, looks good, feels acceptable, and does not fall apart after actual use.” That is a much higher bar.
In the end, the experience is frustrating in the productive way. Vacuum forming key cap covers may not quite work out, but it points toward better experiments: improved vacuum tables, better films, replica molds, smarter spacing, and hybrid restoration methods. For makers, that is not failure. That is the project tapping the bench and saying, “Again, but wiser.”
Note: This article is written for web publishing and educational maker discussion. When experimenting with heated plastics, use proper ventilation, avoid unknown materials, protect your hands and eyes, and test on non-valuable parts before touching rare vintage keycaps.