A homemade duck costume is one of those rare costume ideas that can be cute, funny, comfortable, inexpensive, and instantly recognizable. You do not need a sewing studio, a theatrical budget, or the ability to communicate fluently in quacks. With a few basic craft supplies, an old hoodie, some felt, cardboard, or fabric scraps, you can create a DIY duck costume for Halloween, a school play, a themed birthday party, or a family costume photo.
The secret is not covering every available inch with feathers until your living room resembles a pillow factory explosion. A convincing duck costume needs only a few clear visual cues: a bright bill, webbed feet, wing-shaped details, and colors that match the duck personality you want to create. A yellow duckling, a classic white farm duck, a green-headed mallard, and a cheerful rubber duck all use different color combinations, but they share the same basic costume anatomy.
Below are three practical ways to make a duck costume, ranging from a fast no-sew outfit to a reusable felt version that can survive more than one costume party. Pick the option that fits your time, skill level, and tolerance for crafting at midnight.
Note: Keep costume pieces lightweight, easy to remove, and clear of the wearer’s eyes, nose, and mouth. For outdoor events after dark, add reflective tape or a small light so the duck is easier to spot than a loaf of bread at a pond.
Before You Start: Choose Your Duck Costume Style
Before cutting felt or hot-gluing anything to a hoodie, decide what kind of duck you are making. This keeps the project focused and prevents the costume from accidentally becoming “mystery bird from another planet.”
Yellow Duckling
A yellow duckling costume is the easiest option for toddlers, kids, and adults who want something cheerful. Use yellow clothing, an orange bill, orange feet, and a few white or pale-yellow feather details. This style works especially well for a rubber duck costume because it is bright, simple, and delightfully silly.
White Farm Duck
A white duck costume looks clean, classic, and slightly more dramatic in photos. Start with a white hoodie, white sweatshirt, white dress, or white pajama set. Add an orange bill, orange shoe covers, and layered white felt feathers. It is a great choice for a duck-and-goose group costume, a farm-themed school event, or anyone who enjoys looking like they have very important pond business.
Mallard-Inspired Duck
For a more recognizable bird costume, build a mallard-inspired look with a green hat or hood, a brown chest panel, a gray or tan body, and orange feet. You do not need to copy every feather pattern exactly. A few color blocks do most of the visual work, which is excellent news for anyone whose sewing machine has been used primarily as decorative furniture.
Way 1: Make a Fast No-Sew Duck Costume With a Hoodie
This is the quickest way to make a duck costume when Halloween is approaching with the confidence of a freight train. A yellow hoodie and sweatpants create a comfortable base, while removable felt accessories turn the outfit into a duck in under an hour.
What You Will Need
- Yellow hoodie and yellow sweatpants, leggings, or pajama pants
- Orange craft foam or stiff orange felt
- White and black felt for eyes
- Yellow felt, feather boa, or fabric scraps
- Self-adhesive hook-and-loop strips or fabric-safe tape
- Scissors
- Fabric glue or a hot glue gun for adult use
- Orange socks, slippers, or shoe covers
Step 1: Build the Duck Bill
Cut two rounded orange shapes that resemble a wide, soft triangle with curved edges. Each piece should be large enough to read as a duck bill but small enough that it does not cover the wearer’s mouth or block vision. For a child, a bill about 5 to 7 inches wide usually looks balanced. For an adult, make it a little wider.
Glue or tape the two orange pieces together along the outer edges, leaving the back open. Add a small amount of cotton batting, tissue paper, or lightweight scrap fabric inside if you want the bill to look puffier. Attach the finished bill to the front edge of the hood using hook-and-loop strips. This makes it removable for snacks, car rides, and any moment when the duck decides it wants to become a regular human again.
Step 2: Add Duck Eyes
Cut two white circles from felt and two smaller black circles for pupils. Attach them above the bill on the hood. Large eyes create a cartoon duck costume, while smaller eyes create a softer duckling look. Place the eyes high enough that they do not flop into the wearer’s face when the hood moves.
Step 3: Create Feather Texture
Instead of covering the entire hoodie in feathers, cut several rows of rounded yellow felt scallops. Each strip should look a little like a row of upside-down flower petals. Attach the strips across the chest, shoulders, and upper back, overlapping the rows from bottom to top.
This gives the costume dimension without making it heavy or itchy. It also lets you reuse the hoodie after Halloween, which is much kinder to your closet than permanently transforming every garment into poultry.
Step 4: Make Easy Duck Feet
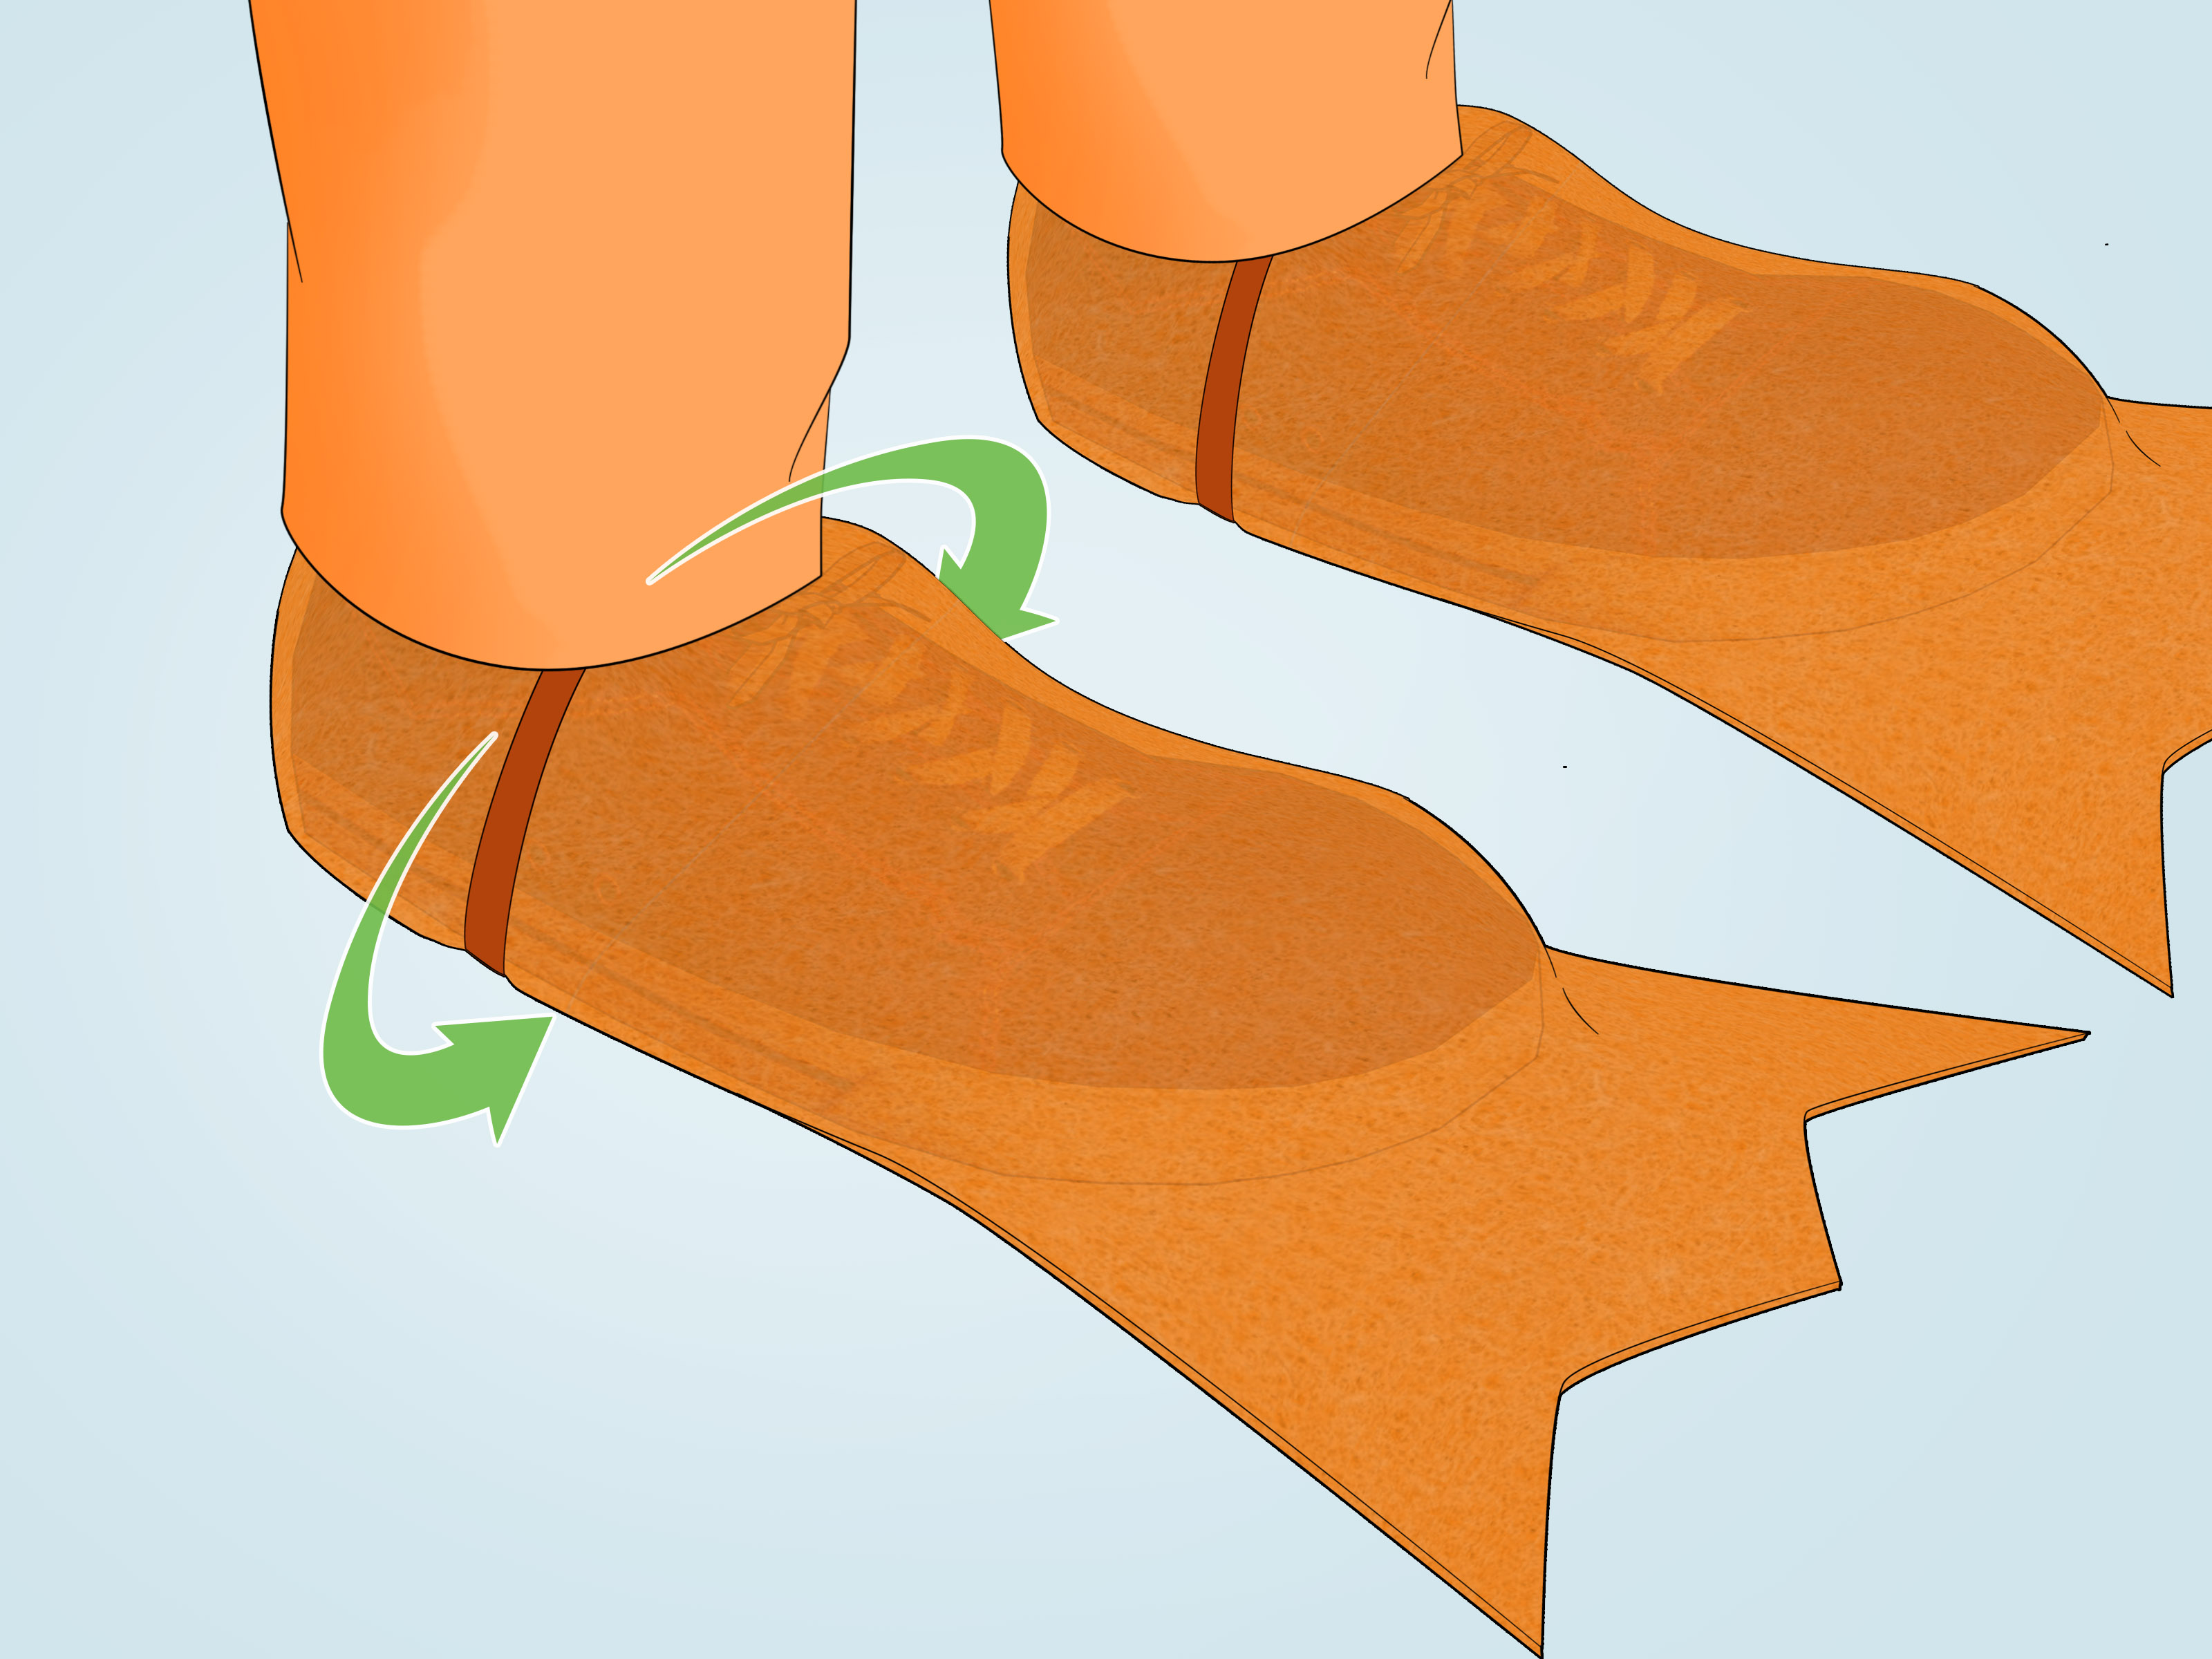
The safest duck feet are shoe covers, not cardboard soles. Cut two orange felt or foam shapes that are wider than the top of each shoe. Add three rounded points at the front to suggest webbing. Attach each shape over the shoe with elastic, ribbon, or hook-and-loop strips.
Keep the bottom of the actual shoe uncovered so the wearer still has traction. A duck costume should waddle because it is charming, not because the wearer is trying not to slide across the kitchen floor like a curling stone.
Best For
This no-sew duck costume is ideal for last-minute Halloween plans, toddlers who need soft clothing, school spirit days, and adults who want a costume that does not require explaining to everyone at the party.
Way 2: Make a Paper-and-Cardboard Duck Costume With Wings
This version is a little more theatrical. It uses cardboard wings, paper feathers, and a simple bill headband to create a costume that looks especially good in school plays, parades, or costume contests. It is lightweight, colorful, and surprisingly easy to personalize.
What You Will Need
- Cardboard from a clean shipping box
- Yellow, white, blue, green, brown, or orange cardstock
- Orange craft foam or cardstock
- Elastic bands, ribbon, or wide strips of fabric
- Strong tape
- Scissors and a craft knife for adult use
- Glue stick, craft glue, or double-sided tape
- Headband or baseball cap
- Solid-color clothing for the costume base
Step 1: Cut the Wing Shapes
Draw two large wing shapes on cardboard. For a child, each wing can be about the length of the forearm, from elbow to wrist. For an adult, extend the shape a little farther, but avoid making the wings so wide that they bump into doorframes, buffet tables, or innocent party guests holding drinks.
Cut the wings with rounded outer edges and a straight inner edge. Reinforce the center of each wing with a strip of tape if the cardboard feels flimsy.
Step 2: Make Paper Feathers
Cut dozens of paper feather shapes from cardstock. They do not need to be identical. In fact, slightly uneven feathers often look more natural and less like they were produced by a tiny, very disciplined office printer.
Glue the feathers onto each cardboard wing in overlapping rows. Start at the bottom edge and work upward, covering the straight top edges of the lower feathers with the next row. Yellow and white work beautifully for a duckling. Blue, gray, brown, and green create a mallard-inspired effect. Use a small patch of bright blue paper on the wing if you want a colorful feather detail that stands out in photos.
Step 3: Add Comfortable Arm Loops
Make two loops from elastic or sturdy ribbon for each wing. One loop should fit around the upper arm, while the other can sit near the wrist. Tape the loops securely to the back of the cardboard, then cover the taped area with another piece of cardboard or strong tape for reinforcement.
Test the wings before decorating the rest of the costume. The wearer should be able to lift, lower, and bend their arms without the wings pulling at the shoulders. Wings are supposed to make you look ready for flight, not ready for physical therapy.
Step 4: Make a Headband Bill
Cut a wide orange bill from craft foam or thick cardstock. Fold the back edge slightly so it curves outward. Attach it to a headband or the brim of a cap with strong tape, glue, or hook-and-loop strips.
A headband bill is usually more comfortable than a full face mask because it leaves the eyes, nose, and mouth open. Add two felt or paper eyes to the headband, or draw simple eyes on a yellow cap for a more cartoon-style duck face.
Best For
This DIY duck costume works well for school performances, classroom projects, themed photo booths, and kids who want dramatic wings without wearing a bulky full-body outfit.
Way 3: Sew a Reusable Felt Duck Costume Vest
When you want a sturdier duck costume that can be worn again for dress-up play, family photos, or another Halloween, make a simple felt vest. This version takes longer than the hoodie costume, but it is still beginner-friendly and far more forgiving than sewing formalwear. Ducks do not care whether your seams are perfectly straight. They are famously relaxed about tailoring.
What You Will Need
- Yellow, white, gray, or brown felt for the body
- Orange felt for the bill and feet
- Black and white felt for eyes
- Matching thread
- Sewing needle or sewing machine
- Fabric scissors
- Hook-and-loop strips, snaps, or ribbon ties
- Polyester stuffing or batting
- Optional feather trim or fabric paint
Step 1: Make the Vest Base
Lay a T-shirt flat on the felt and trace around the front and back, adding about 1 inch around the sides for room to move. Cut two vest pieces. Cut a neck opening at the top and arm openings on both sides.
Sew the shoulder seams and side seams, leaving enough room at the front for a closure. Add hook-and-loop strips, snaps, or ribbon ties so the vest can be opened easily. A costume that requires an escape room strategy to put on is not a costume; it is a textile puzzle.
Step 2: Layer Felt Feathers
Cut medium-size feather shapes from felt. For a yellow duckling, use yellow feathers with a few pale cream accents. For a white duck, use white and light gray. For a mallard costume, use gray feathers on the body and darker brown feathers across the chest.
Sew or glue the feathers onto the vest in overlapping rows. Start near the lower edge and work upward. Leave the center chest area less crowded so the costume stays flexible when the wearer sits, dances, eats cake, or participates in an unexpected duck dance challenge.
Step 3: Add a Tail
Cut three or four long feather shapes from felt. Stitch them together at the base, stuff them lightly, and attach them to the back of the vest. Angle the tail slightly upward so it reads clearly in photos.
Keep the tail short enough that it does not drag on the floor or get caught on chairs. An elegant tail is excellent. A tail that sweeps crumbs from the kitchen is less useful.
Step 4: Sew the Bill and Cap
Cut two rounded orange bill shapes. Sew them together around the edges, leaving a small opening for stuffing. Add a little batting, close the opening, and stitch or attach the bill to a yellow cap, soft headband, or hood.
For extra personality, add embroidered eyelashes, tiny felt nostrils, rosy cheek circles, or oversized cartoon eyes. A duck costume does not need to be realistic to be successful. It simply needs to look intentional, comfortable, and ready to accept compliments.
Best For
This reusable duck costume is a strong choice for family costume traditions, preschool dress-up boxes, handmade gifts, theater props, and anyone who enjoys making something that lasts beyond one October evening.
How to Make Any Duck Costume Look More Polished
Small finishing details can make a basic costume look thoughtfully designed instead of “yellow laundry with an orange triangle.” Add a few of these elements based on your time and materials.
- Use color blocks: A yellow body, orange feet, and orange bill are enough for a duckling. A green hat, brown chest panel, and gray vest suggest a mallard.
- Add a feathered chest: Layered felt strips create texture without shedding everywhere.
- Use a tail: Even a small felt tail makes the costume recognizable from behind.
- Choose comfortable shoes: Orange socks over sneakers or orange shoe covers are safer than stiff cardboard feet.
- Carry a prop: A small blue tote bag can become a “pond,” while a tiny bread-shaped treat bag adds a funny detail.
- Create a group costume: Pair the duck with a farmer, pond, frog, goose, swan, or a row of little ducklings.
Duck Costume Safety and Comfort Checklist
Before wearing the costume outside, have the wearer walk, sit, reach, and turn around in it. A duck costume should be playful, not restrictive. Check that the bill does not block vision, wings do not snag on furniture, and shoe covers do not make walking slippery.
Keep flames, candles, fire pits, and open heat sources away from loose feather boas, tissue paper, lightweight fabric, and cardboard accessories. Avoid long trailing tails or oversized sleeves that could catch on objects. For evening events, use reflective tape on the wings, bag, or back of the costume, and carry a flashlight or small battery-powered light.
If you are making the costume for a young child, choose a headband or cap instead of a full mask whenever possible. It is easier to see, easier to breathe, and much easier to eat a cookie while wearing. That final point may not appear in every costume manual, but it is extremely important in the field.
Experiences: What Making and Wearing a Duck Costume Is Really Like
Making a duck costume can be much more entertaining than buying one because the project becomes part of the celebration. There is something wonderfully ridiculous about sitting at a table surrounded by yellow felt, orange foam, googly eyes, and a pile of cardboard that was supposed to become wings but currently resembles a confused sandwich board. The finished costume may not look exactly like the picture in your head, but that is often where the charm begins.
For families, a DIY duck costume can turn into a small creative ritual. Children may enjoy choosing the duck’s personality before the costume is made. One child may want a cheerful yellow duckling with giant eyes. Another may insist on a serious mallard with dramatic wings. Someone else may request a sparkly purple duck because, in their opinion, nature has been far too conservative with color choices. Letting the wearer make those choices helps the costume feel personal rather than borrowed.
The process also teaches a useful lesson about visual storytelling. A costume does not need perfect realism to communicate an idea. When you add a bright orange bill, webbed feet, and wing shapes, people understand “duck” immediately. That is a valuable design principle for almost any costume: identify the few details that tell the story fastest, then make those details clear and visible.
There is also a practical joy in using what you already have. A yellow sweatshirt can become a duck body. An old cardboard box can become wings. Leftover felt can turn into feathers. A pair of orange socks can become duck feet. Reusing materials makes the project more affordable, but it also gives the costume character. The tiny crease in a cardboard wing or the slightly uneven felt feather becomes evidence that a real person made it, usually while laughing at least once.
Wearing a duck costume tends to invite friendly reactions. People smile, children point, and someone will almost certainly make a quacking sound. This is one of the superpowers of animal costumes: they make strangers feel comfortable being playful. A duck is not intimidating. A duck is not overly serious. A duck arrives at the party with the quiet confidence of a creature that knows water is optional but snacks are mandatory.
For adults, the experience can be unexpectedly freeing. A homemade duck costume is not trying to be glamorous, expensive, or perfectly cinematic. It is cheerful by design. That gives the wearer permission to be a little silly, take funny photos, dance badly, and enjoy the event without worrying whether every detail is flawless. The costume becomes an icebreaker before you say a word.
For kids, the best part is often movement. Wings that flap, a tail that bounces, and oversized duck feet can turn an ordinary hallway into a runway. Give children a chance to test the costume before the event. Let them walk around the house, flap their arms, sit on the floor, and practice their best duck waddle. This helps you catch comfort problems early, but it also builds excitement.
After the party, save the best pieces. A felt bill, wing set, or duck vest can be stored in a dress-up box for future play. The costume may return as part of a school project, a rainy-day game, a family photo, or a completely unplanned living-room parade. The duck may retire for a while, but it rarely disappears forever.
Final Thoughts
The best DIY duck costume is the one that matches your available time, materials, and comfort level. A yellow hoodie with an orange bill can become an adorable duckling in less than an hour. Paper wings and a headband can create a colorful school-play costume. A sewn felt vest can become a reusable favorite for years of dress-up fun.
Focus on the features that matter most: a visible bill, simple wings, safe feet, and a little personality. Whether your duck is fluffy, fancy, realistic, cartoonish, or suspiciously sparkly, it will be memorable because it was made with imagination. And honestly, every costume party is improved by at least one duck.