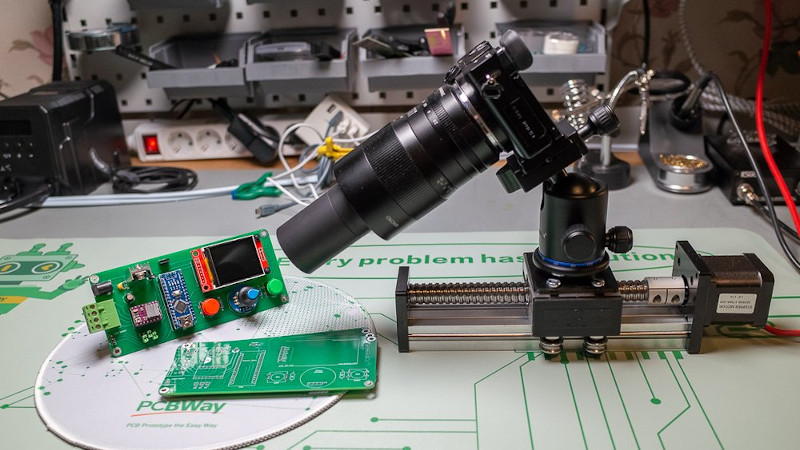
Macro photography has a tiny little problem: the closer you get to your subject, the thinner your depth of field becomes. At life-size magnification, a beetle’s eye can be sharp while its antenna looks like it wandered into a dream sequence. Stop down to f/16 or f/22 and you gain depth, but diffraction starts nibbling away at crisp detail. That is where Arduino focus stacking becomes one of the most satisfying DIY upgrades a macro photographer can build.
Focus stacking is the process of taking multiple photos at slightly different focus positions and blending the sharpest parts into one final image. It is widely used for close-up, product, jewelry, botanical, insect, and microscopy-style photography. Add an Arduino-controlled macro rail to the process, and you get repeatable movement, cleaner stacks, fewer missed slices, and a project that makes your camera rig look delightfully like it escaped from a miniature robotics lab.
This guide explains how Arduino focus stacking works, why it improves macro images, what parts you need, how to plan your workflow, and what real-world lessons help separate a clean final image from a crunchy stack of disappointment.
What Is Arduino Focus Stacking?
Arduino focus stacking combines two ideas: photographic focus stacking and microcontroller-controlled motion. Instead of manually turning a macro rail knob between shots, an Arduino sends precise commands to a stepper motor. The motor moves the camera, lens, or subject forward in tiny increments. After each move, the system pauses, triggers the camera, and repeats the process until the entire subject has been captured in sharp slices.
The resulting image set is imported into software such as Helicon Focus, Zerene Stacker, Photoshop, or another stacking program. The software analyzes each frame, finds the sharpest regions, aligns the stack, and blends everything into a single image with far greater apparent depth of field than one exposure could provide.
Why Not Just Use a Smaller Aperture?
A smaller aperture can help, but macro photography is not always kind to simple solutions. At high magnification, even f/16 may not provide enough depth of field to keep a small subject sharp from front to back. Push the aperture too far and diffraction softens the entire photo. In plain English: the subject becomes technically “more in focus,” but the details look like they were lightly buttered.
Focus stacking lets you shoot at a sharper aperture, often around f/5.6 to f/8 depending on the lens and magnification, while still achieving deep focus in the final composite. The goal is not to cheat physics. The goal is to politely outsmart it.
Why Arduino Is a Great Tool for Macro Focus Stacking
Arduino boards are popular because they are affordable, flexible, and friendly to makers who enjoy turning ideas into physical gadgets. For focus stacking, Arduino is especially useful because it can control repeatable motion, timing, buttons, displays, and camera triggering without needing a full computer attached to the rail.
A typical DIY Arduino focus stacking rig includes an Arduino Uno, Nano, or similar board; a stepper motor; a motor driver; a linear rail or lead screw mechanism; a camera platform; buttons or a rotary encoder; a power supply; and a shutter trigger cable or opto-isolated camera trigger circuit. Some builds add an LCD screen so you can set step size, number of shots, delay time, travel distance, and shooting direction directly on the device.
The big advantage is consistency. Manual rails can work beautifully, but they depend on steady hands and patience. An Arduino-controlled rail moves the same distance every time. That repeatability matters when you are shooting 40, 80, or 200 frames of a tiny subject where one skipped focus slice can create a blurry band in the final image.
How the Arduino Focus Stacking Workflow Works
The workflow is simple in concept, even if the first build looks like a spaghetti convention made of wires.
1. Set Up the Subject
Start by placing your subject on a stable surface. Macro photography magnifies everything, including vibration, dust, and tiny changes in lighting. A flower petal moving from air conditioning can ruin a stack. A live insect walking away mid-sequence can turn your perfect plan into modern art. For best results, use still subjects when learning: coins, feathers, shells, circuit boards, watch parts, stamps, seeds, jewelry, or small product details.
2. Lock Down the Camera
Use a sturdy tripod, copy stand, or fixed frame. Turn off autofocus after setting the starting point. Use manual exposure, manual white balance, and consistent lighting. If your camera supports electronic first curtain shutter or silent shooting, those features can reduce vibration. A remote shutter signal from the Arduino also helps prevent physical contact with the camera.
3. Choose the Start and End Focus Points
Focus at the nearest part of the subject first. Then move the rail until the farthest part of the subject is sharp. The Arduino can be programmed to remember these endpoints or simply run a set number of steps. More advanced controllers calculate the number of images based on aperture, magnification, and desired overlap.
4. Move, Wait, Shoot, Repeat
The Arduino tells the stepper motor to move by a small amount. The rig pauses so vibration settles. Then it triggers the camera shutter. This cycle repeats until the stack is complete. The pause time is more important than beginners expect. If the rail moves and the camera fires immediately, the photo may record micro-vibration. That is the photographic equivalent of trying to read a street sign from a shopping cart.
5. Stack the Images in Software
After capture, load the images into stacking software. Helicon Focus and Zerene Stacker are popular for macro work because they are designed for large stacks and difficult subjects. Photoshop can also stack images using alignment and auto-blending tools, especially for smaller or simpler sets. The final image usually needs cleanup, including halo correction, dust removal, contrast adjustments, and sometimes manual retouching of problem areas.
Choosing Parts for an Arduino Macro Rail
You do not need exotic hardware to build a reliable focus stacking system. The key is matching precision, stability, and simplicity.
Arduino Board
An Arduino Uno is easy for beginners because it has a familiar layout, plenty of tutorials, and enough input/output pins for a basic controller. An Arduino Nano works well if you want a compact build. Either can manage a stepper driver, buttons, display, and shutter output.
Stepper Motor and Driver
A stepper motor is ideal because it moves in controlled increments. Pair it with a motor driver such as an A4988-style driver, DRV8825-style driver, Big Easy Driver, or an Arduino-compatible motor shield. Microstepping can make movement smoother, although mechanical stiffness and rail quality still matter. Do not expect software to fix a wobbly rail that flexes like a noodle at a picnic.
Rail and Lead Screw
The linear rail is the heart of the system. Many DIY builds use parts from 3D printers, small CNC sliders, lead screws, drawer-slide experiments, or repurposed macro rails. A lead screw with fine pitch gives better precision. The camera platform should move smoothly without side-to-side play. If the subject shifts in the frame with each step, stacking software has to work harder and artifacts become more likely.
Camera Trigger
Many cameras can be triggered through a remote port. A safe design uses isolation between the Arduino and the camera, often through an optocoupler or relay module. The goal is simple: let the Arduino press the shutter electronically without sending unwanted voltage into your camera. Because camera ports differ by brand and model, always verify the correct remote cable behavior before connecting a DIY trigger.
Lighting
Good light is not optional. For macro stacking, continuous LED panels, diffused flash, small softboxes, or homemade diffusion domes can all work. The important part is consistency. Exposure changes between frames can create blending problems. Diffusion matters because shiny subjects, insect shells, coins, and electronic parts can throw harsh highlights into the stack.
Camera Settings for Better Macro Stacks
Start with manual mode. Choose an aperture that gives high sharpness without excessive diffraction. Many macro lenses perform well around f/5.6 to f/8, though the best setting depends on magnification and lens design. Use the lowest practical ISO to preserve detail. Set shutter speed based on your lighting. With flash, the flash duration often freezes motion; with continuous light, a solid support and vibration control are essential.
Shoot RAW if possible. RAW files give you more flexibility with exposure, white balance, highlights, and color correction. Before stacking, apply basic global edits consistently across the full set. Avoid heavy sharpening before stacking because it can increase artifacts. Save the edited images as TIFF files if your stacking software prefers them.
How Many Images Do You Need?
The number of frames depends on subject depth, magnification, aperture, and step size. A coin photographed at low magnification may need 10 to 20 images. A small insect at high magnification may need 80, 150, or more. Extreme macro setups can require hundreds of frames.
The safest beginner strategy is to use smaller steps and more overlap than you think you need. Overshooting slightly is better than leaving gaps. A missing focus slice can create a soft stripe that is hard to repair later. Too many frames increase processing time, but too few frames can make the final image unusable. Your computer may grumble; your image will thank you.
Common Problems and How to Fix Them
Stacking Halos
Halos often appear around high-contrast edges, especially when the background is far behind the subject. Use a closer background, softer light, or more careful retouching. Some stacking software offers different algorithms that handle halos differently.
Vibration Blur
Add a delay after each motor movement. Use a sturdier frame. Reduce motor speed. Avoid touching the table during capture. Macro setups are dramatic; they can detect footsteps like a tiny seismograph with a lens attached.
Exposure Flicker
Use manual exposure and consistent lighting. Avoid auto ISO, auto white balance, and changing ambient light. If clouds are moving across the sun, wait or control the light indoors.
Subject Movement
Start with still subjects. For outdoor macro, shoot early in the morning when wind is calmer and insects are less active. For flowers, use clamps carefully outside the frame. For product images, secure the object so it does not shift when the rail moves.
Best Subjects for Arduino Focus Stacking
Arduino focus stacking is excellent for subjects with detail, texture, and three-dimensional depth. Try mineral specimens, mechanical watch parts, LEGO details, coins, printed circuit boards, seed pods, leaves, dried flowers, toy figures, feathers, shells, jewelry, fountain pen nibs, and small tools. These subjects teach you how light behaves, how many frames are needed, and how stacking software handles edges.
As you improve, move into more challenging subjects such as insects, fresh flowers, reflective products, and transparent objects. Each adds a new puzzle. Insects have hairs and compound eyes. Jewelry reflects everything in the room, including the photographer making a confused face. Transparent objects bend light and confuse software. That is part of the fun.
Why DIY Beats Buying a Commercial Rail for Some Photographers
Commercial focus rails can be excellent, but a DIY Arduino macro rail offers customization. You can choose travel length, button layout, step size, shooting delay, display menus, camera compatibility, and even enclosure design. If you enjoy electronics, the build itself becomes part of the creative process.
Cost is another reason. Many DIY rigs use affordable parts from maker suppliers or recycled 3D printer components. A homemade system may not look as polished as a professional rail, but it can perform surprisingly well when built carefully. The tradeoff is time. Buying a commercial rail saves effort. Building one teaches you how the system works, which makes troubleshooting much easier.
Post-Processing Tips for Cleaner Final Images
Do not judge a stack only by the first automatic result. Focus stacking software is powerful, but it is not psychic. Inspect edges, antennae, hairs, reflective surfaces, and backgrounds at high zoom. Use retouching tools to borrow clean areas from individual frames when needed. After stacking, apply contrast, color correction, cropping, and sharpening to the final image.
A good workflow is: import RAW files, apply consistent basic edits, export to TIFF, stack, retouch artifacts, finish in your photo editor, then export a web-ready JPEG or WebP. Keep the original stack files until the project is complete. There is nothing quite like deleting the source images and noticing one terrible artifact five minutes later. That sound you hear is regret wearing tap shoes.
Experience Notes: What Actually Improves Arduino Macro Focus Stacking
After working with Arduino-style focus stacking rigs, one lesson becomes obvious: precision is not only about the stepper motor. Beginners often obsess over the smallest possible step size, but the entire system matters. A precise motor attached to a loose rail still produces inconsistent results. A beautiful camera mounted on a flexible platform still shifts between frames. The best stacks come from a boringly stable setup. In macro photography, boring is beautiful.
One practical experience is to test the rail without taking photos first. Put a ruler, printed grid, or textured object under the lens and move the rail through a short sequence. Watch the live view carefully. If the frame drifts sideways, the rail may be misaligned or the platform may be twisting. If the image jumps after each movement, the motor speed may be too high or the lead screw may have backlash. Slow down the motion, add a pause, and approach the stack from one direction to reduce mechanical play.
Lighting experiments also pay off quickly. A harsh bare LED can make a subject look sharp but unpleasant. A diffused light source reveals texture without creating ugly hot spots. For shiny subjects like coins, jewelry, or circuit boards, try bouncing light off white card or using a translucent diffuser between the light and subject. The Arduino rail may handle focus, but lighting handles mood. Without good light, even a technically perfect stack can look like evidence from a basement laboratory.
Another useful habit is to shoot a few extra frames before and after the subject. Start slightly in front of the nearest detail and finish slightly behind the farthest detail. This buffer protects you from misjudging the endpoints. It also helps stacking software avoid abrupt transitions at the beginning and end of the sequence. Storage is cheap compared with reshooting a complicated setup.
Software choice matters, but technique matters more. Helicon Focus, Zerene Stacker, and Photoshop can all produce good results when the capture set is clean. When the stack has vibration, exposure shifts, focus gaps, or subject movement, even the best software starts inventing weird edges. The cleanest final images usually begin with slow capture, consistent exposure, stable support, and enough overlap.
Finally, keep the project enjoyable. Arduino focus stacking combines photography, electronics, mechanics, and editing. Something will probably fail the first time: a wire comes loose, the motor moves backward, the camera refuses to trigger, or the stack looks like a melted sandwich. That is normal. Fix one issue at a time. Once the rig starts producing crisp macro images, the process becomes addictive. Suddenly, every coin, leaf, screw head, and breakfast crumb looks like a potential subject. Congratulations: you have become the person photographing a sesame seed for 40 minutes.
Conclusion
Better macro images with Arduino focus stacking come from repeatability, patience, and a smart workflow. By using an Arduino-controlled stepper rail, you can capture precise focus slices that reveal detail impossible to hold in a single macro exposure. The technique is especially useful for small subjects with depth: insects, jewelry, product details, plants, coins, electronics, and textured objects.
The best results come from a stable rail, consistent lighting, manual camera settings, safe camera triggering, thoughtful step size, and careful post-processing. You do not need the most expensive equipment to create impressive macro stacks. You need a reliable process, a willingness to experiment, and enough curiosity to spend an afternoon making a tiny object look monumental.
Note: This article is written as original, publication-ready web content based on real macro photography, Arduino motion-control, and focus stacking practices. It intentionally excludes source links inside the article body for a cleaner publishing format.